Midwifery

FEMALE EXTERNAL GENITAL ORGANS

FEMALE EXTERNAL GENITAL
ORGANS

Female external genitalia (the vulva) include the mons pubis, labia majora, labia minora, clitoris, vestibule, the greater vestibular glands (Bartholin’s glands) and bulbs of the vestibule

female

The mons pubis is a rounded pad of fat lying anterior to the symphysis pubis. It is covered with pubic hair from the time of puberty.
The labia majora (‘greater lips’) are two folds of fat and areolar tissue which are covered with skin and pubic hair on the outer surface and have a pink, smooth inner surface.
The labia minora (‘lesser lips’) are two small subcutaneous folds, devoid of fat, that lie between the labia majora. Anteriorly, each labium minus divides into two parts: the upper layer passes above the clitoris to form along with its fellow a fold, the prepuce, which overhangs the clitoris. The prepuce is a retractable piece of skin which surrounds and protects the clitoris. The lower layer passes below the clitoris to form with its fellow the frenulum of the clitoris.
The clitoris is a small rudimentary sexual organ corresponding to the male penis. The visible knob-like portion is located near the anterior junction of the labia minora, above the opening of the urethra and vagina. Unlike the penis, the clitoris does not contain the distal portion of the urethra and functions solely to induce the orgasm during sexual intercourse.
The vestibule is the area enclosed by the labia minora in which the openings of the urethra and the vagina are situated.
The urethral orifice lies 2.5 cm posterior to the clitoris and immediately in front of the vaginal orifice. On either side lie the openings of the Skene’s ducts, two small blind-ended tubules 0.5 cm long running within the urethral wall.
The vaginal orifice, also known as the introitus of the vagina, occupies the posterior two-thirds of the vestibule. The orifice is partially closed by the hymen, a thin membrane that tears during sexual intercourse. The remaining tags of hymen are known as the ‘carunculae myrtiformes’ because they are thought to resemble myrtle berries.
The greater vestibular glands (Bartholin’s glands) are two small glands that open on either side of the vaginal orifice and lie in the posterior part of the labia majora. They secrete mucus, which lubricates the vaginal opening. The duct may occasionally become blocked, which can cause the secretions from the gland to accommodate within it and form a cyst.
The bulbs of the vestibule are two elongated erectile masses flanking the vaginal orifice.
Blood supply
The blood supply comes from the internal and the external pudendal arteries. The blood drains through corresponding veins.
Lymphatic drainage
Lymphatic drainage is mainly via the inguinal glands.
Innervation
The nerve supply is derived from branches of the pudendal nerve.

female

THE PERINEUM

The perineum corresponds to the pelvis outlet, forming a somewhat lozenge-shaped area. It is bordered anteriorly by the pubic arch, posteriorly by the coccyx, and laterally by the ischiopubic rami, ischial tuberosities, and sacrotuberous ligaments. 

A transverse line drawn between the ischial tuberosities divides the perineum into two triangular portions. The anterior triangle, housing the external urogenital organs, is referred to as the urogenital triangle, while the posterior triangle, encompassing the termination of the anal canal, is known as the anal triangle.

The Urogenital Triangle: The urogenital triangle is bounded anteriorly and laterally by the pubic symphysis and the ischiopubic rami. It comprises two compartments: the superficial and deep perineal spaces, separated by the perineal membrane that spans between the ischiopubic rami. The levator ani muscles attach to the cranial surface of this membrane. The vestibular bulb and clitoral crus are fused with the caudal surface of the membrane, covered by the bulbospongiosus and ischiocavernosus muscles.

Superficial Muscles of the Perineum: Superficial Transverse Perineal Muscle: Arising from the inner and forepart of the ischial tuberosity, the superficial transverse muscle is a narrow slip of muscle inserted into the central tendinous part of the perineal body. It connects with the external anal sphincter (EAS) from behind and the bulbospongiosus in the front, all attaching to the central tendon of the perineal body.

female

Bulbospongiosus Muscle: Running along each side of the vaginal orifice, the bulbospongiosus muscle covers the lateral aspects of the vestibular bulb anteriorly and Bartholin’s gland posteriorly. Some fibers merge with the superficial transverse perineal muscle and the EAS in the central fibromuscular perineal body. Anteriorly, its fibers extend around the vagina and insert into the corpora cavernosa clitoridis, compressing the deep dorsal vein. This muscle contributes to clitoral erection and narrows the vaginal orifice.

Ischiocavernosus Muscle: Situated on the lateral boundary of the perineum, the ischiocavernosus muscle is elongated, broader at its middle, and arises from the inner surface of the ischial tuberosity, crus clitoridis, and adjacent portions of the ischial ramus.

Innervation: Nerve supply is provided by branches of the pudendal nerve.

PELVIC FLOOR MUSCLES

Pelvic floor is a muscular partition which separates the pelvic cavity from the anatomical perineum.

It consists of three sets of muscles on either side—pubococcygeus, iliococcygeus and ischiococcygeus and these are collectively called levator ani. 

emale pelvic floor

Its upper surface is concave and slopes downwards, backwards and medially and is covered by parietal layer of pelvic fascia. The inferior surface is convex and is covered by anal fascia. The muscle with the covering fascia is called the pelvic diaphragm/pelvic floor.

ORIGIN: Each levator ani arises from the back of the pubic rami, from the condensed fascia covering the obturator internus (white line) and from the inner surface of the ischial spine.
INSERTION: From this extensive origin, the fibers pass, backwards and medially to be inserted in the midline from before backwards to the vagina (lateral and posterior walls), perineal body and anococcygeal raphe, lateral borders of the coccyx and lower part of the sacrum (Fig. 1.10)

The muscles of the levator ani exhibit distinctive characteristics compared to most other skeletal muscles. These include:

  •  Sustaining continuous tone, except during activities like voiding, defecation, and the Valsalva maneuver.
  •  Demonstrating the capability to contract rapidly during moments of acute stress, such as coughing or sneezing, to uphold continence.
  •  Significantly expanding during childbirth to accommodate the passage of a full-term infant, followed by contracting after delivery to return to regular function.

THE PUDENDAL NERVE

The pudendal nerve serves as a mixed motor and sensory nerve, drawing fibers from the ventral branches of the second, third, and fourth sacral nerves. Exiting the pelvis through the lower portion of the greater sciatic foramen, it traverses the ischial spine and reenters the pelvis via the lesser sciatic foramen. Progressing alongside the internal pudendal vessels, it courses upward and forward along the lateral wall of the ischioanal fossa within a protective sheath of the obturator fascia termed Alcock’s canal (Fig. 3.7). Notably, during an extended second stage of labor, the pudendal nerve is susceptible to stretch injury at this site due to its limited mobility.

female pudendal

From the pudendal nerve’s posterior extension, the inferior haemorrhoidal (rectal) nerve diverges to innervate the external anal sphincter (EAS). Further division yields two terminal branches: the perineal nerve and the dorsal nerve of the clitoris. The perineal nerve subsequently splits into posterior labial and muscular branches. The posterior labial branches supply the labia majora, while the muscular branches distribute to the superficial transverse perineal, bulbospongiosus, ischiocavernosus, and constrictor urethrae muscles. The dorsal nerve of the clitoris, the nerve deepest within the pudendal division, innervates the clitoris itself.

FEMALE EXTERNAL GENITAL ORGANS Read More »

FETAL SKULL

FETAL SKULL

The skull bones encase and protect the brain, which is very delicate and subjected to pressure when the fetal head passes down the birth canal. 

Fetal skull is to some extent compressible and made mainly of thin pliable tabular (flat) bones forming the vault. This is anchored to the rigid and incompressible bones at the base of the skull.

AREAS OF SKULL: The skull is arbitrarily divided into several zones of obstetrical importance
 These are:

  • Vertex : It is a quadrangular area bounded anteriorly by the bregma and coronal sutures behind by the lambda and lambdoid sutures and laterally by lines passing through the parietal eminences.
  • Brow : It is an area bounded on one side by the anterior fontanel and coronal sutures and on the other side by the root of the nose and supraorbital ridges of either side.
  • Face : It is an area bounded on one side by root of the nose and supraorbital ridges and on the other, by the junction of the floor of the mouth with neck.

Fetal skull showing different regions and landmarks of obstetrical significance

fetal skull nurses revision

    Sinciput is the area lying in front of the anterior fontanel and corresponds to the area of brow and the occiput is limited to the occipital bone.
    Flat bones of the vault are united together by non-ossified membranes attached to the margins of the bones. These are called sutures and fontanels. Of the many sutures and fontanels, the following are
of obstetric significance.

Bones of the Vault

The bony structure of the vault originates within a membrane framework. Over time, a process known as ossification hardens these structures from the center outward. 

At birth, ossification remains incomplete, resulting in small gaps existing between the bones referred to as sutures and fontanelles. Each bone features a distinct ossification center, which appears as a noticeable protrusion. The full ossification of the skull takes place only in early adulthood.

The vault’s bony composition encompasses:

  •  The occipital bone, located at the posterior of the head. A portion of this bone contributes to the skull’s base, encompassing the foramen magnum—a protective passage for the spinal cord as it exits the skull. The occipital protuberance marks the site of ossification. 
  •  The two parietal bones situated on either side of the skull. These bones’ ossification centers are termed parietal eminences. 
  •  The two frontal bones, shaping the forehead or sinciput. Ossification initiates at the frontal eminence of each bone. These frontal bones fuse into a singular entity by the age of eight. 
  •  The upper segment of the temporal bone on both sides of the head participates in forming the vault’s structure.

fetal

Regions and landmarks of the fetal skull

The fetal skull’s various segments are defined by distinct regions, each marked by significant landmarks(see figure above). These points of reference hold particular importance for midwives during vaginal examinations, aiding in determining the fetal head’s position.

The occiput region occupies the space between the foramen magnum and the posterior fontanelle. The area below the occipital protuberance (landmark) is referred to as the sub-occipital region.

The vertex region is enclosed by the posterior fontanelle, the paired parietal eminences, and the anterior fontanelle.

The forehead, or sinciput region, spans from the anterior fontanelle and the coronal suture to the orbital ridges.

• Extending from the orbital ridges and the base of the nose to the junction of the chin, or mentum (landmark), and the neck is the face region. The point situated between the eyebrows is recognized as the glabella

SUTURES

  •  The sagittal or longitudinal suture is situated between two parietal bones.
  •  The coronal sutures run between the parietal and frontal bones on both sides.
  •  The frontal suture is positioned between two frontal bones.
  •  The lambdoid sutures separate the occipital bone and the two parietal bones.

Importance:

  1.  It allows smooth movement of one bone over the other during head molding, which is significant as the head passes through the pelvis during labor.
  2.  Palpating the sagittal suture during internal examination in labor provides insight into head engagement (asynclitism or synclitism), the degree of internal head rotation, and head molding.

fetal

FONTANELS

A wide gap in the suture line is referred to as a fontanel. Among the numerous fontanels (total of 6), two hold obstetric significance: (1) Anterior fontanel or bregma and (2) Posterior fontanel or lambda.

Anterior fontanel: It results from the fusion of four sutures in the midline. The sutures include the frontal suture anteriorly, the sagittal suture posteriorly, and the coronal sutures on either side. Its shape resembles a diamond, with anteroposterior and transverse diameters of approximately 3 cm each. The floor consists of a membrane, which undergoes ossification around 18 months after birth. If ossification does not occur even after 24 months, it becomes pathological.

Importance:

  •  Palpating it during internal examination indicates the degree of head flexion.
  •  It aids in head molding.
  •  Due to its membranous nature persisting after birth, it accommodates significant brain growth, with the brain nearly doubling in size during the first year of life.
  •  Palpation of the floor reflects intracranial conditions – depressed in dehydration, elevated in raised intracranial pressure.
  •  In rare cases, blood collection and exchange transfusion can be performed through it, via the superior longitudinal sinus.
  •  Although uncommon, cerebrospinal fluid can be drawn through the angle of the anterior fontanel from the lateral ventricle.

Posterior fontanel: It is formed by junction of three suture lines — sagittal suture anteriorly and lambdoid suture on either side. It is triangular in shape and measures about 1.2 × 1.2 cm (1/2″ × 1/2″).
    Its floor is membranous but becomes bony at term. Thus, truly its nomenclature as fontanel is misnomer.
    It denotes the position of the head in relation to maternal pelvis.
Sagittal fontanel: It is inconsistent in its presence. When present, it is situated on the sagittal suture at the junction of anterior two-third and posterior one-third. It has got no clinical importance.

DIAMETERS OF SKULL

The engaging diameter of the fetal skull depends on the degree of
flexion present. The anteroposterior diameters of the head which may engage are:

PresentationDiameter(cm)Attitude of the Head
VertexSuboccipitobregmatic — extends from the nape of the neck to
the center of the bregma
9.5Complete
flexion
VertexSuboccipito-frontal — extends from the nape of the neck to the
anterior end of the anterior fontanel or center of the sinciput
10Incomplete
flexion
VertexOccupitofrontal — extends from the occipital eminence to the
root of the nose (Glabella)
11.5Marked
deflexion
BrowMento-vertical — extends from the midpoint of the chin to the highest point on the sagittal suture14Partial
extension
FaceSubmentovertical — extends from junction of floor of the mouth and neck to the highest point on the sagittal suture11.5Incomplete extension
FaceSubmentobregmatic — extends from junction of floor of the
mouth and neck to the center of the bregma
9.5Complete
extension

Transverse diameters 

The transverse diameters of the fetal skull;

There are also two transverse diameters,
• The biparietal diameter (9.5 cm) – the diameter between the two parietal eminences.
• The bitemporal diameter (8.2 cm) – the diameter between the two furthest points of the coronal suture at the temples.
fetal

Knowledge of the diameters of the trunk is also important for the birth of the shoulders and breech

  • Bisacromial diameter 12 cm: This is the distance between the acromion processes on the two shoulder blades and is the dimension that needs to pass through the maternal pelvis for the shoulders to be born. The articulation of the clavicles on the sternum allows forward movement of the shoulders, which may reduce the diameter slightly.
  •  Bitrochanteric diameter 10 cm: This is measured between the greater trochanters of the femurs and is the presenting diameter in breech presentation.

Presenting diameters

Some presenting diameters are more favourable than others for easy passage through the maternal pelvis and this will depend on the attitude of the fetal head. 

This term attitude is used to describe the degree of flexion or extension of the fetal head on the neck. The attitude of the head determines which diameters will present in labour and therefore influences the outcome.
The presenting diameters of the head are those that are at right-angles to the curve of Carus of the maternal pelvis.
There are always two: a longitudinal diameter and a transverse diameter. The presenting diameters determine the presentation of the fetal head, for which there are three:

  1. Vertex Presentation: When the head displays pronounced flexion, the sub-occipitobregmatic diameter (9.5 cm) and the biparietal diameter (9.5 cm) come into play. Given their equal length, the presenting area takes on a circular form, optimally conducive to cervix dilation and successful head birth. The sub-occipitofrontal diameter (10 cm) is the dimension that expands the vaginal orifice. Conversely, when the head is deflexed, the presenting diameters shift to the occipitofrontal (11.5 cm) and the biparietal (9.5 cm). This circumstance often arises when the occiput occupies a posterior position. In such cases, if the posterior position persists, the diameter expanding the vaginal orifice will be the occipitofrontal (11.5 cm).

  2. Face Presentation: Complete extension of the head leads to the submentobregmatic diameter (9.5 cm) and the bitemporal diameter (8.2 cm) serving as the presenting dimensions. The sub-mentovertical diameter (11.5 cm) is the dimension that stretches the vaginal orifice.

  3. Brow Presentation: Partial extension of the head results in the mentovertical diameter (13.5 cm) and the bitemporal diameter (8.2 cm) becoming the presenting diameters. In instances where this presentation persists, vaginal birth becomes less likely.

fetal moulding

Moulding

The term moulding is used to describe the change in shape of the fetal head that takes place during its passage through the birth canal.

 Alteration in shape is possible because the bones of the vault allow a slight degree of bending and the skull bones are able to override at the sutures. This overriding allows a considerable reduction in the size of the presenting diameters, while the diameter at right-angles to them is able to lengthen owing to the give of the skull bones(Fig. 7.13). 

The shortening of the fetal head diameters may be by as much as 1.25 cm. The dotted lines in Figs 7.14–7.19 illustrate moulding in the various presentations.
Additionally, moulding is a protective mechanism and prevents the fetal brain from being compressed as long as it is not excessive, too rapid or in an unfavourable direction. The skull of the pre-term infant is softer and
has wider sutures than that of the term baby, and hence may mould excessively should labour occur prior to term.

Home

fetal

FETAL SKULL Read More »

PHYSIOLOGY OF PUERPERIUM

Physiology of Puerperium

The term “involution” is used to refer to the regressive changes taking place in all of the organs and structures of the reproductive tract.

 During this stage, a number of physiological changes take place.

  •  The reproductive organs return to the non-gravid state
  •  lactation is established, and all other physiological changes that occurred during pregnancy are reversed. 
  • The foundations of the relationship between the infant and the parents are laid, and the mother recovers from the stress of pregnancy and delivery, taking on the responsibility for the infant’s care.
Changes in the Endocrine System: 
  • The posterior pituitary gland secretes oxytocin, which stimulates uterine contractions and aids in the expulsion of the placenta during the third stage of labor.
  • Oxytocin also acts on the breast tissue, facilitating milk production when the baby suckles.
  • Hormones such as HCG, HPL, estrogen, and progesterone, which were increased during pregnancy, gradually decrease to their normal levels.
Changes in the Reproductive System: 

Uterus

Involution of the uterus; The uterus tries to go back to its original size, position and situation as in a pre-gravid state.

 At the end of labour, the uterus weighs approximately 900g and goes back at the end of puerperium to 60g representing a reduction of 16 times the weight.

SizeThe uterus is about 12.5-15 cm above the symphysis pubis. It goes back eventually by1.25 cm daily. A week later, the fundus is 7.5cm above the symphysis pubis. 10-12 days later, the uterus will not be palpable. The size of the uterus soon after labour is 15x12x’8 to 10’cm in length, width and thickness and by the end of puerperium, it will be 7.5x5x2.5cm.


ShapeWhen the placenta has been expelled, the uterus contracts and retracts to become globular in shape.

As involution takes place, the cavity becomes small and 6 weeks following delivery, the uterus returns to its normal shape. The decidua continues to shed up to the basal layer and a new endometrium forms.


Involution Of the uterus.

This undergoes four processes, namely;- 

Autolysis

The proteolytic enzymes digest muscle fibres which had increased during pregnancy to 10 times their normal length and5 times their normal thickness.

Phagocytosis

The end products of autolysis are removed by phagocytic action of the polymorphs and macrophages in the blood and lymphatic system and are excreted by the kidneys.

Ischemia

This results in compression of the blood vessels and there is reduction in the uterine blood supply producing a relative state of ischemia. The site is gradually covered by glandular tissue then by endometrium.

Contraction and retraction of uterine muscles under the influence of oxytocin.


Other factors

  • Breast feeding.

During breast feeding, the posterior pituitary gland produces oxytocin which assists in the involution of the uterus. 

  • Exercises(ambulation)
  • Continuous draining of the bladder.

Progression of changes in the uterus after delivery

Period 

Weight of uterus

Diameter of placental site

Cervix

End of labour

900g

12.5cm

Soft and flabby

End of 1 week

450g

7.5cm

2cm

End of 2 weeks

200g

5.0cm

1cm

End of 6 weeks

60g

2.5cm

A slit

Vulva

The labia majora and minora become flabby and are less segmented due to decreased vascularity.

Cervix

After delivery, the cervix may be seen protruding into the vagina but is soft and vascular.

It loses its vascularity rapidly and it normally regains its shape within 2-3 days after delivery.

A finger can still be passed through the cervical canal up to 1 week following delivery. The external os closes eventually leaving a transverse slit which is large enough to admit a finger known as a multiparous os.

Lochia 

It’s a term used to describe the discharges from the uterus during puerperium. Its alkaline in reaction and so it favors rapid growth of micro- organisms as compared to acidic vaginal secretion.

The amount varies in different women. It’s heavy but not offensive and non- irritant.

Lochia under goes sequential special changes as involution takes place.

Red lochia (lochia rubra)

It’s red in colour and consists of blood from the placental site and debris arising from the decidua and chorion.

It’s the 1st lochia that starts immediately after delivery and continues for the 1st 3-4 days postpartum.

Serous lochia( Lochia serosa)

 It’s the next lochia. Its paler than lochia rubra and is serous and pink.

It contains fewer RBCs but more leucocytes, wound exudates, Decidual tissue and mucus from the cervix.

It lasts for 5-9 days.

White lochia(lochia alba)

 It is the last lochia. It is pale, creamy white-brown in colour. It consists of leukocytes, Decidual cells, mucus and debris from healing tissue. It lasts up to 15 days.

Some evidence of blood may continue for 2-3 weeks. A slight increase in the amount of lochia may be seen when a mother is active and during breast feeding. The average lochia discharge for the 1st 5-6 days is estimated to be approximately 250ml.

Vagina

Immediately after delivery, the vagina may remain quite stretched and may have some degree of oedema and gapes open at the introitus. In a day or more it regains its tone and gaping reduces.

It is smooth walled rather than usual and elastic. By the 3rd week postpartum, the vaginal rugae return and it reduces in size. It will always be a little larger than it was before the birth of the 1st child. The torn hymen heals by a scar formation leaving several tissue tags called carunculae myrtiformes.

Breasts

No further anatomical changes occur in the breast for the 1st 2 days following delivery.

The secretion from the breast called colostrum starts during pregnancy and becomes more abundant during this period.

The rise in circulating prolactin acts upon the alveoli of the breasts and stimulates milk production in the 1st 3-4 days and the breasts become heavy and engorged.  As the baby sucks, engorgement is reduced. 

Respiratory System:

  • Breathing returns to normal as the diaphragm and lungs are no longer compressed, as they were during pregnancy.

Urinary System:

  • Physiological Diuresis: There is an increase in urinary frequency and volume due to the elimination of retained fluid from pregnancy and labor.
  • Bladder Changes: The bladder may be edematous and hypotonic initially, leading to over-distension and incomplete emptying. Proper voiding practices are encouraged to prevent complications.

Circulatory System:

    • Heart size returns to normal after the increased cardiac workload during pregnancy.
    • Blood volume gradually returns to non-pregnant levels by the second week postpartum.
  • Vital Signs:

    • Blood pressure, pulse rate, respiration, and temperature generally return to normal levels within the first 24 hours postpartum.

Digestive System:

    • Increased Thirst: Women may experience increased thirst due to fluid losses during labor and postpartum diuresis.
    • Constipation: Constipation may be a concern initially due to the lack of muscle tone in the perineal and abdominal areas.

Musculoskeletal System:

    • Pelvic joints gradually regain their tone over three months.
    • Abdominal walls become flabby but can regain tone with exercises.

Disorders of Puerperium and Relief Measures

These are common discomforts that new mothers may experience after childbirth, but there’s no reason for them to suffer unnecessarily.

  1. Afterbirth pains: Afterbirth pains are the uterus’s sequential contractions and relaxations. They are more common in women with higher parity and those who breastfeed.

    Management:
  • Keep the bladder empty to prevent the uterus from shifting and hindering its contractions.
  • Advise the mother to lie in a prone position with a pillow under her lower abdomen.
  • Administer analgesics to alleviate pain.
  1. Excessive perspiration: Excessive sweating occurs as the body eliminates excess interstitial fluid resulting from hormonal changes during pregnancy.

    Management
    :
  • Ensure the mother stays clean and dry.
  • Change gowns and bed sheets regularly.
  • Keep the mother well-hydrated by offering fluids frequently.
  1. Breast engorgement: Breast engorgement is caused by milk accumulation and stasis, increased vascularity, and congestion. It typically occurs around the 3rd day postpartum and lasts for approximately 24-48 hours.

    Management: Non-breastfeeding:
  • Provide good breast support.
  • Apply ice bags or packs to relieve pain.
  • Use analgesics like PCM or aspirin, if needed, for pain relief.
  • Avoid massaging the breasts to express milk.
  • Avoid applying heat to the breasts, as it may increase milk flow. Breastfeeding:
  • Encourage breast massage, manual expression, and nipple rolling.
  • Ensure the baby nurses every 2-3 hours without missing any feeds or using supplements.
  • Alternate between both breasts during feedings to ensure complete emptying.
  • Apply warmth to the breasts before each feeding to promote milk flow.
  • Use proper breast support without creating pressure points.
  • Ice bags may be used between feedings to reduce swelling and pain.
  • Analgesics can be used if necessary.
  1. Perineal (stitch) pain: Before providing treatment, examine the perineum to determine whether the pain is normal or if complications like hematoma or infection are present.

    Management
    :
  • Apply ice packs or bags to reduce discomfort.
  • Use topical analgesic spray as directed.
  • Take sitz baths 2-3 times a day after defecation and voiding, as the warmth and motion of the water can soothe and promote healing.
  1. Constipation: Constipation can be caused by increased progesterone levels in late pregnancy, decreased bowel motility, and reduced fluid intake during labor.

    Management
    :
  • Stool softeners or mild laxatives are usually prescribed for women with 3rd or 4th-degree perineal repair.
  1. Hemorrhoids: If a woman experiences hemorrhoids, they may be quite painful for a few days.

    Management
    :
  • Use ice bags or packs.
  • Administer analgesics.
  • Apply warm water compresses.
  • Prescribe stool softeners.
  • Consider rectal suppositories and creams, such as sediproct suppositories.
  • Replace external hemorrhoids inside the rectum if necessary.
POSTNATAL EXAMINATION

POSTNATAL EXAMINATION

The puerperal mother should attend the postnatal clinic for a full examination at 6 weeks after delivery to confirm full recovery from the effects of pregnancy, labour, and delivery.

The nurse should follow an organized method when examining the postpartum client, which provides a consistent, quality approach to nursing care. The acronym BUBBLE-HE can serve as a helpful reminder of the elements in a postpartum assessment. BUBBLE-HE stands for:

Breasts Uterus Bladder Bowel Lochia Episiotomy Homan’s sign Emotional status

Requirements: A VE tray containing;

  • A gallipot of sterile swabs
  • 2 receivers
  • Clean pads
  • Sterile gloves
  • Sterile bowel of lotion
  • Antiseptic lotion in a bowel
  • Clean gloves
  • Lubricant
  • Cusco’s vaginal speculum
  • Sim’s speculum
  • Sponge holding forceps
  • Tape measure.

At the bedside:

  • Vital observations tray.
  • Acetic acid
  • Stationary.

Procedure:

  1. The mother’s general condition and emotional health are assessed.
  2. Welcome the mother and the spouse if any.
  3. Offer the mother a seat.
  4. Greet the mother.
  5. Introduce yourself and vice versa.
  6. Communicate to the mother about the activities done at the clinic and the reason for any procedure.
  7. Observe for signs of emotional distress or depression and anxiety.
  8. Take history of pregnancy, labor, and puerperium.
  9. Present health statuses e.g. sleep, appetite, breastfeeding habits, and reactions.
  10. Ask how she feels and how she is managing the baby, if breast milk is adequate.
  11. Ask about any discomforts.
  12. Ask about the onset of menstruation or any vaginal bleeding or abnormal discharges.
  13. Give the mother the opportunity to discuss any problems.
  14. Check and record TPR (temperature, pulse rate, and blood pressure).
  15. Screen for any health concerns by performing a systematic examination from head to toe.
  16. Conduct a breast examination, re-examining for signs of infections or lumps, and check for cracks and blisters on the nipples. Instruct the mother on self-breast examination.
  17. Palpate the uterus and lower abdomen for tenderness to confirm involution of the uterus and note the tone of the abdominal muscles.
Bimanual pelvic examination and speculum vaginal examination:

Examination is done from head to toe systematically.

Breast examination: The breasts are re-examined for signs of infections, lumps, cracks, and blisters on the nipples. The mother is instructed on self-breast examination.

Uterus: The lower abdomen is palpated for tenderness to confirm involution of the uterus and to note the tone of the abdominal muscles.

Bimanual pelvic examination and speculum vaginal examination:

Speculum examination:

  • Follow the general rules for a pelvic examination.
  • Ask the mother to empty her bladder.
  • Place the mother in a dorsal position.
  • Inspect the vulva for any swelling, inflammation, or soreness.
  • Examine the urethral opening for inflammation and local discharge.
  • Have the mother cough or strain while separating the labia to check for any prolapse of the uterus or stress incontinence with urine leakage.
  • If a specimen from the vagina is needed for laboratory examination, pass the speculum before a digital examination.
  • Place the mother in the Sim’s position and examine the anterior and posterior walls using Sim’s speculum.

Bimanual examination:

  • Follow the general rules for a pelvic examination.
  • Have the mother empty her bladder.
  • Position the mother in a dorsal position.
  • Perform vulval swabbing and apply a drape.
  • Lubricate the gloved fingers of the right hand and gently introduce them into the vagina.
  • Palpate for any swelling in the labia or adjacent structures.
  • Note the condition of the vaginal wall.
  • Examine the cervix for direction (anteverted or retroverted), station (position of external os relative to the ischial spines), texture, shape, movement, and tendency to bleed on touch.
  • Place the left hand on the abdomen and palpate the uterus between the two hands.
  • Note the size, consistency, shape, position, mobility of the uterus, as well as possible tumors and areas of tenderness.
  • Move fingers in the vagina to the left and right fornix, following with the hand on the abdomen to look for any enlargement or tenderness of the tubes and ovaries.
  • Move the fingers to the posterior fornix to check for any swelling in the pouch of Douglas.
  • Check the integrity and tone of the perineal body by flexing the internal finger posteriorly and palpating it with the thumb placed externally.
  • Withdraw the fingers and inspect them for any blood stains or abnormal discharge.

Vaginal examination is done to assess the condition of the pelvic floor and the vagina. Examine for organ prolapse, such as cystocele, urethrocele, and cystourethrocele. A cervical smear (Pap smear) may be taken for cytology to detect cancer cells.

Bowel and gastrointestinal system: Assess for dehydration, constipation, and hemorrhoids. Inquire about the mother’s appetite and advise accordingly.

Lochia: Observe the type of discharge, color, odor, and consistency.

Episiotomy: Examine the perineum for healing and good muscle tone.

Extremities: Assess Homan’s sign to check for the presence of thrombophlebitis.

Emotional status: Assess the mother’s response towards her baby, attainment of parental roles, infant care, and family adaptations.

Share the findings with the mother and provide education accordingly.

Discuss family planning and advise the mother to attend a family planning clinic.

Refer appropriately and document the examination findings appropriately, including a full signature.

TRANSFER OR REFERRAL OF MOTHERS

Transfer or referral involves preparing a mother for relocation to another department within the hospital or to a different hospital or home. This is necessary in obstetric emergencies, such as APH (antepartum hemorrhage), vasa previa, cord prolapse, ruptured uterus, obstetric shock, pre-eclampsia, eclampsia, and other major disorders of pregnancy.

Purposes of Referring:

  1. To obtain necessary diagnostic tests and procedures.
  2. To provide treatment and specialized nursing care.
  3. To access specialized care.
  4. To utilize the most appropriate personnel and services available.
  5. To match the intensity of nursing care based on the patient’s level of needs and problems.

Types of Transfer:

  1. Internal Transfer: This involves moving the patient from one unit to another within the hospital, where special care or specific care suited to her needs is provided. For example, transferring a mother from the maternity ward to the intensive care unit.

  2. External Transfer: This refers to relocating the mother from one hospital to another, usually for the purpose of specialized care. For instance, transferring a patient from a lower facility to a referral center.

Preliminary Assessment:

  • Assess the method of transport and inform the receiving midwife.
  • Ensure the patient’s physical well-being during the transfer to the new nursing unit.
  • Provide a verbal report about the patient’s condition to the receiving unit midwife.
  • Ensure all necessary documentation and the care plan are completed.
  • Assist the patient upon arrival at the new unit.
  • Announce the patient’s arrival to the new unit.
  • Transport the patient to the new admission room and assist in transferring her to the bed.
  • Hand over the patient’s investigation records in her file to the receiving midwife.

Requirements:

  • Wheelchair or stretcher
  • Identification labels
  • Patient’s belongings
  • Scans or medical reports

Procedure for Transfer of a Mother to Another Hospital or Department:

  1. Check the doctor’s order for the transfer of the mother.
  2. Inform the mother and her relatives about the transfer.
  3. Inform the ward sister or the hospital where the patient will be transferred.
  4. Arrange for transportation for the mother to the referred hospital.
  5. Check the mother’s chart for complete recording of vital signs, nursing care, and treatment given, and write a referral note.
  6. Collect the mother’s scans, medicines, and other belongings.
  7. Cancel the hospital diet or transfer arrangements if applicable.
  8. Assist the relatives in collecting other belongings.
  9. Make arrangements to settle any due bills if the patient is going to another hospital.
  10. Record the time, mode of transfer, and the general condition of the patient.
  11. Assist in transferring the mother to a wheelchair or stretcher and accompany her to the hospital with proper documentation.
  12. Hand over the mother’s documents and belongings, and give a verbal report to the in-charge or the sister in charge at the receiving unit.
  13. Collect ward articles and take them back.
  14. Clean the unit thoroughly and prepare it for the next patient.
REFERRAL NOTE

Date of referral……………………………..

From: Health unit

To: ………………………………………………………………………………………………………

Referral number………………………………………………………………………………….

Patient name………………………………………………………………………………………

Patient number…………………………………………………………………………………..

Date of first visit………………………………………………………………………………..

History and symptoms……………………………………………………………………………………………………

………………………………………………………………………………………………………………………………………………………………………………………………………………………………………………………………………………………………………….

Diagnosis……………………………………………………………………………………………………………………………………..

Treatment given…………………………………………………………………………………………………………………………………………………………………………………………………………………………………………………………………………………………………

Treatment or surveillance to be continued………………………………………………………………………………….

………………………………………………………………………………………………………

Remarks……………………………………………………………………………………………

Name of obstetrician…………………………………………………………………….signature………………………………


Postnatal exercises

Postnatal exercises are a series of physical activities designed to help new mothers recover from childbirth and regain their strength, flexibility, and overall fitness. 

These exercises are essential for promoting healing, restoring pelvic floor function, and enhancing overall well-being after giving birth.

  1. Kegel Exercises: Kegels target the pelvic floor muscles, which play a crucial role in supporting the bladder, uterus, and rectum. Contracting and relaxing these muscles can help prevent or treat urinary incontinence and pelvic organ prolapse.

  2. Deep Breathing Exercises: Deep breathing helps relax the body, reduce stress, and improve circulation. It is especially beneficial for promoting relaxation and managing stress, which is essential during the postpartum period.

  3. Abdominal Contractions: Gently engaging and releasing the abdominal muscles can aid in toning the core and supporting abdominal recovery after pregnancy. Be cautious not to strain the abdominal muscles, especially if you had a cesarean section.

  4. Pelvic Tilts: Pelvic tilts involve tilting the pelvis forward and backward while lying on your back. This exercise helps strengthen the abdominal muscles and alleviate lower back pain.

  5. Ankle Pumps and Circles: These exercises involve moving the ankles in circles or pumping them up and down to improve blood circulation and prevent blood clots, which can be a concern during postpartum recovery.

  6. Glute Squeezes: Squeezing and releasing the glute muscles while sitting or lying down can help strengthen the buttocks and support the pelvic region.

  7. Leg Slides: Lying on your back with knees bent, gently slide one leg out straight and then back in. Alternate legs to engage the core and strengthen the hip muscles.

  8. Bridge Pose: Lying on your back with knees bent, lift your hips off the floor to create a bridge shape. This exercise targets the glutes, hamstrings, and lower back.

  9. Wall Push-Ups: Standing facing a wall, place your palms on the wall at shoulder height. Bend your elbows and lean in towards the wall, then push back to the starting position. This exercise helps strengthen the upper body.

  10. Gentle Cardio: As you progress in your postpartum recovery, you can incorporate low-impact cardio exercises like walking or swimming. Always start slowly and gradually increase the intensity as your body heals.

PHYSIOLOGY OF PUERPERIUM Read More »

Normal Puerperium

Normal Puerperium

Puerperium, also known as the postpartum period, is the time following childbirth or abortion, commencing after the expulsion of the placenta and membranes, and typically lasting for about 6 to 8 weeks. 

During this phase, the body’s tissues, especially the pelvic organs, undergo a process of returning approximately to their pre-pregnant state, both anatomically and physiologically.

A woman progressing through the puerperium phase is referred to as a “puerpera.”

The postpartum period is generally divided into three distinct phases:

  1. Immediate Puerperium: This initial phase spans the first 6 hours after childbirth.
  2. Early Puerperium: The second phase extends up to 6 days postpartum.
  3. Remote Puerperium: The final phase continues for 6 weeks after childbirth.

Management of Puerperium

Principles: 

The management of puerperium is guided by several essential principles:

  1. Restoring the mother’s health to optimal levels.
  2. Preventing infections and ensuring a hygienic environment.
  3. Providing proper care for the breasts to facilitate breastfeeding.
  4. Encouraging the mother to consider contraceptive options for family planning.

Aims: 

The management of puerperium focuses on achieving the following aims:

  1. Establishing the physical and emotional well-being of the mother.
  2. Facilitating lactation to promote breastfeeding.
  3. Educating the mother on best practices for caring for her newborn baby.
  4. Preventing complications that may arise during this postpartum period.
Management in the 1st One Hour (Fourth Stage of Labor):

The fourth stage of labor, commencing with the birth of the placenta and lasting for one hour, is a critical phase of initial recovery from the stress of labor and delivery. Close monitoring and specific activities are conducted during this period:

  1. Evaluation of the Uterus:

    • Palpating the uterus to ensure proper contraction.
    • Massaging the fundus to expel any clots and promote uterine involution.
    • Measuring the fundal height in relation to the umbilicus.
    • Encouraging the mother to empty her bladder, which aids in uterine contraction.
  2. Inspection and Evaluation of the Perineum, Vagina, and Cervix:

    • Carefully inspecting the perineum for discoloration, swelling, lacerations, or tears.
    • If certain factors are present, the cervix and upper vagina require examination:
      • A well-contracted uterus with continuous vaginal bleeding for an hour.
      • Pushing before full dilation of the cervix.
      • Rapid labor and precipitous delivery.
      • Manipulation of the cervix during labor, such as pushing back an edematous anterior lip.
      • Traumatic procedures during delivery, like forceps delivery.
      • Traumatic delivery, such as in the case of a large baby or shoulder dystocia.
  3. Inspection and Evaluation of the Placenta, Membranes, and Umbilical Cord:

    • This examination is conducted before any repairs, such as laceration repair or episiotomy.
  4. Cleaning of the Perineum and Positioning of Legs.

  5. Post-Delivery Observations:

    • Monitoring and recording vital signs, including blood pressure, pulse, temperature, and respiration.
  6. Offering Food and Fluids:

    • Providing warm drinks and nourishing food to the mother.
    • Ensuring she stays warm and comfortable.
  7. Encouraging Breastfeeding:

    • Motivating the mother to breastfeed her baby, promoting bonding and initiating lactation.

At the end of this period, observations are repeated to ensure everything is normal. If the mother’s condition is satisfactory, she and the baby can be transferred to the postnatal ward for further care and support.

Further Management in the Postnatal Ward (1st 6 Hours after Birth):

During this critical period, the puerperal mother requires extra care and attention as she may be tired and susceptible to bleeding. Upon receiving information about a new patient, the postnatal ward prepares to welcome and make the mother comfortable in her bed. 

The following care is provided during the first 6 hours:

  1. Rest and Sleep:

    • Rest and sleep are crucial for the mother’s recovery and emotional well-being.
    • Visitors are limited during the day to reduce anxiety and discomfort.
    • A calm and peaceful atmosphere is maintained to ensure relaxation.
    • If sleep is difficult, sedatives may be prescribed to address possible signs of puerperal psychosis.
  2. Ambulation:

    • After 6 hours of normal delivery, mothers are encouraged to get out of bed and walk around.
    • Ambulation promotes good circulation, drainage of lochia, and aids in uterine involution.
    • It also helps improve muscle tone and venous return from the lower limbs, reducing the risk of venous thrombosis.
  3. Diet:

    • A well-balanced diet rich in proteins, vitamins, and nutrients is provided to help the mother regain strength and ensure successful lactation.
    • Plenty of fluids are encouraged to prevent constipation.
    • Vitamin, iron, and folic acid supplements are given as needed.
  4. Care of the Bladder:

    • The mother is encouraged to empty her bladder regularly, as large amounts of urine are excreted during the early days of puerperium.
    • Difficulties in passing urine may arise due to bruising or lack of privacy, leading to urinary retention.
    • Ensuring regular bladder emptying helps prevent complications like subinvolution of the uterus, postpartum hemorrhage, and urinary tract infections.
  5. Hygiene:

    • Vulval toilet should be performed at least 3 times a day, and pads should be changed whenever soiled.
    • Daily baths and changing of clothing and bed linen are encouraged.
    • Clean and suitable bathrooms are provided for use.
  6. General Examination:

    • A daily head-to-toe examination is conducted to check for anemia, edema, jaundice, and signs of dehydration.
    • Fundal height is measured using a tape measure.
    • The vulva is inspected to assess the state of lochia, including color, amount, and smell.
    • Legs are examined daily for signs of deep vein thrombosis (DVT).
  7. Care of Breasts:

    • The breasts are cleaned before each feeding.
    • Immediate breastfeeding after delivery helps prevent postpartum hemorrhage and fosters early bonding.
    • Proper breast attachment may require supervision and assistance initially.
    • Continued breastfeeding prevents breast engorgement.
    • Demand feeding is encouraged for a good milk flow.
    • Mothers are advised to wear a well-fitting brassiere for breast support.
  8. Relief of Pain:

    • After-pains may occur within 2-3 days after delivery, and pain relief, such as Panadol, is provided.
  9. Perineal Care:

    • The Perineal pad is inspected and changed as needed.
    • Coitus is avoided for up to 6 weeks or until the perineum has healed.
    • Proper hygiene is maintained, and application of native medicine is discouraged.
    • Postnatal exercises are recommended for recovery.

During this crucial postpartum period, diligent care and support are provided to ensure the mother’s smooth transition into motherhood and to promote her overall well-being.

REQUIREMENTS

TROLLEY

Top ShelfBottom ShelfBedside
Sterile dressing pack containing:Sterile drum of cotton woolScreen
– 2 dressing towelsSterile drum of gauzeBedpan and cover
– 2 non-toothed dissecting forceps2 flannelsHand washing equipment
– 2 dressing forcepsAntiseptic solutionHamper
– 3 gallipots (1 for lotion, 1 for swabs, 1 for gauze)Normal saline 
– A pair of stitch scissors or clip remover (if required)Bathing soap 
– ProbeDressing mackintosh and towel 
– Sinus forcepsApron 
Gloves 
Cheatle forceps 
2 sanitary towels 
2 jags of water (1 for hot, 1 for cold) 
A small jar for pouring water 
2 receivers 
Procedure for Postnatal Care (1st 6 Hours after Birth):

Following the general rules, the postnatal care for the mother during the first 6 hours after birth involves the following steps:

  1. Request mother to empty the bladder and bowel.

  2. Fold back the clothes to the foot of the bed, leaving the patient covered up to the waist with a top sheet.

  3. Put the mother in a dorsal position.

  4. Wash hands, put on clean gloves, and remove the soiled pad, disposing of it properly.

  5. Inspect the genitalia for signs of infection.

  6. Examine lochia, noting its amount, color, consistency, and odor.

  7. Place a bedpan in position.

  8. Wash the pubic area, inner part of thighs, and buttocks using warm soapy water and a flannel.

  9. Carefully wash the genitalia using the dominant hand to cleanse while the non-dominant hand pours water. Pay attention to skin folds and repeat on the opposite side.

  10. Rinse and dry the area thoroughly from perineum to rectum using a flannel.

  11. Remove the bedpan.

  12. Place a clean pad in position and ensure the mother is comfortable.

  13. Clear away the trolley used for the procedure.

  14. Document the procedure for records and future reference.

The woman should be instructed clearly about how to cleanse herself after passing urine and defecation. These instructions include:

  • Washing hands before and after perineal care.
  • Avoiding touching stitches with fingers; use a wet or disposable wiper to wipe from front to back across the stitches, rinse, and dry from front to back.
  • Proper application of the perineal pad to prevent movement with body motions.
  • Applying and removing the perineal pad from front to back.
  1. Postnatal Exercises:

Postnatal exercises are important for proper circulation and regaining tone in abdominal and pelvic floor muscles. These exercises include deep breathing and free movement in bed, relaxation techniques, using pillows for support, sitting and feeding postures, and pelvic floor exercises.

  1. Observations:

Monitoring temperature, pulse, respiration (TPR), and blood pressure (BP) should be done twice and recorded.

  1. Care of the Bowel:

Bowel movements may be sluggish in the first 2 days after delivery, but constipation should be avoided as it can contribute to subinvolution of the uterus. A diet with sufficient roughage and fluids is encouraged, and mild laxatives like milk of magnesia may be given if necessary.

  1. Prevention of Infection:

Strict aseptic precautions must be observed during vulval toilet to prevent infections. Proper use of gowns, masks, and gloves, along with adequate sterilization of equipment, is essential. Anyone with a cold or septic spot should not attend to a puerperal mother, and the number of visitors should be restricted.

  1. Rooming-In or Bedding-In:

After normal delivery, the baby should be kept with the mother in a cot beside her bed or in her bed when she is awake. This promotes bonding and helps the mother become familiar with baby care.

  1. Immunization:

Mothers susceptible to rubella infection should be vaccinated, and they should be advised to postpone pregnancy for at least 2 years. Tetanus toxoid (TT) should be given at discharge if not administered during pregnancy. Unimmunized Rh-negative mothers who delivered Rh-positive babies should receive anti-D.

  1. Involution of the Uterus:

Daily palpation of the fundus is essential to ensure adequate involution. The uterus should feel smooth, firm, well-contracted, and not painful. Measure the fundal height daily using a tape measure to identify subinvolution if the uterus remains the same size for several days.

  1. Records:

Keeping detailed records helps assess the mother’s progress and detect early deviations from normal. Puerperal rounds are done at least once a day to assess the mother’s physical and emotional well-being.

  1. Discharge of the Mother:

Before discharge from the ward, the mother and baby are fully examined to ensure their well-being. The midwife ensures that 

  • vital signs
  •  breast condition
  •  breastfeeding
  • involution of the uterus
  •  lochia
  •  bladder, bowel, and perineum are all normal.

For the baby, the midwife checks 

  • sucking,
  •  sleeping pattern, 
  • umbilicus cleanliness, and vaccination status, ensuring that BCG and polio 0 vaccines are given.

Advice on Discharge:

For the Mother:

  1. Personal Hygiene and Breast Care:

    • Continue practicing good hygiene, especially in the perineal area.
    • Cleanse the breasts before and after each breastfeeding session.
  2. Well-Balanced Diet:

    • Maintain a nutritious diet rich in proteins, vitamins, and nutrients to support recovery and lactation.
  3. Rest and Sleep:

    • Ensure adequate rest and sleep to aid in recovery and overall well-being.
  4. Postnatal Exercises:

    • Continue with postnatal exercises to promote circulation and tone muscles.
  5. Avoid Heavy Lifting:

    • Refrain from lifting anything heavier than the baby for the first 2-3 weeks to allow the body to recover.
  6. Medications:

    • Take prescribed medications as directed by the healthcare provider.
  7. Vaginal Discharge and Menstruation:

    • Inform the mother about postpartum vaginal discharge, which will gradually decrease and eventually stop.
    • Menstruation may resume within 2-3 months but may be delayed if fully breastfeeding.
  8. Sexual Intercourse:

    • Advise avoiding sexual intercourse for about 6 weeks to allow bruised tissues to heal properly.
  9. Postnatal Examination:

    • Emphasize the importance of attending the postnatal clinic for a check-up at 6 weeks after delivery.

For the Baby:

  1. Exclusive Breastfeeding:

    • Encourage exclusive breastfeeding for the first 6 months to provide optimal nutrition and immune protection.
  2. Bottle Feeding (if applicable):

    • Instruct on proper care and preparation of formula.
    • Explain how to clean and sterilize bottles, nipples, containers, spoons, or feeding dishes.
    • Demonstrate how to hold the baby during feeding to ensure proper latch and comfort.
    • Show how to hold the feeding bottle to prevent the baby from sucking air.
  3. Burping:

    • Teach the technique for burping the baby after feeding to alleviate gas.
  4. Baby Bathing and Dressing:

    • Explain how to bathe and dress the baby properly.
    • Guide on caring for the genital area.
  5. Cord Care:

    • Provide instructions on caring for the umbilical cord to prevent infection.
  6. Diaper Rash Prevention and Treatment:

    • Educate on preventing diaper rash and how to treat it if it occurs.
  7. Checking Baby’s Temperature:

    • Teach how to check the baby’s temperature safely and accurately.
  8. Recognizing Baby’s Needs:

    • Help the mother understand the signs and cues of the baby’s needs, such as hunger, sleep, and comfort.
  9. Check-Up and Immunization:

    • Stress the importance of regular check-ups and immunizations for the baby’s health and protection.

Normal Puerperium Read More »

Examination of placenta

Examination of the Placenta:

Aims of Placenta Examination:

  • To determine the completeness of the placenta and the membranes.
  • To detect any abnormalities.

Requirements:

  • Top shelf:

    • Clean gloves.
    • Measuring jar.
    • Placenta in a receiver.
  • Bottom shelf:

    • Weighing scale.
    • 3 buckets.
    • Apron.
  • At the side:

    • Gum boots.
    • Hand washing equipment.
    • A flat work surface.

Method/Procedure of Placenta Examination:

  1. Remove all clots and place them in a measuring jar.
  2. Hold the placenta by the cord and inspect for extra holes, ruling out the presence of a Succenturiate lobe or the passage of the baby.
  3. Observe the length of the cord and check the blood vessels. Normally, there should be three blood vessels present (one vein and two arteries).
  4. Note the insertion of the cord. It should be centrally inserted. If it is inserted towards the edge, it is known as battledore insertion.
Fetal Surface:
  1. Observe the color of the fetal surface, which should normally be white and shiny. Branches of the umbilical vein and arteries should be seen radiating from the center of insertion outwards.

  2. Check the membranes, consisting of the amnion and the chorion, for completeness.

    • The amnion reaches the umbilical cord, is smooth, tough, and transparent, making it difficult to tear.
    • The chorion is thick, opaque, and friable and is found at the edge of the placenta.
Maternal Surface:
  1. Lay the placenta flat on the examining surface, putting the lobes together, and observe for any missing lobe.

  2. Note the color of the maternal surface, which should normally be dark red.

  3. White patches found on the maternal surface are called infarcts.

  4. Weigh the placenta (approximately 1/6 of the baby’s weight at birth).

  5. Place the placenta in a designated placenta bucket and disinfect the examination area.

  6. Record the findings in the appropriate chart.

  7. Report any abnormalities to the in-charge.

Disposal of the Placenta:

  • Inquire from the mother if she would like to take the placenta home.
  • If the mother declines, dispose of the placenta by taking it to the incinerator or placenta pit.

Lorem ipsum dolor sit amet, consectetur adipiscing elit. Ut elit tellus, luctus nec ullamcorper mattis, pulvinar dapibus leo.

MCQ Type Questions for Midwives:

Question 1:
What is the main purpose of performing an episiotomy during childbirth?
A) To reduce maternal distress
B) To prevent cerebral damage in premature babies
C) To quicken delivery in certain cases
D) To prevent excessive bleeding

Answer: C) To quicken delivery in certain cases

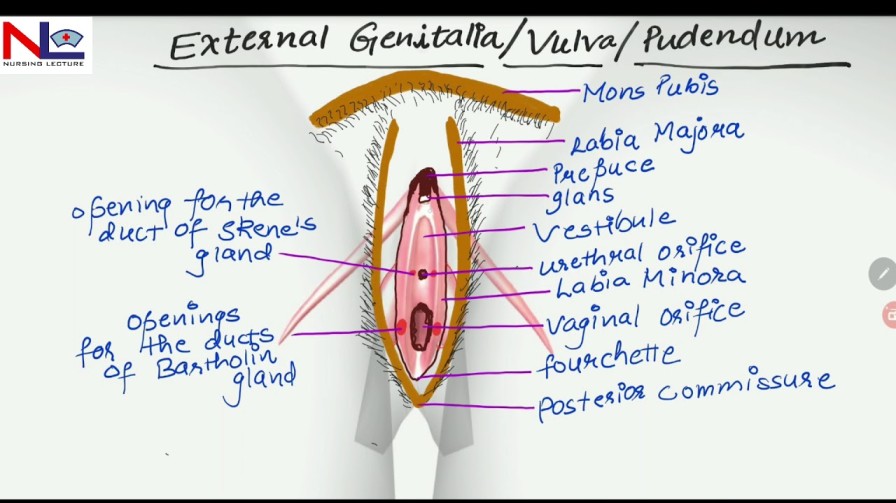
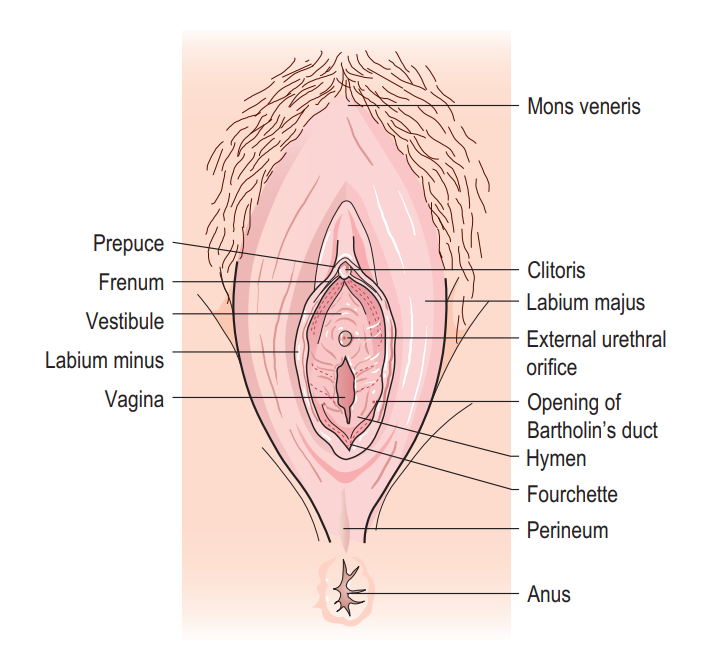
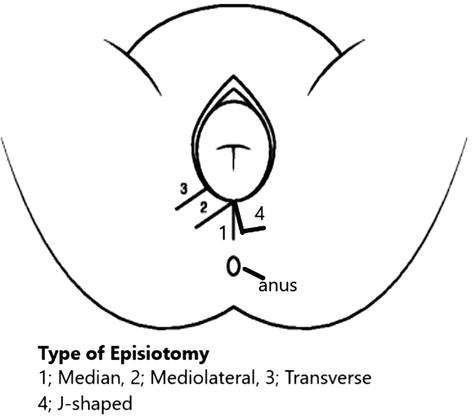
Explanation: Episiotomy is a surgical incision made on the perineum to enlarge the vaginal orifice prior to delivery of the baby. It is performed to expedite the delivery process in specific situations, such as maternal distress, fetal distress, cord prolapse, rigid perineum, forceps delivery, face-to-pubis delivery, and certain other conditions.

Question 2:
Which type of episiotomy incision is discouraged due to the risk of damage to the Bartholin’s glands?
A) Medial lateral
B) J-shaped
C) Lateral incision
D) Bilateral

Answer: D) Bilateral

Explanation: The “bilateral” episiotomy incision is done on either side and is similar to the lateral incision. However, it is discouraged because it can cause injury to the Bartholin’s glands, which are located on either side of the vaginal opening.

Question 3:
What is the primary purpose of controlled cord traction during the third stage of labor?
A) To expedite placental delivery
B) To prevent perineal tears
C) To encourage maternal pushing
D) To reduce postpartum hemorrhage

Answer: A) To expedite placental delivery

Explanation: Controlled cord traction is a method used during the third stage of labor to help deliver the placenta more efficiently by applying controlled downward traction on the umbilical cord. It aims to shorten the duration of the third stage and reduce the risk of postpartum hemorrhage.

Question 4:
What is the average volume of blood flow through the placental site before the baby is born?
A) 100-200ml/min
B) 300-500ml/min
C) 500-800ml/min
D) 1000-1200ml/min

Answer: C) 500-800ml/min

Explanation: The normal volume of blood flow through the placental site before the baby is born is approximately 500-800ml/min. This blood flow decreases significantly once the baby is delivered and the placental separation begins.

Question 5:
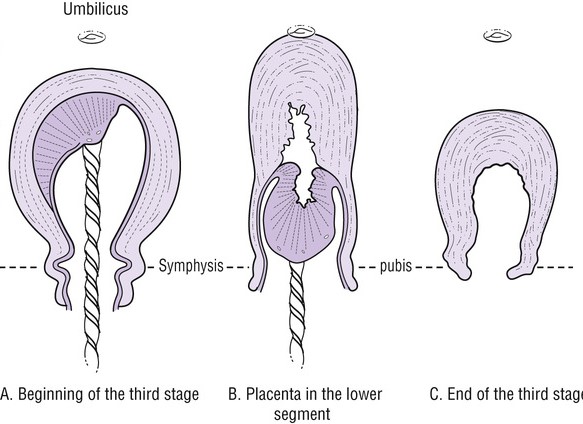
Which stage of labor involves the separation, descent, and expulsion of the placenta and membranes?
A) First stage
B) Second stage
C) Third stage
D) Fourth stage

Answer: C) Third stage

Explanation: The third stage of labor involves the separation, descent, and expulsion of the placenta and membranes after the delivery of the baby.

Question 6:
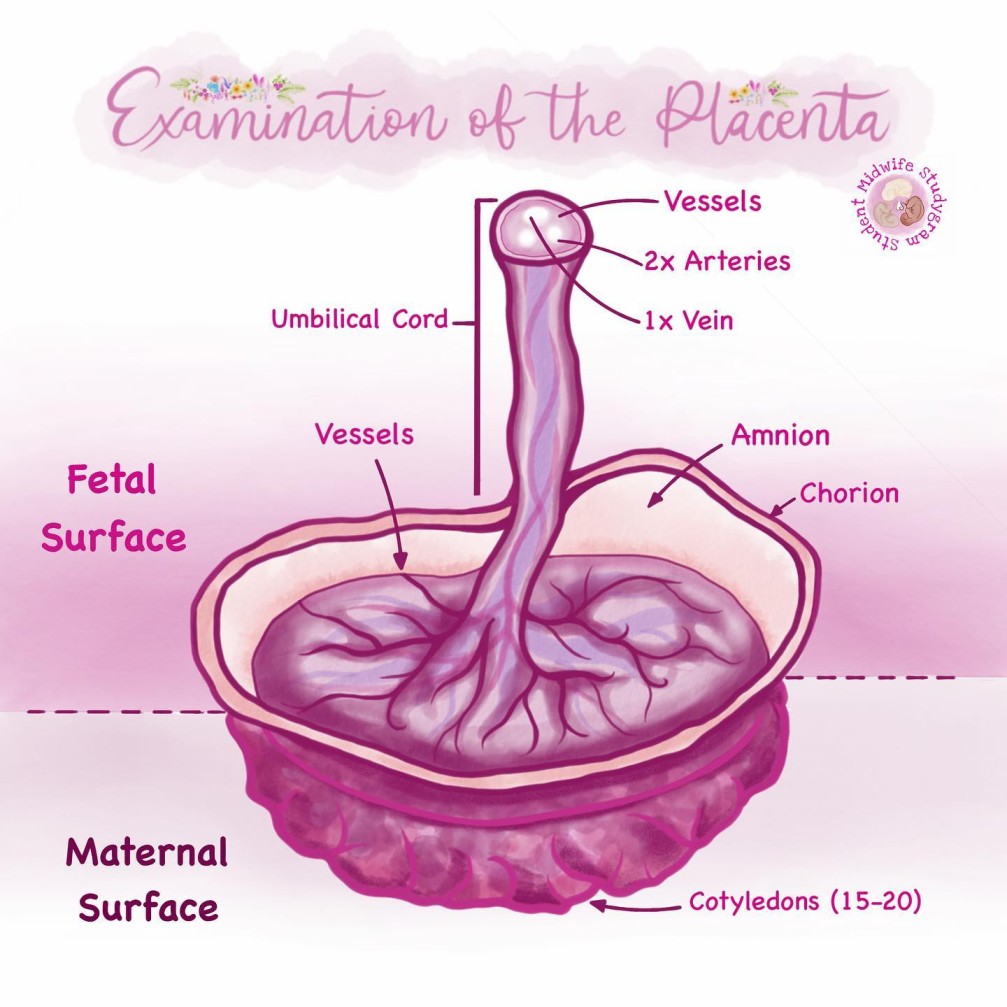
What is the main purpose of the placental examination after delivery?
A) To check the baby’s health status
B) To detect any abnormalities in the placenta
C) To ensure proper positioning of the baby
D) To assess maternal blood loss

Answer: B) To detect any abnormalities in the placenta

Explanation: The placental examination after delivery aims to assess the completeness of the placenta and membranes and to detect any abnormalities that may have occurred during pregnancy or delivery.

Question 7:
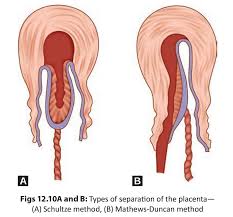
What is the recommended method of placental separation during the third stage of labor?
A) Mathew Dankan method
B) Active management with controlled cord traction
C) Passive management with maternal efforts
D) Schultze method

Answer: D) Schultze method

Explanation: The Schultze method is the recommended method of placental separation during the third stage of labor. It involves separation starting centrally, resulting in the formation of a retroplacental clot that aids in the separation process.

Question 8:
Which type of episiotomy incision is done by doctors and involves curving away from the anal sphincter?
A) J-shaped
B) Medial lateral
C) Bilateral
D) Lateral incision

Answer: A) J-shaped

Explanation: The J-shaped episiotomy incision is done by doctors and starts from the center of the fourchette, curving away from the anal sphincter.

Question 9:
What is the primary aim of uterine contractions during the third stage of labor?
A) To facilitate placental separation
B) To promote fetal descent
C) To prevent maternal discomfort
D) To dilate the cervix

Answer: A) To facilitate placental separation

Explanation: Uterine contractions during the third stage of labor help to facilitate placental separation and expulsion by reducing the area of the placental site and exerting pressure on the torn blood vessels.

Question 10:
Which stage of labor involves the arrest of hemorrhage?
A) First stage
B) Second stage
C) Third stage
D) Fourth stage

Answer: C) Third stage

Explanation: The third stage of labor involves the arrest of hemorrhage as the uterus contracts and closes the spiral arterioles after placental expulsion, reducing bleeding.

Question 11:
What is the main indication for performing an episiotomy in a forceps delivery?
A) To reduce fetal distress
B) To prevent cerebral damage in premature babies
C) To quicken delivery
D) To prevent excessive bleeding

Answer: C) To quicken delivery

Explanation: In a forceps delivery, an episiotomy may be performed to quicken delivery, allowing for easier extraction of the baby using forceps and reducing the risk of prolonged labor.

Question 12:
Which type of episiotomy incision is the commonest, safest, and recommended for use by midwives?
A) J-shaped
B) Medial lateral
C) Bilateral
D) Lateral incision

Answer: B) Medial lateral

Explanation: The medial lateral episiotomy is the commonest, safest, and recommended incision for use by midwives. It starts from the fourchette to the medial lateral direction of the perineum.

Question 13:
What is the typical healing time for an episiotomy?
A) 1-2 weeks
B) 2-4 weeks
C) 4-6 weeks
D) 6-8 weeks

Answer: C) 4-6 weeks

Explanation: The typical healing time for an episiotomy is around 4-6 weeks, depending on the size of the incision and the type of suture material used.

Question 14:
What is the average volume of blood flow through the placental site after the baby is born?
A) 100-200ml/min
B) 300-500ml/min
C) 500-800ml/min
D) 1000-1200ml/min

Answer: A) 100-200ml/min

Explanation: After the baby is born, the average volume of blood flow through the placental site reduces to approximately 100-200ml/min.

Question 15:
What is the primary aim of rubbing the fundus during the third stage of labor?
A) To assess the size of the uterus
B) To promote uterine contractions
C) To monitor the baby’s heart rate
D) To assess cervical dilation

Answer: B) To promote uterine contractions

Explanation: Rubbing the fundus during the third stage of labor helps to promote uterine contractions and assist in the expulsion of the placenta and membranes. It aids in preventing postpartum hemorrhage and achieving hemostasis.

Examination of THE placenta Read More »

Normal third stage of labour

Normal Third Stage of Labour

The third stage of labor is a critical phase that involves the separation, descent, and expulsion of the placenta and membranes, as well as the prevention of hemorrhage.

Physiology of the Third Stage of Labour:

  1. Contraction and Retraction:
    • The placental separation is initiated by the contraction and retraction of the uterine muscles. These contractions thicken the uterine wall, reducing the capacity of the upper uterine segment and decreasing the area of the placental site.
    • Separation starts from the center of the placenta. As the blood sinuses tear, a retroplacental clot forms, aiding in further placental separation.
  2. Descent of the Placenta:
    • The placenta descends due to the force of gravity acting like a piston on the clot. This propels the placenta from the upper uterine segment into the lower uterine segment.
  3. Separation of Membranes:
    • The membranes become separated as the weight of the placenta peels them off the decidua. However, the membranes may remain adherent around the cervix until the placenta is expelled from the vagina.
  4. Haemostasis (Preventing Hemorrhage):
  • At placental separation, swift control of blood flow is crucial to prevent serious hemorrhage. Several physiological processes play a role in achieving haemostasis:


a
. Retraction of oblique uterine muscle fibers leads to the thickening of the uterine muscles, acting as a clamp and securing a ligature action on the torn vessels.

b
. Vigorous uterine action after separation brings the uterine walls into opposition, exerting further pressure on the placental site.

c
. A fibrin mesh rapidly covers the placental site after separation, utilizing 5-10% of the circulating fibrinogen to aid in clot formation and control bleeding.

d
. Breastfeeding stimulates the release of oxytocin, which enhances uterine contractions, contributing to haemostasis.

Separation of the Placenta normal

Separation of the Placenta:

The separation of the placenta during the third stage of labor can occur in two ways, known as the Schultze method and the Mathew Dancan method.

  1. Schultze Method:
  • Separation usually starts centrally, resulting in the formation of a retroplacental clot. This clot exerts pressure at the midpoint of the placental attachment, aiding in the separation process and helping to strip the placenta’s adherent lateral borders.
  • The increased weight of the placenta also assists in peeling the membranes off the uterine wall, creating a membranous bag enclosing the clot. As the placenta descends, the fetal surface comes out first.
  • This method is associated with more complete shearing of both the placenta and membranes, leading to less fluid blood loss. It is a quick and clean method.
  1. Mathew Dancan Method:
  • Placental separation begins from the sides, and blood escapes from the sides during the process, without the assistance of a retroplacental clot.
  • The placenta descends slipping sideways, with the maternal surface coming out first.
  • This method takes longer and is associated with ragged and incomplete expulsion of membranes, leading to a higher fluid blood loss.

After separation, the uterus contracts strongly, forcing the placenta and membranes to fall into the lower uterine segment and eventually into the vagina.

Signs of Placenta Separation:

  1. The uterus becomes hard, round, and mobile.
  2. The fundus rises to or above the umbilicus.
  3. The cord lengthens or elongates.
  4. There may be a gush of blood.
  5. The placenta can be felt on vaginal examination (VE).
  6. Presence of the placenta at the vulva.
  7. If suprapubic pressure is applied, the cord does not recede into the vagina.

Mechanism of Placental Separation:

  • Placental separation is facilitated by a combination of uterine contractions and involution. 
  • After the delivery of the fetus, the uterus continues to contract approximately every 3-4 minutes. These contractions, along with the process of involution (the shrinkage of the uterus), lead to the site of implantation of the placenta undergoing shrinkage as well.
  • Within 10-15 minutes after the baby’s delivery, most of the placenta detaches from the uterine wall. This results in an increase in vaginal bleeding from the exposed implantation site, which signals the impending delivery of the placenta.
  • As the placenta is delivered, the uterus continues to contract, closing the spiral arterioles and reducing bleeding. The ongoing contraction of the uterus helps in preventing excessive blood loss.

N.B: It is important to note that the average blood loss from a vaginal delivery is approximately 250-300mls.

Management of the Third Stage of Labour:

Methods of Delivering the Placenta:

  • Controlled cord traction. (active)
  • Maternal efforts(passive management).
  1. Active Management (Controlled Cord Traction):
    • Palpate the abdomen to exclude undiagnosed twin pregnancies.
    • Administer oxytocin 10 IU intramuscularly to enhance uterine contractions.
    • Extend the cord clamp slightly to the vulva to get a good grip. Place the left hand over the fundus of the uterus.
    • During the first contraction, turn the palm of the left hand facing the fundus and apply counter traction above the pubic bone.
    • The right hand grasps the cord clamp and applies steady downward and outward traction until the placenta is visible at the vulva, then applies upward traction to receive the placenta in a cupped hand.
    • Take care to roll the membranes to prevent them from breaking.
    • Deliver the membranes in upward and downward movements.
    • Note the time of placenta and membranes delivery.
    • Rub the fundus to promote further uterine contractions.
    • Quickly examine the placenta for completeness and place it in a receiver.
    • Clean the vulva to remove any blood, and examine the cervix and vagina for lacerations or an extension of an episiotomy.
    • Repair any lacerations or tears.
    • Place a clean pad and ensure the mother is comfortable.
  2. Passive Management (Maternal Efforts):
    • This method is only used when the placenta has already separated from the uterine wall.
    • Wait for signs of placental separation.
    • Once the placenta has separated, ask the mother to push during contractions.
    • Place a flat palm over the mother’s abdomen to provide resistance for her to push against.
    • Receive the placenta in both hands and deliver it complete.
    • Administer oxytocin 10 IU intramuscularly.

Note: It is essential to keep the mother warm as she has undergone strenuous physical exercise during the first and second stages of labor, leading to significant heat loss from her body.

Normal third stage of labour Read More »

Episiotomy

EPISIOTOMY

An episiotomy is a surgical procedure that involves making an incision on the perineum to widen the vaginal opening before childbirth.

Indications for Episiotomy:

To qicken delivery in the following situations:
a. Pre-eclampsia and eclampsia.
b. Cardiac diseases, to reduce strain on the mother.
c. Maternal distress, to minimize strain during delivery.
d. Fetal distress, aiming to prevent fetal death.
e. Cord prolapse in the second stage of labor, while the baby is still alive.

To prevent excessive trauma in the following cases:
a. Rigid perineum.
b. Forceps delivery.
c. Face to pubis delivery.

To reduce the risk of cerebral damage in the following circumstances:
a. Premature births.
b. Postmaturity.
c. After the baby’s head emerges in breech deliveries.
d. In cases of a narrow subpubic arch.
e. After previous third-degree tears.

TYPES OF EPISIOTOMY:

  1. Lateral Incision:

    • This incision is made laterally across the labia majora and can be challenging to repair.

    Disadvantages:

    • May lead to excessive bleeding.
    • Risk of damaging the Bartholin’s glands.
    • Causes discomfort to the mother.
    • Takes longer to heal.
  2. Medial Lateral:

    • This is the most common and recommended type, particularly for midwives.
    • The incision starts from the fourchette and extends in the medial lateral direction of the perineum, typically 2-3cm.

    Advantages:

    • Usually heals well.
    • Easier for a midwife to perform and repair.
    • Minimizes damage to blood vessels.
    • Reduces the risk of excessive perineal tear.
    • Shortens the duration of the second stage of labor.
    • Helps avoid injuries to the Bartholin’s glands and the anal sphincter.
  3. Medial or Central or Midline:

    • This incision begins at the center of the fourchette and proceeds in the midline towards the anus.

    Advantages:

    • Results in less bleeding.
    • Provides greater comfort to the mother.
    • Simple to perform and easy to repair.

    Disadvantages:

    • May extend to involve the anal sphincter.
    • Poor repair could lead to Rectovaginal fistula (RVF).
  4. J-shaped:

    • Performed by a doctor, this incision starts from the center of the fourchette and curves away from the anal sphincter at a distance of 2.5cm.
  5. Bilateral:

    • Similar to the lateral incision but done on both sides.
    • It starts from the fourchette to the lateral wall.

    Note: Bilateral episiotomy is discouraged due to the potential risk of injury to the Bartholin’s glands.

Precautions when giving episiotomy:

  1. Timing: Avoid performing the episiotomy too early or too late during labor.

  2. Presentation: In cephalic presentation, the head should be stretching the perineum, and in breech presentation, the anterior shoulder should be stretching the perineum before performing the episiotomy.

  3. Contraction Height: Give the episiotomy during a contraction to ensure better control and precision.

Basic principles prior to repairing the perineum:

  1. Timely Repair: Perform the repair as soon as possible to minimize the risk of bleeding and perineal edema.

  2. Aseptic Technique: Ensure that the repair is done using proper aseptic techniques to reduce the risk of infection.

  3. Equipment Check: Verify that all necessary equipment is in place and count swabs and needles before and after the procedure to avoid leaving any foreign objects inside.

  4. Anesthesia: Make sure the wound is adequately anesthetized before starting the repair to minimize discomfort to the patient.

Basic principles after repair:

  1. Hemostasis: Ensure complete hemostasis to prevent excessive bleeding.

  2. Post-repair Examination: Perform rectal and vaginal examinations to confirm the adequacy of the repair, ensuring no other tears have been missed, and verify that rectal mucosa has not been inadvertently repaired.

  3. Removal of Swabs: Double-check to ensure that all tampons or swabs used during the procedure have been removed.

  4. Detailed Documentation: Make detailed notes of the findings and the repair procedure for accurate medical records.

  5. Post-repair Care: Inform the woman about the use of appropriate analgesia (pain relief), hygiene practices, maintaining a good diet, and performing pelvic floor exercises to aid in recovery.

Method of Infiltration and Method of Performing:

Requirements:

  • A sterile episiotomy pack containing:
    • Pair of episiotomy scissors.
    • Needle and cut gut.
    • Needle holder.
    • Sterile gauze and cotton swabs.
    • Sterile gloves.
    • Syringe.
    • Lignocaine.
    • Hibicet.
Method of Infiltration:
  1. Ensure the procedure is performed under sterile conditions.
  2. Explain the procedure to the mother to keep her informed.
  3. Draw the required amount of lignocaine or local anesthesia (10mls of 0.5% and 5-7mls of 1%).
  4. Swab the vulva to maintain cleanliness.
  5. During a contraction, when the head or presenting part is distending the vulva, place two fingers of the left hand between the fetal head and the perineum to ensure that the drug is injected into the fetal scalp to avoid potential harm to the baby.
  6. Introduce the needle into the perineum and withdraw the piston to check for any blood aspiration. If blood is aspirated, reposition the needle and repeat the procedure until no blood is withdrawn.
  7. Insert two fingers into the vagina and position the blades at the peak of a contraction. Make a single clean cut approximately 3cm in length in a medial lateral direction.
  8. Control hemorrhage by pressing a sterile swab on the area.

Repair Technique:

Before the midwife starts to repair the episiotomy:

  1. Ensure the proper setting:

    • Place the mother comfortably.
    • Remove any soiled linen from under the genitalia.
    • Adjust the light source to have a clear view inside the vagina.
  2. Communicate with the mother, explain the repair procedure, and provide reassurance.

  3. Put on fresh sterile gloves.

  4. Check whether the previously administered local anesthesia is still effective. If the mother feels pain, administer more anesthesia before the repair.

  5. Remove all clots from the birth canal.

  6. Assess the extent of damage to the vagina and locate the apex of the episiotomy.

  7. Insert a roll of vaginal pack and secure the end with artery forceps.

  8. Start suturing the episiotomy from the apex.

  9. Suture the vaginal mucosa using the continuous stitch technique. Pass the needle through the vaginal mucosa from behind and bring it out on the perineum wound.

  10. Continue using the continuous suturing method all the way to the bottom of the wound to close the deep muscle layer. The same technique can be used on the skin.

  11. Remove the vaginal pack, inspect the vagina, and insert a finger in the rectum to ensure closure and exclude involvement of the rectum.

  12. Clean the mother after completing the repair.

  13. Provide a pad for the mother’s comfort.

  14. Advise the mother on caring for the episiotomy and provide necessary instructions.

  15. Clear away and properly dispose of used materials.

Note: The typical healing time for an episiotomy is around 4-6 weeks, depending on the size of the incision and the type of suture material used to close the wound.

Classification of Perineal Trauma:

Classification of Perineal Trauma:

  1. First Degree Tear:

    • Injury to the perineal skin only.
  2. Second Degree Tear:

    • Injury to the perineum involving perineal muscles but not the anal sphincter.
  3. Third Degree Tear:

    • Injury to the perineum involving the anal sphincter.
  4. Fourth Degree Tear:

    • Injury to the perineum involving the anal sphincter complex and anal epithelium.
  5. Isolated Buttonhole Injury of the Rectum:

    • Injury to the rectal mucosa without injury to the anal sphincters.

Complications of Perineal Trauma:

  1. May become a 3rd degree tear.
  2. Bleeding.
  3. Infections.
  4. Swelling.
  5. Defect in wound closure.
  6. Local pain and a short-term possibility of sexual dysfunction.

Episiotomy Read More »

Normal second stage of labour

Normal second stage of labour

The second stage of labor commences when the cervix is fully dilated and concludes with the delivery of the baby.

SIGNS OF SECOND STAGE

Premonitory signs
  • Expulsive uterine contractions: Expulsive uterine contractions may occur when the mother is not fully dilated, particularly in occipital posterior position or with a full rectum.
  • Rapture of fore waters: Rupture of fore waters can occur at any time during labor.
  • Dilatation and gaping of the anus: Dilatation and gaping of the anus may happen due to deep engagement of the presenting part and premature maternal effort in the later part of the first stage.
  • Appearance of presenting part: Appearance of the presenting part becomes evident. Excessive molding may lead to the formation of a large caput succedaneum, which can protrude through the cervix before full dilatation. In breech presentation, the presenting part may be visible when the cervix is only 7-8 cm dilated.
  • Show: Show should be distinguished from bleeding caused by partial separation of the placenta, stretched cervix, or vaginal mucosa when the presenting part descends.
  • Congestion of the vulva: Congestion of the vulva is due to enthusiastic premature pushing.
  • Bulging of the perineum.
Confirmatory sign:
  • No cervix is felt on VE (full dilatation – 10cm).

Stages:

 Passive:
  • The cervix is fully dilated, but there are no involuntary expulsive contractions. Labour that is progressing well may take one hour. 
Active:
  • The cervix is fully dilated, there are involuntary expulsive contractions, and the baby is visible. The doctor should be informed if the baby has not been delivered after 2 hours in primigravida and 1 hour in multigravida.

Phases:

Propulsive phase:
  • It starts from full dilatation up to the descent of the presenting part to the pelvic floor.
 Expulsive phase:
  • It is distinguished by maternal bearing down efforts and ends with the delivery of the baby.

PHYSIOLOGY OF SECOND STAGE

 Descent:

  • Descent of the presenting part, which began during the first stage of labour and reaches its maximum speed towards the end of the first stage, continues its rapid pace through the second stage until it reaches the pelvic floor.

Uterine action:

  • The contractions become stronger and longer but can be less frequent, allowing a mother and a fetus a recovery period during the resting phase. The recovery period may last for one hour and is longer in primigravidas than in multigravidas. They are of strong intensity and expulsive in nature.
  • Membranes often rupture spontaneously at the onset of the second stage, so the drainage of liquor allows the hard round fetal head to be directly applied to the vaginal tissue, aiding distention. 
  • Fetal axis pressure increases flexion of the head, resulting in smaller presenting diameters, more rapid progress, and fewer traumas to both mother and fetus. 
  • Contractions become expulsive and as the fetus descends further into the vagina, pressure from the presenting part stimulates the nerve receptors in the pelvic floor, and the mother feels the need to push. 
  • Contractions become increasingly expulsive and overwhelming, and the mother responds by contracting abdominal muscles and the diaphragm.

Soft tissue displacement:

 As the fetal head descends, the soft tissue of the pelvis becomes displaced.

  • Anteriorly, the bladder is pushed upwards into the abdomen where it is at less risk of injury during the descent of the fetus. This results in stretching and thinning of the urethra, reducing its lumen.
  • Posteriorly, the rectum becomes flattened in the sacral curve, and the advancing head expels any residual fecal matter.
  • The levator ani muscles dilate, thin out, and are displaced laterally.
  • The perineal body is flattened, stretched, and thinned.
  • The fetal head is seen at the vulva advancing with each contraction and recoiling during the resting phase until crowning takes place.
  • The head is born, and the shoulders and body follow with the next contraction, accompanied by a gush of amniotic fluid and sometimes blood.

MECHANISM OF NORMAL LABOUR

 These are series of movements made by the fetus as it passes through the birth canal in order to be born. 

OR: These are series of passive movements made by the fetus as it negotiates the curves and diameters of the pelvis in order to be born. There is a mechanism for every presentation and position which can be delivered vaginally.

Principles common to all mechanisms:
  • Descent takes place throughout.
  • Whichever part that leads and first meets the resistance of the pelvic floor will rotate forward until it comes under the symphysis pubis.
  • The part that escapes under the symphysis pubis will pivot around the pubic bone.
  • The fetus turns slightly to take advantage of the widest space in each plane of the pelvis, i.e., transverse at the brim and anteroposterior at the outlet.

TERMS USED 

Attitude: This refers to the relationship of the fetal head and limbs to its trunk. The ideal attitude should be one of complete flexion. Flexion of the fetal head enables the smallest diameters to present to the pelvis, resulting in an easier labor.

Presentation: This indicates the part of the fetus that lies in the lower pole of the uterus. The normal presentation is vertex, where the head presents first.

Lie: This denotes the relationship between the long axis of the fetus and the long axis of the uterus. In normal labor, the lie should be longitudinal, which occurs in 99.5% of cases.

Position: This describes the relationship between the denominator of the presentation and specific points on the pelvic brim. Various positions are used in different presentations.

Right occipitoanterior:

  • The occiput points to the right iliopectineal eminence.
  • The sinciput points to the left sacroiliac joint.
  • The sagittal suture is in the left oblique diameter of the maternal pelvis.

Left occipitoanterior:

  • The occiput points to the left iliopectineal eminence.
  • The sinciput points to the right sacroiliac joint.
  • The sagittal suture is in the right oblique diameter of the maternal pelvis.

Right occipitoposterior:

  • The occiput points to the right sacroiliac joint.
  • The sagittal suture is in the right oblique diameter of the pelvis.

Left occipitoposterior:

  • The occiput points to the left sacroiliac joint.
  • The sagittal suture is in the left oblique diameter of the pelvis.

Right occipitolateral:

  • The occiput points to the right iliopectineal line, midway between the iliopectineal eminence and the sacroiliac joint.
  • The sagittal suture is in the transverse diameter of the pelvis.

Left occipitolateral:

  • The occiput points to the left iliopectineal line, midway between the iliopectineal eminence and sacroiliac joint.
  • The sagittal suture is in the transverse diameter of the pelvis.

Presenting part: This is the part of the presentation that lies over the internal os of the cervix.

Denominator: This is the name of the part of the presentation that is used when referring to the fetal position. Each presentation has a different denominator, which includes:

  • In vertex presentation: occiput
  • In breech presentation: sacrum
  • In face presentation: mentum

In the mechanism of normal labor:

  • Attitude is one of complete flexion.
  • Lie is longitudinal.
  • The presentation is cephalic.
  • Position can be either right or left occipitoanterior.
  • The denominator is the occiput.
  • Presenting diameters are the biparietal and occipitofrontal.
  • Engaging diameters are the biparietal (transverse) and suboccipitofrontal (anteroposterior).

MAIN MOVEMENTS 

Engagement: Engagement occurs when the biparietal and suboccipitofrontal diameters pass through the pelvic brim. In primigravidas, engagement often happens before the onset of labor, while in most multigravidas, it occurs in the late first stage.

Descent: Throughout the first stage of labor, uterine muscle contractions and retraction reduce the space in the uterus, exerting pressure on the fetus to descend. After the rupture of the fore waters and with maternal effort, descent speeds up, culminating in the complete expulsion of the fetus. Factors facilitating descent include uterine contraction and retraction, bearing down efforts, and straightening of the fetus after the rupture of membranes.

Flexion: At the beginning of labor, with the position being right occipitoanterior (ROA) or left occipitoanterior (LOA), the fetus is in the attitude of complete flexion. At the onset of labor, the suboccipitofrontal diameter of 10cm presents. With greater flexion, the suboccipitobregmatic diameter of 9.5cm presents, and the occiput becomes the leading part. Resistance from the lower segment, pelvic walls, unfolding cervix, and pelvic floor promotes full flexion of the fetal head.

Internal Rotation of the Head: During a contraction, the presenting part is pushed downward onto the pelvic floor. It first meets resistance with the pelvic floor muscles and then rotates 1/8 of a circle forward, bringing the occiput under the symphysis pubis.

Crowning: With strong uterine contractions, crowning takes place as the occipital eminence escapes under the symphysis pubis and no longer recedes back during contractions. The widest diameter (biparietal) is born. If flexion is maintained, the suboccipitobregmatic diameter of 9.5cm distends the vaginal orifice.

Extension of the Head: After crowning, the fetal head can extend by pivoting on the suboccipital region around the pubic bone. This movement realizes the sinciput, face, and chin, which sweep the perineum and are born by extension.

Restitution: This is the movement of the head after delivery to correct the twist in the neck. The occiput rotates back 1/8 of a circle towards the side where it began.

Internal Rotation of the Shoulders: The shoulders enter the oblique diameter of the pelvic cavity. The anterior shoulder reaches the pelvic floor first and rotates 1/8 of a circle forward, bringing the shoulders in the anteroposterior (AP) diameter of the outlet to lie under the symphysis pubis. The movement can be clearly seen as the head turns at the same time (external rotation of the head). It occurs in the same direction as restitution, and the occiput of the fetal head now lies laterally.

External Rotation of the Head: It occurs at the same time as the internal rotation of the shoulders.

Lateral Flexion: The anterior shoulder escapes under the symphysis pubis, and the posterior shoulder sweeps the perineum. The whole body is born by lateral flexion towards the mother’s abdomen.

Factors Influencing the Length of the 2nd Stage:
  • Maternal parity
  • Fetal size
  • Force of uterine contractions
  • Presentation
  • Position
  • Pelvic size
  • Method of anesthesia
  • Magnitude of maternal expulsive effort

MANAGEMENT OF SECOND STAGE OF LABOUR

 The woman should be reassured and provided with psychological support to encourage cooperation during the second stage of labor. 

  • Ensure the woman is not left alone and transfer her to the delivery room in a timely manner without rushing. 
  • Prepare the delivery room, necessary equipment, and a cot for the baby well in advance. 
  • Ensure a clean and decontaminated environment, with adequate lighting in the delivery room. 
  • Properly prepare oneself and any assisting personnel by wearing protective gear, washing hands thoroughly with clean water and soap, and wearing sterile gloves. 
  • Before conducting delivery, scrubbing and wearing protective gear should be done. 
  • Position the mother in a dorsal position for delivery.

NURSING CARE

  1. Care of the bladder: Encourage the mother to empty her bladder at the beginning of the second stage. A full bladder may delay the descent of the presenting part, and the bladder may be at risk of injury during the descent of the fetal head.
  2. Hygiene and comfort: Swab the vulva whenever necessary and provide a sterile pad to cover it between contractions. In case of leg cramps, massage, extend, and flex the leg to provide relief.
  3. Emotional support: Offer constant praise and keep the woman informed of her progress. Create a calm and quiet environment with privacy to reduce anxiety. Avoid unnecessary interruptions by other caregivers.
  4. Position: Consider using positions like squatting, kneeling, all fours, standing, left lateral position, or dorsal position during the second stage. These positions may improve the effectiveness of contractions and facilitate the process.
  5. Observations: Monitor the strength, length, and frequency of contractions. Observe the descent of the presenting part, fetal condition (e.g., fetal heart rate, color of amniotic fluid, molding, and state of membranes), and maternal condition (e.g., emotional coping ability, pulse every 30 minutes, and blood pressure hourly).

CONDUCTING 2ND STAGE ( ACTIVE MANAGEMENT)

Requirements

A trolley with;-

Top ShelfBottom ShelfBeside
Sterile delivery pack containing:Vial of lignocaineA warm cot and baby’s clothing
– 6 delivery swabsAmp of oxytocinResuscitation equipment
– 2 cord clampsMeasuring jarGum boots
– 1 pair of cord scissorsApron2 buckets (one for used gloves, swabs, etc., and one with disinfectant)
– 1 pair of episiotomy scissors2 pairs of sterile glovesHamper
– 2 gallipots for swabs and lotionEpisiotomy packDrip stand
– 2 receiversDisinfectant 
– Bulb syringe (mucus extractor)Syringe and needles 
– 2 syringesMackintosh and towel 
– Perineal padClean pads 
– Four delivery towelsSafety box 
– Cord ligatures  
– Sterile gloves  
– 4 delivery towels  
Responsibilities of Assistant During 2nd Stage
  1. Reassure the mother: Provide constant reassurance and emotional support to the mother throughout the second stage of labor to help her remain calm and focused.

  2. Position the mother: Assist the mother in assuming the most comfortable and effective position for delivery, whether it’s dorsal, squatting, kneeling, all fours, standing, or left lateral position.

  3. Instruct mother when to push: Guide the mother and provide clear instructions on when to push during contractions to facilitate the descent and delivery of the baby.

  4. Listen to fetal heart: Monitor the fetal heart rate regularly, especially after each contraction, to assess the well-being of the baby during the delivery process.

  5. Give oxytocin after delivery: Administer oxytocin to the mother within one minute after the baby’s delivery to help prevent excessive bleeding and facilitate uterine contractions.

  6. Show the sex of the baby: After delivery, if requested, reveal the sex of the baby to the mother and her partner, respecting their preferences and cultural beliefs.

  7. Score the baby: Perform the Apgar scoring at 1 minute and 5 minutes after birth to assess the baby’s overall health and well-being.

  8. Ensure baby care: After delivery, ensure the baby is promptly dried, kept warm, and placed on the mother’s breast for skin-to-skin contact and initiating breastfeeding.

birth-positions-pictures LABOUR

Procedure:

  1. Explain the Procedure to the Mother: Communicate the entire delivery process to the mother, ensuring she understands what will happen during the second stage of labor. Address any questions or concerns she may have.

  2. Put on Gum Boots, Gown, and Mask: Prior to conducting the delivery, don gum boots, wear a sterile gown, and put on a mask to maintain a hygienic environment and prevent the spread of infections.

  3. Position the Mother: Assist the mother in assuming a comfortable position for delivery, such as dorsal, squatting, kneeling, all fours, standing, or left lateral position, depending on her preference and the progress of labor.

  4. Scrub Hands before Conducting Delivery: Thoroughly scrub and clean your hands with soap and water to ensure they are free from any potential contaminants.

  5. Put on Two Pairs of Sterile Gloves: Wear two pairs of sterile gloves to maintain a sterile field during the delivery process.

  6. Swab the Perineum and Drape with Sterile Towels: Prepare the perineal area by swabbing it with an antiseptic solution to maintain cleanliness. Then, drape the delivery area and perineum with sterile towels to create a sterile field.

  7. Place a Sterile Pad on the Anus: To prevent contamination from fecal matter, place a sterile pad over the anus, ensuring the delivery field remains clean and sterile.

  8. Confirm 2nd Stage of Labor: Before proceeding, confirm that the mother has entered the second stage of labor, with full dilatation of the cervix and the presenting part of the baby ready for delivery.

Delivery of the Head:
  1. As the fetal head descends at the vulva, keep it flexed by applying pressure with two fingers of the left hand on the vertex, pointing towards the anterior fontanel.
  2. Use the right hand to place a small rectal pad to control fecal matter and maintain the sterile delivery field.
  3. Monitor the descent of the head with your fingers to prevent expulsive crowning and potential perineal laceration.
  4. The head should advance with each contraction. At crowning, ask the mother to stop pushing and pant to maintain pressure on the head and control the birth.
  5. Deliver the head slowly by extending it, bringing the occiput towards the symphysis pubis. Wipe the baby’s face, swab the eyes inside outwards, and clear the airway as soon as the head is born.
  6. During the resting phase, check for the umbilical cord around the baby’s neck. If it’s loose, slip it over. If tight, clamp it with two artery cord clamps and cut between them.
  7. Hold gauze over the incised area to reduce the risk of being sprayed with blood during the procedure.
Delivery of the Shoulders:
  1. Ensure restitution and external rotation of the head to safely deliver the shoulders and avoid perineal lacerations.
  2. External rotation of the head indicates that the shoulders are rotating into the anterior-posterior diameter of the pelvic outlet, ready to be delivered.
  3. Deliver one shoulder at a time to prevent overstretching of the perineum.
  4. Place a hand on each side of the baby’s head over the ears and deliver the anterior shoulder with a downward movement and the posterior shoulder with an upward movement, sweeping the perineum.
  5. Deliver the rest of the body towards the mother’s breast.
  6. Note the time of delivery and perform the Apgar score at 1 minute. Congratulate the mother and palpate the abdomen to rule out a second baby.

Immediate Care of the Newborn After Birth (Within the First Hour):

  1. Clamp and cut the cord.
  2. Clear secretions from the baby’s mouth and nostrils.
  3. Tightly ligature the cord.
  4. Warm the newborn and wrap it in a sterile warm towel.
  5. Place the baby on the mother’s breast if in good condition and not contraindicated.
  6. Perform the Apgar score at 5 minutes.
  7. Show the baby’s face and sex to the mother.
  8. Provide warmth to the mother.
  9. Put an identification tag on the baby with the mother’s name, time of delivery, sex, birth weight, and date of delivery.
  10. Note that the baby should have a strong and lusty cry, which helps the lungs expand.

Points to Consider While Conducting Delivery:

  1. Ensure all necessary equipment, including newborn resuscitation equipment, is available and the delivery area is clean and warm.
  2. Make sure the mother’s bladder is empty before delivery.
  3. Assist the woman in assuming a comfortable position of her choice.
  4. Stay with the mother and provide emotional and physical support throughout the process.
  5. Allow the mother to push as she wishes and avoid urging her to push.
  6. Decontaminate the delivery trolley and set up sterile equipment.
  7. Prepare the delivery environment, decontaminate the bed, and ensure adequate lighting.
  8. Put on protective gear such as a plastic apron and gum boots.
  9. Wear sterile gloves for the delivery procedure.
  10. Ensure controlled delivery of the baby’s head to prevent complications.

Factors Influencing the Length of the 2nd Stage of Labour:

  1. Maternal parity (number of previous pregnancies).
  2. Fetal size.
  3. Uterine contractile force and strength of contractions.
  4. Presentation of the baby (e.g., vertex or breech).
  5. Position of the baby during delivery (e.g., occipitoanterior or occipitoposterior).
  6. Size and shape of the maternal pelvis.
  7. Method of anesthesia used during labour, if any.
  8. The magnitude of maternal expulsive force.

Possible Complications of 2nd Stage of Labour:

  1. Deep transverse arrest (failure of the baby’s head to rotate and descend properly).
  2. Obstetrical shock (resulting from severe bleeding or other complications).
  3. Uterine inertia (weak or ineffective uterine contractions).
  4. Maternal distress (emotional or physical strain during labour).
  5. Shoulder dystocia (difficulty delivering the baby’s shoulders after the head is born).
  6. 3rd-degree tear (severe tear involving the perineum and anal sphincter).
  7. Amniotic embolism (rare but serious condition where amniotic fluid enters the mother’s bloodstream).
  8. Ruptured uterus (tearing of the uterine wall during labour).
  9. Fetal distress (abnormalities in the baby’s heart rate or well-being).

Normal second stage of labour Read More »

DOMICILIARY CARE

DOMICILIARY CARE

Domiciliary care is an obstetric care given to a mother in her home during pregnancy, labour and puerperium.

Types of Domiciliary Care

  1.  Type one domiciliary midwifery care “continuity:; In this type the woman is cared for in her home all through during antenatal period delivery and postnatal care. The woman will only visit a health unit or hospital only when there is a problem that requires specialized care or more gadgets to be used. This care is known as continuity of care or fragmented care. In this case one midwife provides all the care to the woman.
  2.  Type two, community, integrated or centralized care; In this care service is integrated (mixed) in a way that part of the care may be given at home and some in the health setting like a hospital. Usually antenatal or delivery may be offered in the hospital and puerperium period managed at home. This is the type of care that student midwives and nurses offer as part of their midwifery part two and is compulsory for them.
  3.  Employee or independent practitioner in domiciliary; This is a type of care in which a midwife practices as a private midwife in the community but not necessarily on one woman. The midwife may have a maternity Centre for all or part of the care or she may combine it with one to one community midwifery care. This is the commonest type of domiciliary care in Uganda.

Forms of Domiciliary Care
Characteristics of patterns of domiciliary care depend on a number of factors and these can be:

  • Decision of the midwife
  • Decision of the woman / family
  •  Location and nature of community
  •  Availability of basic requirements for domiciliary care

Objectives of Domiciliary Care.

  1.  Domiciliary midwifery care  to take midwifery near to the community thus increasing accessibility to services

  2.  To encourage full participation and involvement of male partners and family members in the birth process so as to get their full support

  3.  To reduce on maternal / infant morbidity and mortality as the midwife has less workload and concentrates on one woman.

  4.  To reduce on hospital/health facility over crowding

  5.  To promote midwife-mother relationship and mutual understanding between the woman and the midwife.

Domiciliary Care given by midwives
  1.  Care before conception
    >   Health education to young girls on good nutrition and hygiene
    >   Teaching young girls about life skills
    >    Immunization of young girls with tetanus toxoid
    >    Counselling adolescents on reproductive health and other social issues
  2.  Care during pregnancy
    >   Immunization
    >   Antenatal check ups
    >   Treatment of minor problems.    >   Health education on problems in pregnancy
  3. Care during labour
    >   Care of mother in Labour
    >   Use of partograph to monitor labour
    >   Delivering of the baby
    >   Infection prevention
  4. Care after delivery
    >   Immunization
    >   Care of mother and baby
    >   Postnatal exercises
    >   Family planning

Advantages of Domiciliary Services.

  • Domiciliary services promotes midwife – mother relationships and thus minimizing fears and phobias of childbirth
  • It promotes continuity of care and close supervision of the mother thus – contributing to the reduction of maternal / infant morbidity and mortality
  •  Increases access to health services as the woman is found in her home instead of herself looking for the services
  •  Domiciliary is cost effective to a certain level as only relevant care will be given to individual women and at the same time the woman will continue her responsibilities especially supervision of the home
  •  It gives peace of mind to the mother, husband children and other house members because the woman remains at home
  •  It promotes woman centered care including choice control over services rendered and also encourages continuity of care.
  •  It promotes privacy and security and respect the mother with less interference and exposure
  • Promotes good communication and openness. Only relevant information is given to the mother and her family. As the midwife knows the woman personally, she understands better their concerns, lives, and challenges and assists them accordingly.
  •  Promotes autonomy to the midwife and there is job satisfaction
  •  It promotes creativity, problem solving skills and maturity in service with good experience.
 

Brief History of Domiciliary Care

 Throughout the ages, women have depended upon a skilled person, usually another woman to be with them during child birth
 In United Kingdom, the midwives skills are increasingly valued and midwives are being urged to expand their role even further in the field of public health.

  • In Uganda in 1960’s(May 1968), this is when the midwife would look after the mother in the home environment.  Midwives would do antenatal care, deliver mothers in their own homes and continue to give post natal care in the mother’s home.
     >    This would also give opportunity for the midwife to give health education to the other family members.
    >     In the 1970s when the political system in Uganda changed, leading to a lot of insecurity, the midwives stopped delivering mothers at home  and instead delivered mothers in hospitals and maternity units. Then the midwives continued to nurse the mothers and their babies at the mother’s home.
     > These services have continued today and are being practiced by Private Midwives and the student midwives who are undertaking Registered Midwifery Course of Diploma in Midwifery Course.
Types/ Groups of mothers Needing Domiciliary care
  • Group 1: Women with less risk of getting complications
    Women who have ever delivered one baby but have not exceeded five – that is gravid two to four.
    This group of women if they did not experience any major complication in pregnancy labour and puerperium, can be care for in the community throughout, pregnancy labour and puerperium
  • Group 2: These are the women who are suspected of developing a complication, though they may not develop them at all. For examples: primigravida – pregnant for the first time,
    Grand multi para – has delivered more than four times, short women- less than 152cm high, women with previous complications that are likely to occur again e.g. cord prolapsed.
    This group of women may be cared for only for antenatal or delivery and puerperium depending on other factors as detected on history and assessment.
  • Group 3: These are the high Risk Mothers, women who come with obvious complications, or are highly suspected of developing various complications. Examples: Multiple pregnancy – those with medical conditions like cardiac diseases, diabetes mellitus, sickle cell disease.

Common Drugs used in Domiciliary 

  •  Ergometrine
  •  Ferrous sulphate
  •  Folic acid
  •  Panadol
  •  Chloroquine

How Domiciliary is carried out.

  •  Booking

A mother who has to be booked must be with the following
>  Must be normal with no risk factors like CPD,
>  Grande multi parity, multiple pregnancy

  •  Home delivery

The following must be put in consideration
(a).   Well ventilated home without without overcrowding
(b).   Clean house, good hygiene in and around the house
(c).   The house should have more than 4 bedrooms, toilets
and kitchen
(d).   The floor must be cemented
(e).   There must be tap water
(f).   There must be easy means of boiling water

  •  Enough equipment especially for the mother and baby(bathing)
  •  Husband and wife should be willing for the care
  •  The distance from the home to hospital should be less than 2 miles.
QUALITIES OF A MIDWIFE

In normal circumstances the midwife should be a qualified senior student midwife with enough knowledge
(a)  She must create a friendly relationship between her, the mother and family
(b)   She must remember that she does not belong to the family and is only a guest so she must adopt her behavior in relation to the family routine
(c)   No commands or orders should be given but advices, the midwife should be flexible
(d)   She should show interest in the family
(e)   Avoid embarrassing the mother in the family

(f)   She has to apply her professional code of conduct and stay in the home only as a midwife
(g)   Quick and correct judgment has to be applied in providing the best care expected


DOMICILIARY BAGS

The midwife must be equipped with the following

  •  Sphyginomanometer
  •  Stethoscope
  •  Urine testing strips
  •  Clinical thermometer
  •  Spirit for baby’s cord
  •  Swabs in the gallipot and cord ligatures
  •  Receivers, dissecting forceps, artery forceps, scissors
  •  Antiseptic lotion
  •  Plastic apron and tape measure
  •  Drugs like Panadol, and iron tablets


Care

Here in Uganda a mother is delivered in the hospital then cared for in her home for seven day including the 1st days in the hospital

ANTENATAL CARE
Normally a mother is booked on her 1st visit at 12wks.It should be during this time when the midwife inspect the home of the mother until the mother is delivered in the hospital and cared for the first 2 days and  then 5 days at home

PUEPERIUM
During puerperium the midwife continues to visit the mother daily at her home. If there is any indication of complication arising of the mother requires extra supervision and support additional visits will be made
The midwife observes the mother’s general condition both mentally and physically, ask her how she is feeling. Inquire about the baby particularly feeding, sleeping, passage of urine and stool.

If the mother appears stressed, depressed, or anxious about the baby or any other problem. The midwife should sit, listens and responds. The time spent listening and discussing problems with the mother invariably of great value to her wellbeing
The midwife inquires whether the mother is sleeping and eating well passing urine without difficult or discomfort and has had a bowel action.
She take the mothers vitals and carries out a full postnatal examination of the breast, abdomen to palpate the uterus, vulva to inspect lochia and perineum.

Any abnormality detected should be discussed with the mother and appropriate advice is given. Postnatal exercises are taught on the first day after delivery and the mother is encouraged to practice them dairy throughout puerperium
On the first postnatal visit the midwife usually assists the mother to bath there after the mother should have a bath on her own should be twice or more daily, mother should be advised to change her pads frequently.

Adequate rest and sleep are essential and though ambulating is good but the mother should rest and sleep at appropriate time each day.
The mid wife performs a daily examination on the baby and shows the mother how to bath and dress the baby and attend to the cord.


  • > She observes its general condition,  examine him from head to toe observing the skin, eyes, mouth and cord for any signs of infection or any abnormality.
  • > Stool should be observed and the passage of urine.
  • > Baby should be observed whether breastfeeding well
  • > At the last visit, the mid wife advises the mother when to go back to postnatal clinic and the baby to health clinic.
  • > Health educate and demonstrates to the mother the postnatal exercises. 

DOMICILIARY CARE Read More »

PARTOGRAPH

PARTOGRAPH

Partograph is a graph or tool used to monitor fetal condition, maternal condition and labour progress during the active 1st stage of labour so as to be able to detect any abnormalities and be able to take action.
It’s only used during 1st stage of labour. It is used for recording salient conditions of the mother and the fetus.

USES OF A PARTOGRAPH

  1. To detect labour that is not progressing normally.
  2. To indicate when augmentation of labour is appropriate.
  3. To recognize CPD when obstruction occurs.
  4. It increases the quality of all observations on the mother and fetus in labour.
  5. It serves as an “early warning system”
  6. It assists on early decision of transfer and augmentation.

Who should not use a partograph?

  • Women with problems which are identified before labour starts or during labour which needs special attention.
  • Women not anticipating vaginal delivery (elective C/S).

Parts of a Partograph

A partograph has 3 parts i.e. –

  • Fetal part
  • Maternal part
  • Labour progress part

Observations charted on a partograph:

  1. The progress of labour
    >  Cervical dilatation 4 hourly
    >  Descent 2 hourly
    >  Uterine contractions
  2. Fetal condition
    >  Fetal heart rate ½ hourly
    >  Membranes and liquor 4 hourly
    >  Moulding of the fetal skull 4 hourly.
  3.  Maternal condition
    >  Pulse ½ hourly
    >  Blood Pressure 2 hourly
    >Respiration and >  temperature 4 hourly
    Urine; – volume 2 hourly, acetone, proteins and sugars.
    >  Drugs
    >  I.V fluids 2 hourly and Oxytocin regimen.
Starting a partograph:
  • The partograph should be started only when a woman is in active phase of labour.
  • Contractions must be 1 or more in 10 minutes.
  • Cervical dilatation should be 4cm or more.
FETAL CONDITION
  1. Fetal heart;
    It is taken 1/2 hourly unless there is need to check frequently i.e. if abnormal every 15 minutes and if it remains abnormal over 3 observations, take action. The normal fetal heart rate is 120-160b/m. below 120b/m or above 160b/m indicates fetal distress.
  2. Molding;
    This is felt on VE. It is charted according to grades.
    State of moulding                                         Record
    Absence of moulding.                                     (-)
    Bones are separate and sutures felt   (0)
    Bones are just touching each other   (+)
    Bone are over lapping but can be Separated (++)
    Bones are over lapping but cannot be separated (+++)
  3. Liquor amnii;
    This is observed when membranes are raptured artificially or spontaneously.
    It has different colour with different meaning and meconium stained liquor has grades.
    State of liquor Record
    Clear (normal)     (C)
    Light green in colour (m+)       Moderate green, more slippery       (m++)      Thick green, meconium stained   (m+++)       Blood stained    (B)
  4. Membranes;State of membranes  Record
  • Membranes intact    (I)
  • Membranes raptured   (R)
LABOUR PROGRESS

5. Cervical dilatation,
The dilatation of the cervix is plotted with an “X”. Vaginal examination is done at admission and once in 4 hours. Usually we start recording on a partograph at 4cm.
Alert line starts at 4cm of cervical dilation to a point of expected full dilatation at a rate of 1cm per hour
Action line– parallel and at 4 hours to the right of the alert line.

6. Descent of presenting part.
Descent is assessed by abdominal palpation. It is measured in terms of fifths above the brim.
The width of five fingers is a guide to the expression in the fifth of the head above the brim.
A head that is ballotable above the brim will accommodate the full width of five fingers.
As the head descends, the portion of the head remaining above the brim will be represented by fewer fingers.
It is generally accepted that the head is engaged when the portion of the head above the brim is represented by 2 or less fingers.
Descent is plotted with an “O” on the graph

7. Uterine contractions This is done ½ hourly for every 30 minutes. The duration, frequency and strength of contraction is observed. Observe the contractions within 10 minutes.

-Mild contractions last for less than 20 seconds.
-Moderate contractions last for 20-40 seconds.
-Strong contractions last for 40 seconds and above.
When plotting and shedding contractions use the following symbols.
Dots for mild contractions
Diagonal lines for moderate contractions
Shade for strong contractions

MATERNAL CONDITION
  1. Pulse; this is checked every 30 minutes. The normal pulse is 70-90b/min.
    The raised pulse may indicate maternal distress, infection especially if she had rapture of membranes for 8-12 hours and in case of low pulse, it can be due to collapse of the mother.
  2. Blood pressure; it is taken 2 hourly. The normal is 90/60-140/90mmHg. Any raise of 30mmHG systolic and 20mmhg diastolic from what is regarded as normal or if repeated over 3 times and remains high, test urine for albumen to rule out pre-eclampsia.
  3. Temperature; this is taken 4 hourly. The normal range is between 37.2 0 c to 37.5 0 c. Any raise in temperature may be due to infections, dehydration as a sign of maternal distress or if a mother had early rapture of membranes.
  4. Urine; the mother should pass urine atleast every after 2 hours and urine should be tested on admission.
  5. Fluids; she should be encouraged to take atleast 250-300 mls every 30 minutes. Any type of fluid can be given hot or cold except alcohol. The fluid should be sweetened in order to give her
    strength.
Further management in the normal 1st stage of labour
 Nursing care
  1. Emotional support:

Midwife should rub the mothers backto relieve pain.
Allow the mother to move around or sit in bed if membranes are still intact.
Re-assure the mother and keep her informed about the progress of labour to relieve anxiety.
Allow her to talk to relatives and husband.
Allow her to read or do knitting.

2. Nutrition;
Encourage mother to take light and easily digested food like bread, soup and sweet tea to rehydrate her and provide energy.

3. Elimination;
Taking care of the bladder and bowel. Encourage mother to empty bladder every 2 hours during labour. Every specimen is measured and tested for acetone, albumen, sugars and findings interpreted and recorded.
Pass catheter if mother is unable to pass urine.

4. Personal hygiene;
Allow mother to go for bath in early labour or on admission if condition allows. If membranes rapture, give a clean pad and ask mother to change frequently to prevent infections.
VE should be done only after aseptic technique.


5. Ambulation and position:
In early labour, mother is encouraged to walk around to aid descent of presenting part.
During contractions, ask mother to lean forward supporting herself on a chair or bed to reduce discomfort.
Allow mother to adopt a position of her choice except supine position.
Mother should be confined to bed when membranes rapture in advanced stage of labour.


6. Prevention of infections
Strict aseptic technique should be maintained when doing a VE and vulval swabbing.
When membranes rapture early, vulval toileting should be done 4 hourly to reduce the risk of infections. Put mother on antibiotics to avoid risk of ascending infections in early raptured of membranes.
Frequent sponging is done, bed linen changed when necessary when a mother is confined in bed.
The midwife should pay attention to her own hygiene and be careful to wash her hands before and after attending to the mother.


7. Sleep and rest
Mother is encouraged to rest when there is no contraction (rest in between contractions).

What to report
  • Abnormality found in urine.
  • Failure to pass urine.
  • Rise in temperature, pulse and BP.
  • Hypertonic uterine contractions.
  • Rapture of membranes with meconium stained liquor grade 2 and 3.
  • Failure of presenting part to descend despite good uterine contractions.
  • Tenderness of abdomen.
  • Bleeding per vagina.
  • Fall in BP.
  • Raise in fetal heart rate.
Complications
  • Infections
  • Early rapture of membranes
  • Cord prolapse
  • Supine hypotensive syndrome
  • Fetal distress
  • Maternal distress
  • APH
  • PET and eclampsia
  • Prolonged labour
  • Obstructed labour

PARTOGRAPH Read More »

Get Pen and a Paper and write,

No copy and Paste Allowed!