
Episiotomy and Perineal Tears
1. Indications for an Episiotomy
A midwife does not cut the perineum for every delivery. It is only done for specific medical reasons. These reasons are divided into three main categories:
A. To Quicken the Delivery (Speed up childbirth)
In certain emergencies, the baby must be born as fast as possible:
- 1. Pre-eclampsia and Eclampsia: Dangerous conditions involving very high blood pressure where the mother could get a stroke or seizures.
- 2. Cardiac (Heart) Diseases: Pushing for a long time puts too much dangerous strain on a mother with a weak heart.
- 3. Maternal Distress: When the mother is extremely exhausted, weak, and physically cannot continue pushing anymore.
- 4. Fetal Distress: When the baby is lacking oxygen (shown by a dropping heart rate) and needs to be born immediately to prevent the baby from dying.
- 5. Cord Prolapse in the Second Stage: When the umbilical cord falls out before the baby. If the baby is still alive, a quick cut is made to deliver the baby before the cord is completely crushed.
B. To Prevent Excessive Trauma (Severe Tearing)
Sometimes the mother's tissues are at risk of tearing apart violently:
- 1. Rigid Perineum: When the mother's tissues are very stiff, tight, and refuse to stretch easily (common in older first-time mothers).
- 2. Forceps Delivery: When the doctor needs extra room to insert metal forceps to help pull the baby out safely.
- 3. Face to Pubis Delivery: When the baby comes out facing upwards (Occipito-Posterior position). The baby's head takes up much more space in this position.
C. To Reduce the Risk of Cerebral (Brain) Damage to the Baby
- 1. Premature Births: A premature baby has a very soft, fragile skull. Pushing hard against a tight vagina can cause bleeding inside the baby's brain.
- 2. Postmaturity (Overdue Baby): The baby’s skull bones have become very hard and do not fold or mold easily to fit through the birth canal.
- 3. Breech Deliveries: In a breech birth, after the body is out, the head (which is the biggest part) comes last. The cut ensures the head comes out fast without getting trapped.
- 4. Narrow Subpubic Arch: When the mother's front pelvic bones are too narrow, it forces the baby’s head backward toward the anus, causing dangerous pressure.
- 5. Previous Third-Degree Tears: If the mother had a severe tear into her anus in a past pregnancy, an episiotomy protects that old, weak scar from tearing open again.
2. Types of Episiotomy
- 1. Medial Lateral (Mediolateral):
This is the most common and highly recommended type, especially for midwives. The cut starts from the bottom center of the vaginal opening (the fourchette) and extends diagonally downward and outward (medial lateral direction) for about 2-3cm.
Advantages:
- 1. It usually heals very well.
- 2. It is much easier for a midwife to perform and repair.
- 3. It minimizes damage to large blood vessels.
- 4. It strongly reduces the risk of the cut extending into an excessive perineal tear.
- 5. It shortens the total duration of the second stage of labor.
- 6. It helps avoid serious injuries to the Bartholin’s glands (lubrication glands) and the anal sphincter muscle.
- 2. Medial, Central, or Midline:
This cut begins directly at the center of the fourchette and goes straight down the middle toward the anus.
Advantages:
- 1. Results in much less bleeding.
- 2. Provides greater comfort and less pain for the mother afterward.
- 3. Very simple to perform and easy to stitch back up.
Disadvantages:
- 1. It may accidentally tear further downwards and involve the anal sphincter.
- 2. A poor repair could lead to a Rectovaginal Fistula (RVF)—a hole where feces can leak into the vagina.
- 3. Lateral Incision:
This cut is made completely sideways across the outer lips (labia majora). It is rarely done today.
Disadvantages:
- 1. It is very challenging and difficult to repair.
- 2. It may lead to severe, excessive bleeding.
- 3. High risk of permanently damaging the Bartholin’s glands.
- 4. Causes extreme discomfort to the mother and takes much longer to heal.
- 4. J-shaped:
This is usually performed only by a doctor. It starts from the center of the fourchette and goes straight down, but then curves away from the anal sphincter at a distance of about 2.5cm, forming a "J" shape.
- 5. Bilateral:
This is similar to the lateral incision but is done on both the left and right sides. It starts from the fourchette to the lateral walls.
Note: Bilateral episiotomy is strongly discouraged because it carries a massive potential risk of destroying both Bartholin’s glands.
3. Precautions When Giving an Episiotomy
- Timing: Avoid making the cut too early (causes heavy bleeding) or too late (the tissues will have already torn naturally).
- Presentation: In a normal head-first (cephalic) presentation, wait until the baby's head is visibly stretching the perineum. In a breech presentation, wait until the anterior (front) shoulder is stretching the perineum before cutting.
- Contraction Height: You must only make the cut exactly during a strong contraction. This ensures the tissues are tight, providing better control, precision, and less pain for the mother.
4. Basic Principles of Perineal Repair
Basic Principles Prior to (Before) Repairing the Perineum
- 1. Timely Repair: Perform the stitching as soon as possible after the placenta is out. This minimizes the risk of heavy bleeding and prevents the area from swelling up (perineal edema).
- 2. Aseptic Technique: Ensure the entire repair is done using proper, clean, sterile methods to highly reduce the risk of dangerous infections.
- 3. Equipment Check: Verify that all necessary equipment is ready. You must strictly count your swabs, gauze, and needles before and after the procedure to avoid accidentally leaving any foreign objects inside the mother's body.
- 4. Anesthesia: Make sure the wound is fully numb (anesthetized) before starting the repair so the mother does not feel sharp pain.
Basic Principles After the Repair is Completed
- 1. Hemostasis: Ensure complete hemostasis (meaning all bleeding has completely stopped) to prevent blood loss.
- 2. Post-repair Examination: You must gently perform a rectal and vaginal examination with your fingers to confirm the repair is good, ensure no other hidden tears were missed, and verify that you did not accidentally stitch the rectal mucosa to the vagina.
- 3. Removal of Swabs: Double-check and look inside to ensure that all tampons or swabs used to block blood during the procedure have been completely removed.
- 4. Detailed Documentation: Make clear, detailed notes in the mother's file describing your findings, the size of the tear, and the exact repair procedure for accurate medical records.
- 5. Post-repair Care: Inform the woman about how to take pain relief (analgesia), how to wash the area properly (hygiene practices), the importance of maintaining a good diet, and performing pelvic floor exercises to help the muscles recover fast.
5. Method of Infiltration and Performing the Episiotomy
Requirements (Equipment Needed)
A sterile episiotomy pack containing exactly the following:
- 1. Pair of episiotomy scissors.
- 2. Needle and suture material (like catgut).
- 3. Needle holder.
- 4. Sterile gauze and cotton swabs.
- 5. Sterile gloves.
- 6. A syringe.
- 7. Lignocaine (local anesthesia).
- 8. Hibicet (antiseptic cleaning solution).
Method of Infiltration and Cutting (Step-by-Step)
- Step 1: Ensure the entire procedure is performed under strict sterile conditions.
- Step 2: Explain the procedure to the mother to keep her informed, calm, and cooperative.
- Step 3: Draw the required amount of Lignocaine or local anesthesia into the syringe (usually 10mls of 0.5% Lignocaine, or 5-7mls of 1% Lignocaine).
- Step 4: Clean (swab) the vulva with antiseptic to maintain cleanliness.
- Step 5: Wait for a contraction. When the baby's head or presenting part is pushing hard and distending the vulva, place two fingers of your left hand firmly between the fetal head and the mother's perineum. This ensures you do not accidentally inject medicine into the baby's scalp.
- Step 6: Introduce the needle into the perineum. Pull back on the syringe (withdraw the piston) to check for any blood aspiration. If blood enters the syringe, it means you are in a vein. Reposition the needle and repeat until no blood is withdrawn. Then inject the medicine.
- Step 7: Keep your two fingers inside the vagina. Position your scissors, and at the absolute peak of the next contraction, make a single clean cut approximately 3cm in length in a medial-lateral direction.
- Step 8: Immediately control the hemorrhage (bleeding) by pressing a sterile swab firmly on the cut area.
6. The Repair Technique (Step-by-Step)
This is the exact sequence of actions a midwife takes to stitch the wound back together. Do not skip any of these steps:
- Step 1: Ensure the proper setting before you start:
- a. Place the mother in a comfortable position.
- b. Remove any dirty or soiled linen from under her genitalia.
- c. Adjust your light source so you have a very clear, bright view deep inside the vagina.
- d. Communicate with the mother, explain the repair procedure, and provide reassurance.
- Step 2: Put on a fresh, clean pair of sterile gloves.
- Step 3: Check whether the previously administered local anesthesia is still effective. If the mother feels sharp pain when you touch the wound, administer more anesthesia before starting the repair.
- Step 4: Carefully remove all blood clots from the birth canal.
- Step 5: Open the vagina to assess the true extent of the damage. Locate the very top end of the cut inside the vagina, which is called the apex of the episiotomy.
- Step 6: Insert a roll of sterile gauze (vaginal pack) deep inside to stop blood from dripping down over your work area. Secure the end of this pack with an artery forceps so it is not lost inside.
- Step 7: Start suturing (stitching) the episiotomy directly from the apex.
- Step 8: Suture the vaginal inner lining (vaginal mucosa) using the continuous stitch technique. Pass the needle through the vaginal mucosa from behind and bring it out on the perineum wound.
- Step 9: Continue using the continuous suturing method all the way down to the bottom of the wound to close the deep, thick muscle layer. The same continuous technique can be used to close the outside skin nicely.
- Step 10: Remove the vaginal pack. Inspect the vagina carefully, and insert one finger into the rectum to ensure perfect closure and to exclude any accidental involvement of the rectum.
- Step 11: Clean the mother gently with warm water after completing the repair.
- Step 12: Provide a clean sanitary pad for the mother’s comfort and hygiene.
- Step 13: Advise the mother on how to properly care for the episiotomy at home and provide all necessary instructions.
- Step 14: Clear away all your tools and properly dispose of all used and bloody materials in the correct bins.
⏳ Healing Time
The healing time for an episiotomy is around 4 to 6 weeks. This depends largely on the size of the incision and the type of suture material (thread) used to close the wound.
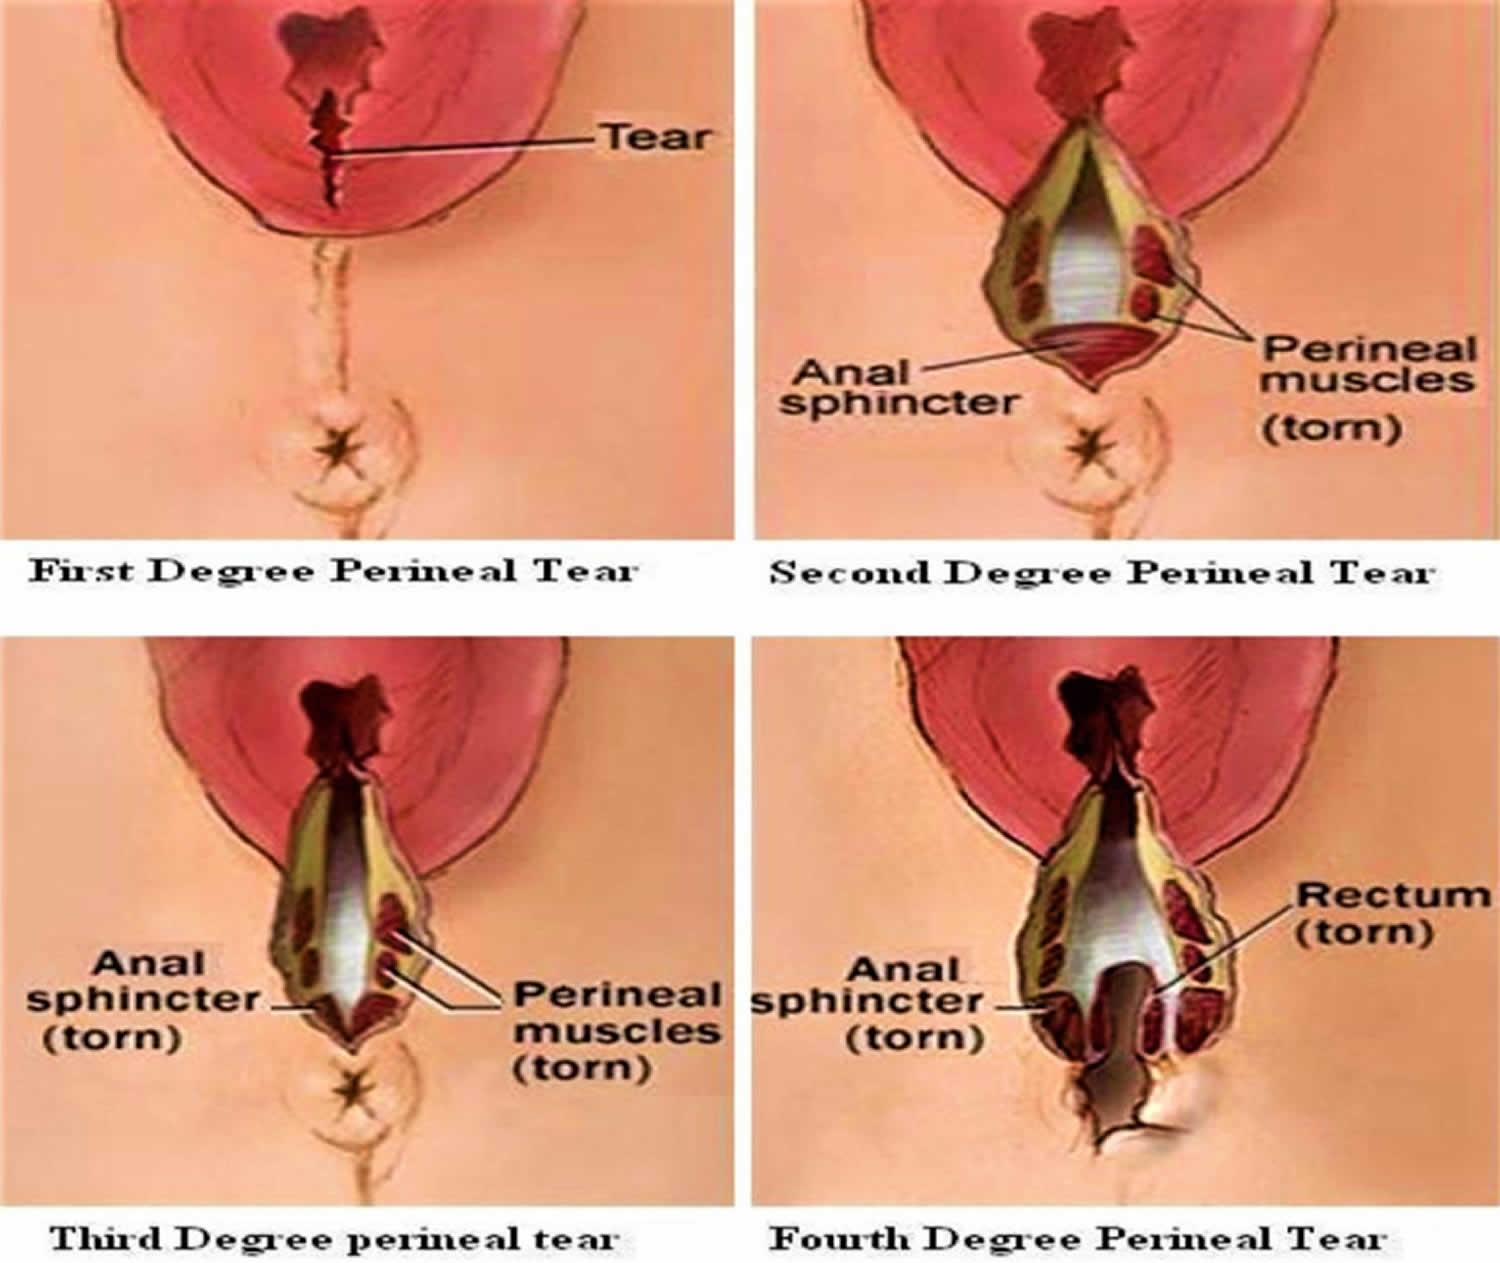
7. Classification of Perineal Trauma (Tears)
When the perineum tears naturally during birth, the damage is classified into different degrees of severity.
| Classification | Clinical Description |
|---|---|
| First Degree Tear | A very mild injury to the perineal skin only. The muscles underneath are perfectly safe. |
| Second Degree Tear | A deeper injury to the perineum that involves the perineal muscles, but it completely stops before hitting the anal sphincter. |
| Third Degree Tear | A severe injury to the perineum that goes deep enough to involve and tear the anal sphincter (the circular muscle that controls the anus). |
| Fourth Degree Tear | The most severe and dangerous injury. It involves the total destruction of the perineum, the anal sphincter complex, and tears completely into the inner lining of the rectum (anal epithelium). |
| Isolated Buttonhole Injury | A rare injury where there is a direct hole punched into the rectal mucosa (the wall of the rectum), but the anal sphincter muscles at the bottom remain intact without injury. |
Complications of Perineal Trauma
If tears or cuts are not managed well, the mother can suffer the following problems:
- 1. May become a 3rd degree tear: A smaller cut can accidentally rip further into the anus if the baby comes out too fast.
- 2. Bleeding: Heavy, continuous bleeding (hemorrhage) from torn blood vessels.
- 3. Infections: The wound is very close to the anus, making it highly susceptible to bacterial infection and pus.
- 4. Swelling: Severe swelling and blood collecting under the skin, causing immense pain.
- 5. Defect in wound closure: The stitches may break or dissolve too early, causing the wound to open up again.
- 6. Local pain and sexual dysfunction: The mother may experience severe short-term pain, making sexual intercourse difficult or painful for a while.

I got the best understanding of episiotomy procedure ever
Thank you so much, this has been helpful to me and other colleagues
wonderful
👍👌
This should continue always