First Aid

dresssings

DRESSINGS

Addressing is any protective cover for the wound. It is usually a cotton material.

Uses of dressings

  1. It helps to control bleeding.
  2. To prevent infections.
  3. To absorb any discharge.
  4. Prevents further injury to the wound.

Points to note:

  • All dressings should be at least 2.5cm (inch) bigger than the wound. 
  • Dressings should, if possible be sterile so as not to put pathogenic micro-organisms onto the wound.
  • Dressings should be absorbent so that sweat does not make the skin around the wound to get moistened or to absorb any discharge. 
  • Dressings should be airative to allow fresh air to the wound.

TYPES OF DRESSINGS 

  1. Adhesive dressing (plasters): These are cloth materials which are embedded with gum or glue to assist in strapping onto the skin around the wound is dry and clean. Does not touch on to the wound with dirty hands after. Cleaning it or any part which is to be in direct contact with the wound.
  2. Sterile dressings: These are the best first aid dressing for large wounds. They are sealed in protective wrappers and should not be used if the wrapping has been torn or broken.

HOW TO USE STERILE DRESSINGS

  • Remove both the outer and inner wrapping.
  • Hold the folded dressing and its special bandage.
  • Hold the bandage with the dressing over the wound and open out the folded dressing. Make sure you do not touch the wound inside which goes to the wound then place it on the wound.  
  • Wind the short piece of bandage once round the limb and then bandage firmly but gently with a long piece like a normal roller bandage.

           3. Gauze dressings: these are used where you need a light covering e.g. gun shot. If there is no sterile dressing then you should use gauze dressing. It can be used together with pad of cotton wool. Secure it with a bandage or adhesive dressing. If there is no actual dressing available, then use any clean soft absorbent material which must be held  in place firmly.

GENERAL RULES OF APPLYING DRESSINGS.

  • If possible wash your hands thoroughly before applying dressing and thereafter.
  • If the wound is not too large and bleeding is under control, clean it and surrounding skin before applying dressing.
  • Avoid touching the wound or any part of the dressing which will be in contact with the wound. 
  • Never talk or cough over a wound or dressings.
  • If necessary cover non adhesive dressings with cotton wool pads and bandage to control bleeding and absorb discharge.
  • When cleaning the wound a swab soaked  in antiseptic or disinfectant should be used once.
  • If the dressing slips over a wound before you fix it in place, discard it and use a fresh one because the first one may have picked up germs from surrounding skin.
  • Always place dressings directly onto the wound. Never slide it from the side. 

BANDAGING

A bandaging is a piece of gauze or cloth material used for any of the purposes to support, hold or to immobilize any part of the body. Bandaging is a technique of application of specific roller bandages to different parts of the body.

PURPOSES OF BANDAGING 

  1. To control bleeding
  2. To immobilize sprained or fractured limbs.
  3. To secure splints incase of fractures.
  4. To protect open wounds from contaminants.
  5. To provide support and aid in case of varicose veins or impaired circulation.
  6. To reduce swelling.

TYPES OF BANDAGING

There are three types of bandages;

  1. Triangular bandages.
  2. Roller bandages.
  3. Tubular bandages.
  1. TRIANGULAR BANDAGES
  • They are made of cloth.
  • They are usually used as slings
  • They are used to secure dressings and immobilize injured limbs.
  • When open, they can be used as scalp bandages.

Triangular bandages can be modified into;

  • Broad fold bandage.
  • Narrow fold bandages are used to immobilize the feet and ankles.
  • They can also secure dressings on wounds (limbs)
  • ROLLER BANDAGES

They are made of cotton gauze or linen. These are secured by pins, clips, tapes or tying knots

USES

  • To secure dressing in position 
  • To apply pressure so as to control bleeding.
  • To give support to sprain and strains in order to reduce pain.

THERE ARE THREE TYPES OF ROLLER BANDAGES

  1. CREPE BANDAGES
  • These give firm support to injured joints.
  • They give firm support to dressings applied over a wound.
  • They provide good ventilation.

          2. OPEN WEAVE BANDAGES

  • They are used to hold light dressings in place 
  • They also allow ventilation because of their loose weave.

However they can not apply pressure on wounds or support to joints

         3. COMFORTING BANDAGE

  • These also secure dressings used to secure dressings on digits.
  • They provide support to joints of digits
  • Tubular bandage:

These bandages are rolls of seamless, tubular fabric. Elasticized bandages are used to support joints such as elbow or ankle. Tubular gauze bandage is used with a special applicator that is supplied with the bandage. It is suitable for holding dressings in a finger or toe, but not to control bleeding. 

Method 

    1. Cut a piece of tubular gauze about two-and-a-half times the length of the casualty’s injured finger. Push the all length of the tubular gauze on to the applicator, and then gently slide the applicator over the finger and dressing.
    2. Holding the end of the gauze on the finger, pull the applicator slightly beyond the finger tip, leaving a layer of gauze bandage on the finger. Twist the applicator twice to seal the bandage over the end of the finger.
    3. While still holding the gauze at the base of the finger, gently push the applicator back over the finger to apply a second layer of gauze. Once the gauze has been applied, remove the applicator from the finger.
    4. Secure the gauze at the base of the finger with adhesive tape that does not encircle the finger. Check the circulation to the finger then again every ten minutes. Ask the casualty if the finger feels cold or tingly. If necessary, remove the gauze and apply it more loosely.                                           

   CHARACTERISTICS OF AN IDEAL BANDAGE

  1. It should be elastic (but not too elastic).
  2. It should be well perforated to ensure adequate ventilation of the wound.
  3. It should be cotton made for easy absorption. 
  4. It should be long enough to enable adequate support of the dressing or immobilization of the limbs.
  5. It should be non – adhesive in nature.

NOTE: Bandages are not for application on a wound but for application over a dressing on a wound.

GENERAL PRINCIPLES OF BANDAGING

  1. Use a tightly rolled bandage of suitable with and maintain one.
  2. Face the patient when bandaging an arm or leg except when bandaging the head.
  3. Hold the head of the bandage upper most
  4. Hold the bandage in the right hand when bandaging the left limb and vice versa.
  5. Bandage the limb from inside out wards and from bellow upwards keeping the even through out
  6. Begin the bandage with a secure turn and allow each turn to cover 2/3 of the proceeding one.
  7. Ensure that the bandage is neither too tight nor to lose.
  8. Finish off the bandage with a straight turn, fold in the end and secure a voiding joints and the site of injury.
  9. Fasten with safety pins or with the fasters provided with some bandages.
  10. A tape is always used in mentally handicapped or pediatric patients instead of pins or other sharp appliances.

GENERAL RULES OF BANDAGING

Before applying a bandage

  1. a) Keep reassuring and explain the procedure to the patient or casualty.
  2. b) Make the patient comfortably for example by lying or sitting him on the floor and the position should be convenient for the nurse or first aider.
  3. c) Keep the injured part well supported and elevated if necessary.

When applying a bandage

  1. a) Always stand in front of the casualty while bandaging except in scalp or head bandaging.
  2. b) If the casualty is lying down, pass bandages under the body’s natural hollows. For example the ankles, knees, neck etc.
  3. c)  Apply bandages firmly enough to control any bleeding and hold dressings in place but not so tightly as to impair blood circulation.
  4. d) Leave fingers and toes on a bandage limb exposed to check for circulation 
  5. e) Use reef knots to tie a bandage but do not tie on the injured part or over bony areas

When bandaging to immobilize a limb:

  1. a) Strictly pad between the limbs and the body or between the legs with cloth or folded cotton or towels
  2. b) Tie knots in front of the body and to the injured site or the middle of the body if the sites are injured.

After bandaging:

  1. a) Check the circulation of the injured part after every 10 minutes to ensure that blood flow is not impaired.
  2. b) Ask the casualty if there is any serious discomfort caused by bandaging.

NOTE: Always ensure infection prevention and control as much as possible.

SIGNS OF IMPAIRED CIRCULATION

  1. The extremities look pale, cold and later bluish appearance to the skin.
  2. Tingling and numbness of the part.
  3. Inability to move the affected limb.
  4. Swelling 

HOW DO YOU CHECK FOR CIRCULATION.

Press one of the finger or toe nails or the skin on the foot or hand until its pale. Release the pressure. A pink color should return quickly if it remains pale, the bandage is too tight therefore loosen it by unrolling enough turns until the pink color is retuned and the warmth is felt.

BANDAGING TECHNIQUES/ PATTERNS USED IN BANDAGING

  1. CIRCULAR METHOD:

 The bandage is applied in such a way that each turn encircles the previous one completely covering it. This technique is used to ankle bandaging or dressings.

  1. SPIRAL METHOD:

Each turn particularly overlaps the previous one. It is applied along straight body parts or parts with increasing circumferences. It can also be used to bandage the ear.

  1. SPIRAL REVERSE:

The bandaging is anchored and then applied in reverse direction half way through each spiral turn.  This method is used to accommodate increasing circumferences of the body parts. Used for upper arm and upper leg.

  1. FIGURE OF EIGHT (8): 

The bandage is anchored below the joint and then alternating in ascending and descending turns to form a figure of eight (8). This technique is used around joints.

  1. RECURRENT METHOD:

This technique includes a combination of recurrent and circular turns. Hold the bandage as you make each recurrent turn and then use circular turns as the final anchor. This technique is used for bandaging the scalp and a stump.

  1. TRIANGULAR BANDAGING:

Triangular bandage is used on the shoulder when it is injured and to give support to a fractured clavicle. It can be used as arm sling but in emergencies, the bandage can be used at all body parts.

a) ARM SLING

An arm sling holds the fore arm in a slightly raised or horizontal position. It provides support for injured upper arm, wrist or fore arm on a casualty whose elbow can be bent. Or:  to immobilize the arm for a rib fracture.

PROCEDURE:

  1. Ensure that the injured arm is supported with the hand slightly higher than the elbow.
  2. Fold the base of the bandage under to form ahem (enclose).
  3. Place the bandage with the base parallel to the casualty’s body. 
  4. Slide the upper end under the injured arm and pull it around the neck to the opposite shoulder.
  5. Fold the lower end of the bandage over the fore arm and bring it to meet the upper end at the shoulder.
  6. Tie a reef knot on the injured site at the hollow above the casualty’s collar bone and tuck both free ends of the bandaging under the knot to pad it.
  7. Hold the paint of bandage beyond the elbow and twist it until the fabric fits the elbow, then tuck it in. Alternatively, if you have a safety pin, fold the fabric and fasten it to the front.
  8. Check the circulation in the fingers as soon as you have finished. Re – check every 10 minutes.

b) ELEVATION SLING

This form of sling supports the fore arm and hand in raised position with the finger tips touching the casualty’s shoulders. It helps to control bleeding from wounds on the fore arm and also minimize swelling. It can also be used to support the arm in case of injured hand.

MANAGEMENT

  • Ask the casualty to put his hand across his chest with the fingers resting on the opposite shoulder.
  • Place the bandage over his body with one end over the shoulder on the injured side.
  • Hold the point just beyond his elbow.
  • Ask the casualty to extend off the injured arm from the chest while you took the bandage up diagonally across his back to meet the other end at his shoulder.
  • Tie the ends to make a reef knot at the hollow above the casualty’s collar bone and took the ends under the knot pad it.
  • Twist the point until the bandage fits closely around the casualty’s elbow. Tuck the point in just above his elbow and secure it.
  • Check circulation, loosen and re – apply if necessary.

HAEMORRHAGE

This is loss of a blood from vessel. It can be internal or external. It can be mild or severe.

  • Mild hemorrhage comes from injured capillaries. This bleeding flows in a stream.
  • Severe hemorrhage comes from an artery or vein. And this blood tends to come with great force. This is because most large arteries transport blood at high pressure.

CLASSIFICATIONS:

It can be classified in 3 ways;

  • Time of occurrence.
  • Vessel injured (source)
  • Site of the injury.
  • CLASSIFICATION BY SITE

It can be external or internal. 

External is visible or can be seen while internal means the bleeding is hidden or concealed.  If bleeding is hidden in the abdomen, peritoneal, this is very dangerous because it’s hard to stop this kind of bleeding sometimes. It becomes visible, for instance if blood is in the lungs the casualty will cough it up, which is known as haemoptysis. In case bleeding is in the stomach, the patient or casualty vomits the blood, which is known as haematemesis.   

The color of the vomits depends on the time; it also depends on the site which has been affected. It is dark red like coffee ground; it is an indication of a bleeding stomach ulcer.

People who have peptic ulcers as they progress they start bleeding such. Sometimes kidneys are injured or bladder and here blood is passed in urine which is called haematuria. In this case urine is smoky, blood stained. 

Sometimes blood is passed on the stools, a condition known melaena. This makes the stools to be dark in appearance. This means the bleeding is from the upper intestine. Sometimes blood passed with the stools in fresh and bright red colored. It means bleeding is in the lower part of the bowel. 

Bleeding from the vagina is normally due to miscarriage, menstruation or injury to those parts.  

As a first aider always suspect internal bleeding after a severe injury or if the patient has signs of shock without obvious blood loss you must suspect that the patient may have sustained internal bleeding.

There are special sites of hemorrhage;

  • Hemorrhage from the nose.
  • Hemorrhage from the lungs
  • Hemorrhage from the urinary bladder. 
  1. b) Haemorrhage classification according to vessel (source)
  1. Arterial hemorrhage: Arteries are vessels which carry blood from heart to the rest of the body. This blood is fully oxygenated; it is bright red in color. Because it’s coming from the heart, it comes with pressure. It spurts out blood.
  2. Venous haemorrhage: This blood contains less oxygen and its color purplish red because it does not contain much oxygen. 
  3. Capillary bleeding: Capillaries are the smallest vessels. In this case blood just oozes all over the wound. Its color is dark red and is the most common color.

c). Haemorrhage classification according to time. 

  1. Primary haemorrhage: This occurs at the time of injury.
  2. Reactionary haemorrhage: This may occur any time within 24 hours of injury. It occurs due to recovery from shock which means the casualty is improving.
  3. Secondary haemorrhage: This occurs after 48 hours and is usually due to infection or sepsis.

CLOTTING MECHANISM

The human body has certain mechanisms which help to stop bleeding naturally.

When bleeding occurs, platelets collect together at the site of the injury and help to plug the wound, clotting factors are released, and there is a protein present in blood known as fibrinogen is converted to fibrin. The fibrin forms a mesh across the cut skin vessel. It traps the platelets and the blood cells from escaping. Then the mesh shrinks as serum oozes out leaving a solid clot which covers the wound. 

GENERAL MANAGEMENT OF HAMORRHAGE

The aim of this management is to stop bleeding immediately and get medical aid as quick as possible.

  1. Put the patient in a suitable position. Preferably sitting or lying according to the type /site of injury.
  2. Elevate the bleeding part and support if not fractured.
  3. Expose the wound but removing small clothing as possible.
  4. Do not disturb any formed clot.
  5. Remove any foreign body which is visible and easy to remove.
  6. Apply and maintain pressure
  7. Apply a dressing or bandage.
  8. Immobilize the injured part.
  9. Transfer to hospital as soon as possible.

CONTROLLING HAEMORRHAGE

The principle of controlling blood loss is to restrict blood flow to the wound and encourage clotting. This is done in two ways that is by applying pressure and elevation of injured part.

DIRECT AND INDIRECT PRESSURE

  • Direct pressure
  1. Direct pressure is put directly on the wound while indirect pressure is put on the vessel supplying blood to the wound. 
  2. We always start with direct pressure 
  3. In order to stop bleeding without interfering with the rest of the circulation by applying direct pressure on the wound.
  4. In case there is a foreign body or projecting bone, put the pressure around it and then maintain for 5 – 15 minutes.
  5. In case the wound is getting, cover the wound with a clean cloth.
  6. Put the casualty in a suitable comfortable position. If the bleeding continues, add on more clothing/ dressing/ padding without removing the first one. 
  7. Secure the dressing with a bandage not firmly but able to cut off hemorrhage.
  8. Immobilize the injured part.
  • Indirect pressure
  • If bleeding cannot be controlled by direct pressure or if not possible, you apply indirect pressure at an appropriate pressure point between the heart and wound. For instance it can be used to control arterial bleeding within the limb. 
  • But as you compress this for a long time, then the limb will die off because of oxygen cut off.

The two pressure points for controlling severe bleeding are;

  • Bronchial artery in the upper limb (arm).
  • Femoral artery in lower limb.

                      INTERNAL BLEEDING

This may occur after an injury such as a fracture 

  • It could be a crash injury such as car injury.
  • It can also occur due to a periodical condition 
  • It can also occur due to penetrating injury.
  • The spleen can get ruptured.
  • Internal bleeding is more severe/ dangerous than external bleeding.
  • Much as this blood is not from the body but lost from circulation and hence not reaching vital organs.
  • When this blood collects in different arteries, it may cause pressure on vital structures. For instance, if bleeding is within the skull and the person may become unconscious.
  • If bleeding is inside the chest, it may prevent expansion of the lungs hence causing difficulty in breathing.

           SIGNS AND SYMPTOMS

They vary according to the amount of hemorrhage and the rate of flow.

  • There is always history of sufficient injury sometimes the history of the medical condition.
  • There is pain and tenderness on the affected site and sometimes actual swelling.
  • Patients may also have signs of shock. One of the signs of shock is pallor or paleness of the mucous membrane.
  • The pulse rate is weak and rapid.
  • Breathing also becomes shallow.
  • The casualty becomes restless. 
  • If he/she is conscious, he/she will complain of the thirst.
  • The temperature is below normal.
  • Sometimes there is vomiting.
  • Cold extremities.
  • Blood may appear either from the mouth and eventually the patient may become un conscious

          THE AIM OF  TREATMENT

Is to arrange urgent remove to the hospital.

  • Mean while lay the casualty down with the head lower than the rest of the body.
  • Also ensure complete rest.
  • Loosen any tight clothing around the neck, chest and waist for better circulation
  • Re assure the patient to rest.
  • Protect the patient from cold.
  • Check for any other injury and manage accordingly.
  • Carefully watch the breathing and pulse rate and record.
  • Save and specimen be it of urine, vomitus for examination.
  • If the casualty becomes unconscious, make sure the air way is clear and this is done by positioning the patient.
  • Arrange transport to hospital as quickly as possible, quietly and knowledgeably.
  • Do not give any thing by mouth because you are not sure if the patient is going to the theatre.

ARRESTING HAMMORRHAGE FROM SPECIALITIES 

          SCALP WOUND

  • These usually occur due to accidents or falling down or during fighting. These wounds tend to bleed profusely.
  • This is because of the reach blood supply and the skin on the scalp is straight.
  • Sometimes these wounds are associated with a fracture.

SIGNS AND SYMPTOMS

  • There is pain, tenderness and bleeding.
  • There is swelling around the wound.
  • There might be signs of fracture on the skull and that is bleeding from the nose.
  • The casualty may become unconscious.

  THE AIM OF TREATMENT

Is to control bleeding as soon as possible and transport to  hospital for the director to rule out head injury.

  • Control bleeding using direct pressure.
  • Cover the wound with a sterile or clean piece of cloth and put a bandage to make sure bleeding stops.
  • If the patient is unconscious, lay him down with the head slightly raised.
  • Check breathing, check the pulse, level of response.
  • If the casualty becomes unconscious, secure a clear air way by positioning.
  • Arrange urgent removal to hospital as you maintain the treatment position 

EPISTAXIS (NOSE BLEEDING)

It is a condition where there is bleeding from the blood vessels of the nostrils. It may be due to a blow, sneezing, it may be a sign of a fractured skull.

  • Nose bleeding can cause considerable blood loss.
  • The casualty may swallow the blood or inhale.
  • If inhaled it is going to cause breathing problems.
  • This patient presents with flow of blood.

In case there is a skull fracture, blood may be mixed with a clear, watery cerebral spinal fluid.

        THE AIM OF TREATMENT 

  • Is to safe guard breathing by preventing inhalation of blood.
  • Make the casualty to sit with the head slightly forward.
  • Loosen any tightening around neck.
  • Advise him to breathe through mouth.
  • Pinch the soft part of his nose.
  • Patient should not speak, swallow, and cough.
  • Allow blood to come out (dribble) do not plug control wool.
  • Casualty should not raise the head.
  • Clean around the nose using lukewarm water with a soaked clean cloth.
  • When bleeding goes beyond 30 minutes or stop and comes back then seek medical advice.


 BLEEDING FROM THE MOUTH

Cuts in the mouth or on the tongue vary from mild to severe. They may be caused by the casualties’ teeth.

  • It can also occur after tooth extraction
  • Laceration can also occur and are quite often associated with the fracture of the jaw.

     SIGNS AND SYMPTOMS

  • Patients can complain of bleeding around or in the mouth.
  • Pain at the bleeding area.

AIMS OF TREATMENT

To safe guard the airway by preventing the inhalation of the blood and to control bleeding.

WHAT TO DO

  • Ask the patient to sit down with the head tilted slightly to the affected side.
  • Place a clean dressing over the wound and tell the casualty to apply direct pressure on it.
  • If it is a tooth socket, get a thick pad of gauze and place it across the socket and tell the casualty to bite on it.
  • This pressure should be maintained for 10 – 20 minutes to allow any blood to dribble out from the mouth because if swallowed can cause vomiting.
  • If bleeding persists after a period of 10 – 20 minutes carefully remove the pad without disturbing the clot that might have formed and replace with a new one and continue with pressure for more ten minutes.
  • The casualty should not wash or rinse the mouth because it may disturb the clot.
  • He should not take anything hot (drinks) for 12 hours.
  • If bleeding persists or if it re- occurs, then refer for medical aid or dentist.

CAUSES OF HAEMORRHAGE

  • Trauma/ injury

>  It may be direct injury to the blood vessel involving neighboring tissues could be due to accident, surgical operation resulting into wounds.
>  It may be indirect injury e.g. fractures of the skull may cause injuries to the vessels.

  • Labour

>  Ruptured fallopian tube incase of ectopic pregnancy.
>  An obstetric is where the fetus separates from the placenta bringing out excess bleeding.

  • Abnormalities in blood vessels for example.
  1. Neoplasm. These are new growth or tumors. They are actually concern cells which have the ability to destroy blood vessels
  2. Hemorrhoids. They are found in the digestive system (alimentary tract) especially at the rectum.
  3. Atheroma. Is the thickening of the walls of the arteries which bring about their rapture.
  4. Aneurysm. Arterial dilatation due to blood pressure on the weak tissues leading to their rapture.
  • Diseases of blood for example hemophilia. Hemophilia is a blood coagulation disorder which is genetically determined and characterized by repeated hemorrhage. This could be nasal bleeding which is (epistaxis), rectal bleeding, hamaturia (blood in urine).
  • Menstruation: Is a monthly loss (discharge) of blood through the birth canal of the females between 12 – 45 years.
  • Diseases of intestinal tracts e.g. peptic ulcers, typhoid fever, dysentery, ulcerative colitis, may lead to loss of blood.
  • Hypertension. Blood pressure refers to the force exerted on the walls of the blood vessels once the blood pressure is high than normal, then we talk of hypertension. And this can easily be due to cerebral vascular accidents.

           GENERAL SIGNS AND SYMPTOMS OF HAEMORRHAGE.

  1. The face and lips are pale.
  2. Skin is cold and clammy.
  3. There is dizziness and fainting.
  4. The pulse is rapid and weak.
  5. Breathing is shallow and accompanied by yawning.
  6. Blood pressure is also decreased
  7. Temperature is low    
  8.  There is blurred vision.
  9. Casualty feels thirsty and will always ask for water.
  10. Low blood volume.
  11. Sighing and yawning.
  12. Oliguria – low output of urine.
  13. Casualty complaints of not feeling well and is anxious. 

SIGNS AND SYMPTOMS OF INTERNAL HAMORRHAGE

 Bleeding from orifices


SITE

APPEARANCE

CAUSE

1.

MOUTH 

  • Bright frothy coughed up blood (haemoptysis)
  • Vomited blood (haematemosis) possibly dark reddish brown.
  • Bleed in the lungs
  • Bleeding with in digestive system.

2.

EAR

  • Fresh bright red blood.
  • Thin watery blood
  • Injury to the inner ear, perforated ear drum
  • Leakage of cerebral spinal fluid following head injury.

3.

ANUS

  • Fresh bright red blood.
  • Black offensive smelling stool (melena)
  • Injury to anus or low bowel.
  • Injury to the upper bowel.

4.

NOSE

  • Fresh bright red blood 
  • Thin watery blood
  • Raptured blood vessels in nostrils.
  • Leakage of cerebral spinal fluid following head injury.

5.

URETHRA

  • Urine with a red or smoky appearance (hamaturia)
  • Bleeding from the bladder or kidneys.

6.

VAGINA

  • Either fresh or dark
  • Menstruation, miscourage, disease of or injury to vagina or wound.

NATURAL MECHANISM OF ARRESTING HAEMORRHAGE:

There are three ways through which bleeding can be arrested and these are:

  1. Constriction of blood vessel ( peripheral)
  2. Lowering of blood pressure.
  3. Clotting mechanism.

      CLOTTING MECHANISM

    In the clotting mechanism, the damaged platelets and tissues release a substance called thrombokinase (thromboplastin) which is an enzyme. This enzyme activates the prothrombin to the thrombin. The thrombin combines with fibrinogen to form fibrin. The fibrin forms a mesh to arrest the bleeding by trapping the blood cells to form a clot.

       COMPLICATIONS OF HAMORRHAGE:

  1. Paralysis may occur due to damage or disturbance of the nerves.
  2. Hypovolaemic.
  3. Anaemia.
  4. Asphyxia.
  5. Hypothermia.
  6. Unconsciousness. 

DIABETES MELLITUS

This is a condition which can lead for 2 types of coma.

  1. Diabetic coma (hyperglycemia).
  2. Insulin coma (hypoglycemia)
  • HYPERGLYCAEMIA (DIABETIC COMA)

It occurs when there is excessive increase of glucose and a cetone.

SIGNS AND SYMPTOMS

Sometimes, he/she may be known diabetic.

  • The onset is gradual – with headache, restlessness and the patient feels drowsy.
  • Abdominal pain.
  • Respirations are deep and sighing.
  • The skin is dry.
  • The breath smells acetone.

TREATMENT

  • If the patient is unconscious, treat accordingly. 
  • If she/he is a known diabetic, the only treatment would be insulin which may not be available but if available measure it appropriately and give it.
  • Quickly make arrangements and sent patient to hospital. 
  • Continue monitoring the vital signs.
  • Reassure the patient always.
  • HYPOGLYCAEMIA (INSULIN COMA)

Insulin is a drug used for treatment of diabetics. It occurs if a patient takes insulin without eating or eating late, or having done excessive exercises than planned.

SIGNS AND SYMPTOMS

  • Sudden onset/ where the patient feels dizzy, fainting, irritability and confusion.
  • Respirations are shallow
  • Headache 
  • The skin is moist.
  • The patient is sweating.
  •  The hands and legs are shaking or tremors
  • He appears like drunkard.
  • The breath has no particular smell.
  • Eventually the patient becomes unconscious.

TREATMENT

  • Check the patient’s pockets – checking for card indicating whether he/she is a diabetic.
  • Check if he/she has a lamb of sugar.
  • Check if the   patient has marks of previous injections
  • If it’s recognized early, give two spoonful of sugar in a juice or fruity drink.
  • Once patient is not cooperative at first, but you have to act quickly.
  • The sugar can be repeated after 10 minutes and this patient will begin coming up.
  • Patient should be advised to always carry something sweet such that if he feels signs of hypoglycaemia he/she can take it.
  • If the patient is unconscious, send the patient to hospital.

COMPLICATIONS OF DIABETES MELLITUS

  • Neuropathy: no motor or sensory sensation.
  • Erectile dysfunction and frigidity in women 
  • Cataracts 
  • Hypertension 
  • Retinopathy 
  • Diabetic foot 
  • Still birth, abortions, delivering big babies. 

PREVENTIVE MEASURES

  • Early identification/ screening for diabetes mellitus
  • Adequate exercise to burn out excessive fats and glucose
  • Avoid prolonged use of steroid therapy
  • Excessive consumption of alcohol should be avoided
  • Early detection and treatment of infections that can pause danger to the pancreas

FITS AND CONVULSIONS (SEIZURES)

A seizure consists of involuntary contraction of body muscles.  It’s due to disturbance in the electrical activity of the brain. This convulsion result in loss or impairment of consciousness. The commonest cause is epilepsy. But there are also other causes including;

  • Head injury
  • Brain damaging diseases
  • Shortage of oxygen or glucose
  • Certain poison

There are two main types of epilepsy;

  • Petitmal (minor)
  • Grandmal (major)
  1. Petitmal epilepsy: is characterized by a short period of unconsciousness which may not be noticed. The person appears pale for a short time with a blank expression.
  2. Grandma epilepsy: Its described into type i.e. – idiopathic, Symptomatic 
  • Idiopathic has no evidence of a serious disease. The fit start in child hood and adolescence.
  • Symptomatic represents with recognizable pathological condition which may be held to be directly responsible or indirectly responsible. They include anything that compresses the brain (tumor), head injury.

SIGNS AND SYMPTOMS

They occur in phases.

Phase1

  • Aura ( warning stage)
  • This stage, it precedes loss of consciousness 
  • The person experiences a funny feeling in the stomach, funny taste, in the mouth, a funny smell which is not real its brief.
  • Tonic stage.
  • There is sudden loss of consciousness.
  • The person falls to the ground and may get injured. 
  • Muscles become rigid and back is arched very stiff.
  • The teeth are clenched.
  • Breathing becomes very difficulty, it may be noisy and it may stop temporarily.
  • The patient may make a funny cry.
  • The face is cyanosed and puffy.
  • The neck veins are engorged.
  • This lasts for around 30 seconds.
  • CLONIC STAGE
  • In this stage, muscles relax and then start contracting very rapidly.
  • The whole body goes into those contractions.
  • The tongue may be badly bitten.
  • Frothing at the mouth.
  • Patient may have incontinence of urine and faces.
  • The convulsions and twitching gradually become less violent and eventually stop.
  • This stage last for 1 minute.
  • COMA STAGE
  • When the twitching stops, the patient goes into coma and eventually sleeps.
  • During this period, muscles relax.
  • Color of face returns to normal.
  • Breathing becomes normal and quiet.
  • This lasts for 30 minutes.
  1. On waking up;
  • The patient may have a slight/ brief of mental confusion.
  • The patient may vomit.
  • The patient may complain of headache
  • And he/she may be disoriented
  • He/she may act in a strange way. And this is called post epileptic automatism  

MANAGEMENT

  • During the tonic stage.
  • Create space around the patient.
  • Remove any dangerous item.
  • Protect him from injury.
  • Position the casualty by laying him down on the back with head turned to one side.
  • Put a soft pillow under the neck.
  • Place a well padded article; put it between the teeth if possible. This helps to prevent biting the tongue. Do not force the article.
  • Loosen any tight clothing around the neck.
  • Note the time and duration of falling.
  1. During clonic stage.
  • Don’t restrain the patient.
  • Watch and prevent him from injury.
  • Try to support and protect the head by providing a pillow until the fit is over.
  • During coma stage
  • Make the patient comfortable by putting in recovery position.
  • Don’t wake the patient if sleeping 
  • Allow consciousness to return gradually.
  • Let the patient quit after consciousness has turned.
  • Give appropriate advice.
  • OBSERVATION
  • Observe the parts of the body which have been affected.
  • Duration and frequency of the fits.
  • Note presence of incontinence.
  • Vital signs. 

All these must be recorded and reported to the doctor.    

  CONVULSIONS IN CHILDREN

Convulsions commonly occur in young children, they are sometimes referred to as infantile convulsions. The symptoms are similar to those of epileptic fits but in children are more severe. They often occur as a result of high temperature; as it’s associated with infection of the throat, ear.

MANAGEMENT 

  • The child should be placed in bed and a pillow or something soft placed around the child so that the violent movements do not cause injury.
  • Do not restrain the child when is convulsing
  • Cool the child by removing extra clothing, ensure fresh air supply but do not expose to extreme coldness.
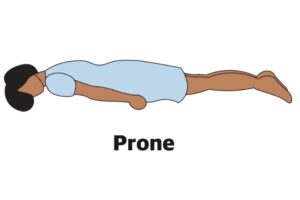
  • Once the convulsions stop, maintain a clear air way by placing the child in recovery/ prone position
  • Re – assure the parent of the child.
  • Monitor the vital observation.
  • Arrange transfer to hospital.

COMPLICATIONS OF EPILEPSY

  • Status epileptic us
  • Brain damage due to prolonged anoxia (lack of oxygen to the brain)
  • Burns due to falling into fire
  • Suicide as a result of stigmatization
  • Unprovoked episodes of violence, anger
  • Memory disturbance
  • Isolation 
  • Lack of employment
  • Sexual exploitation
  • Low self-esteem
  • Fear 
  • Depression 
  • Contractures- fibrosis causing permanent contractions.
  • Psychotic behaviors e.g. hallucinations, delusions.
  • Committing crimes in the state of post ictal phase 

UNCONSCIOUSNESS (INSENSIBILITY)

Consciousness: is the state of awareness or alertness

It is due to interruption of the brain due to some interference with the nervous system. It’s an indication of injury or disease onto the brain but it can also be to other body parts. It’s a stage of unawareness.

LEVELS OR STAGES OF UNCONSCIOUSNESS STATE

  1. One can be fully awake or fully conscious.
  2. Disoriented but able to answer simple question.
  3. When the person is not able to answer questions but can obey orders.
  4. The person does not respond to any words but can respond to painful stimuli.
  5. Completely unresponsive.

TERMS USED TO DESCRIBE UNCONSCIOUSNESS

  1. Stupor (partial unconsciousness)
  2. Coma (stage of complete unconsciousness)

The degree of unconsciousness may be determined by the following.

  • Speaking to the casualty.
  • In the stupor state, the patient can be roused with difficulty in response. But in coma, there is no response at all.
  • In stupor, the pt objects touching his/her eye lids and in coma, there’s no response at all.
  • Reaction to light, in stupor, pupils of the eye react to light i.e. the pupils become smaller and in deam light or darkness to pupils becomes dilated. While in coma, there’s no reaction to light.

CAUSES OF UNCONSCIOUSNESS

  1. Shock 
  2. Asphyxia
  3. Poisoning
  4. Head injury especially when associated with brain injury causing a condition known as concussion or compression.
  5. Epilepsy
  6. Hysteria
  7. Infantile convulsions
  8. Excessive heat
  9. Diabetes
  10. Fainting can also lead to unconsciousness.
  11. Heart attack
  12. Electric shock
  13. Brain attack
  14. Eclampsia
  15. Cerebral vascular accident (CVA) (Sroke)

SIGNS AND SYMPTOMS OF UNCONSCIOUSNESS

  • Shallow breathing
  • Face turns pale
  • Skin cold and clammy
  • Pulse is rapid and weak
  • Dilated pupils and unequal
  • No reflexes 
  • Restless in case of head injury
  • Nausea and vomiting on recovery
  • Loss of memory of event before and after accidents

FIRST AID MANAGEMENT OF UNCONSCIOUSNESS

  • Remove the casualty from danger
  • Ensure plenty of fresh air and if the casualty is near smoky area remove him or her from that place.
  • Ensure an adequate supply of fresh air and check on the following:
  • Look for any signs of injury like wounds, bleeding from any side of the body.
  • Check the pulse rate.
  • Respirations; check respiratory rate, chest movements and any noise.
  • Check the skin, is it cyanosed, sweating, cold, dry, pale
  • The pupils of the eye; are they dilated, constricted equal or unequal.
  • Smell of the breath, could it be alcohol, disinfectant, acetone.
  • Give artificial respiration or resuscitation.
  • If there is any bleeding, control it, dress wound and immobilize fracture.
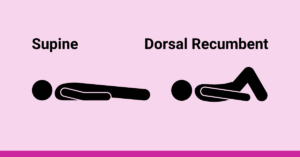
  • Position the casualty in semi-prone (recovery) position with the head slightly lower than the level of legs.
  • Establish the level of unconsciousness and record any changes in reaction to pupil.
  • Reassure the casualty after gaining consciousness.
  • Moisten her / his lips but nothing by mouth.
  • If the casualty is restless, prevent him from hurting himself.
  • Transport the casualty to the hospital.
  • Reaching the hospital handover the casualty to in charge and report.

GENERAL RX

  1. Position the casualty appropriately.
  2. Ensure a clear airway.
  3. Remove dentures.
  4. Remove tight clothing around the neck, chest etc 
  5. Keep away crowds.
  6. Give nothing by mouth.
  7. Keep the patient warm but do not over heat.
  8. If breathing has stopped, position the patient and start CPR (cardio pulmonary resuscitation).
  9. If breathing is quiet, lay the patient on the back with the head turned to one side.
  10. Elevate the lower part to encourage drainage of secretion from the lungs.
  11. Treat the cause of the unconsciousness. 
  12.  Remain with the casualty until she is handed over to a responsible person.
  13. Continuously watch carefully for any change in the casualty condition.
  14. Move the casualty to shelter.
  15. When the casualty gains consciousness, moisten the lips
  16. If there is no suspected to abdominal injury, sips of water can be given to drink.

COMPLICATIONS OF UNCONSCOUSNESS

  • Respiratory tract infections: person may develop aspirated pneumonia due to mucus secretions 
  • Respiratory tract obstruction: the tongue may fall backwards and obstruct the airway
  • Heart failure may result especially if the causes of the unconsciousness was cardiac arrest 
  • Renal or kidney failure may develop
  • Damage to the brain cells due to lack of oxygen to the brain.

DIRECT INJURY TO THE BRAIN

  • CONCUSSION

This is shaking of the brain. It occurs when there is wide spread disturbance of the brain as a result of injury to the head and sometimes the spine. It may be caused by a blow on the head or falling. It may not be associated with any change in the brain substance.

SIGNS ANND SYMPTOMS

  • Brief period of impaired consciousness.
  • Patient may have temporally confusion.
  • There is dizziness, nausea and vomiting.
  • Temporary loss of memory.
  • Mild generalized headache.
  •  

TREATMENT

  • Manage as unconscious patient.
  • Monitor vital signs.
  • Even after recovery, continue monitoring these patients for possible deterioration in the level of consciousness.
  • Advice him to go to hospital if he/she develops any of the following.
  • Headache
  • Confusion
  • Vomiting
  • A patient who has been unconscious even for 1 minute or less shouldn’t be allowed to do anything before she/he has been checked by the doctor
  • CEREBRAL COMPRESSION

This is a condition due to pressure on same part of the brain with the skull. It may be a blood clot, apiece of a bone in case of skull fracture it may be a tumor. Cerebral compression may lead to unconsciousness when is irreversible. Compression is a very serious condition. As so serious with in most cases it requires surgery.

SIGNS AND SYMPTOMS

  • In the early stages, pt is irritable.
  • He may have twitching of the limbs.
  • Shouting.
  • May get convulsion.
  • When a patient is having an attack of convulsion, he should not be restrained, just protect him from getting injured.
  • With unconsciousness, coma may be present.
  • Breathing is noisy.
  • Face is flushed.
  • The pulse is slow but strong.
  • Temperature may be raised.
  • The pupils of the eye may be unequal in size or they may be dilated.
  • The patient may get paralysis.
  • The patient usually complains of severe headache.

TREATMENT

Apply the general rules of unconsciousness send the patient for medical treatment.

 FOREIGN BODIES

A foreign body is an object that enters the body through different areas. It can enter through around in the skin like penetrating objects. It can enter through one of the natural openings of the body i.e. through mouth, nose, ears eyes, etc. 

A penetrating foreign body can be only thing from a big or tiny object. It can be loose, whereby it can be removed without causing pain or injury. But sometimes it’s deeply embedded in which can lead it act as a plug to prevent blood loss.

A large embedded object may produce a deep wound. But a small one will cause minor lacerations. 

The problem with penetrating foreign objects is that in most cases there not clean and if not clean there’s a risk of infection.

SPLINTERS

  • These are small pieces of wood, glass, metal which may enter the skin.
  • They are the commonest type of foreign bodies
  • They can successfully be removed without any problem.
  • If it is deep and difficult to remove, don’t interfere refer the patient to hospital.


TREATMENT

  • Gently clean the area with soap and Ho2 
  • Get the pair of tweezers which should be sterile or as clean as possible and dry to handle of the object and pull it out.
  • After pulling it out, squeeze around the wound such that same little fluid comes out.
  • As it comes out, it may washout some of the remaining pieces remaining.
  • Clean and cover the wound with a clean dressing. If the splinter does not come out easily, treat, it as an embedded body and refer the patient to hospital.

FOREIGN BODY IN THE EYE.

  • Dust, grit (sand, small piece of stone), insects etc. can get into the eye
  • These cause discomfort and if not removed quickly, they can cause serious trouble.
  • You must not attempt to remove anything that sticks to the eyeball.
  • Make sure you send the casualty to hospital quickly.

TREATMENT

  • Make the patient sit.
  • Gently separate the eye leads.
  • Examine every part of the eye.
  • You can ask the patient to blink the eyes rapidly. This may dislodge the foreign body
  • If the foreign body is visible and loose, pour water from the inner corner such that it can drain up.
  • Alternatively you can flood the eye in water 
  • If you think it is in the upper lid, try to pull it outwards and push it over the lower lid, this could also help to dislodge it.
  • You can also use a corner of a handkerchief to remove it out.
  • If all this fail, apply an antibiotic eye ointment, cover the eye and refer to hospital.

FOREIGN BODY IN THE EAR

  • Children often push things like beans, tablets, etc into the ear.
  • Insects can also enter the ear.
  • When a foreign body gets lodged in the ear, it may cause temporally deafness by blocking the ear canal.
  • It may also damage the ear drum.

TREATMENT

  • If you’re sure that it’s an insect in the ear, floats and comes out with the fluid as you turn.
  • For other foreign objects, just refer the patient to hospital as soon as possible.

FOREIGN BODY IN THE NOSE

Again children may push small objects in their noses. They can block the nose that can cause infection. If it’s sharp, it can cause damage to tissues in the nose and it can cause a sore.

TREATMENT OR MANAGEMENT

  • Take quick history
  • Calm down the patient by reassuring him/her. 
  • Examine the nose to see how deep the foreign body is.
  • If it’s not very far, try to touch in the unaffected nostril which may induce the casualty to sneeze.
  • If this fails, block the ears and try to tell the casualty to blow very hard. This may help to dislodge the foreign body.
  • If all these fails, refer, meanwhile tell him to breathe through the mouth.
  • Make sure, there is no disturbance with the nostril.
  • If it’s a child, you tie the hands/ arms.

Dressings Read More »

Injuries and trauma fractures

Injuries and Trauma

FRACTURE 

A fracture is a break in the continuity of a bone.  Any injury involving a bone should be considered a fracture until proved otherwise.

CAUSES OF FRACTURE

  1. A fracture can be caused by direct force. This is when the injury occurs at the site where the forces have been applied e.g. blow, accident
  2. Indirect force. For this case, the bone breaks a distance from where the force is applied. This means that the force is transmitted an example is fall from a tree.
  3. Strong muscular action, this is common with the patella bone. 
  4. Stress i.e. repetitive force
  5. Fracture may also be caused by bone diseases ( pathological) responsible diseases e.g.
  • Osteomyelitis
  • Tuberculosis of bones 
  • Cancer
  • Old age 
  • Bone tumors.

 Classification by Fracture Location


TYPES OF FRACTURES 

  1. SIMPLE OR CLOSED FRACTURE : This is fracture in which the bone is broken but the skin remains intact. A simple fracture can become complicated if not handled properly.
  2. COMPOUND OR OPEN FRACTURE : This is when there is a wound associated with the fracture sometimes the wound is caused by a protruding piece of broken bone. This may be associated with extensive blood loss.
  3. COMPLICATED FRACTURES: This may be open or closed but there may be injury to internal or surrounding structures. It could be the lungs incase of fracture of the ribs etc.
  4. COMMUNITED FRACTURES: In this type of fracture, the bone is broken into several pieces.
  5. IMPACTED FRACTURES: Here the broken bone enters into each other.
  6. DEPRESSED FRACTURE: The broken parts are pushed in wards.
  7. GREENSTICK FRACTURE: Is where the bone is cracked or bent. It’s common in children because their bones are still soft.

GENERAL SIGNS

  • There is pain and tenderness at the site.
  • There is difficulty in movement.
  • There is swelling and oedema
  • Deformity.
  • Discoloration
  • Loss of function
  • There may be unnatural or abnormal movement of the affected part.
  • Crepitating (grating sound) if limb is moved gently.
  • The patient may also go into shock. 
  • Warmth due to increased blood supply

AIMS OF FIRST AID

  1. To prevent further damage of the fracture.
  2. To prevent pain or reduce.
  3. To make the patient as comfortable as possible as you wait for expertise.
  4. To prevent shock.

RULES FOR TREATMENT OF FRACTURES

  1. Do not remove the affected part if not in danger.
  2. Steady and support the injured part at once and prevent movement.
  3. Reassure your casualty and send for medical aid 
  4. Stop bleeding if any.
  5. Cover any wound with a sterile dressing.
  6. Do not remove the casualty’s clothes unnecessarily.
  7. Try to prevent/ counter act shock. This is by handling the casualty gently, keeping him warm, and give sweeter fluids incase if there is no possibility of anaesthia. 

GENERAL MANAGEMENT OF A CASUALTY WHO HAS SUSTAINED A FRACTURE.

  • Prevent rubbing of the broken bones by immobilization and keeping the pieces of broken bones together.
  • Re – assure the patient.
  • Ensure the clear air way.
  • Stop hemorrhage if any. 
  • Treat shock
  • Relieve pain
  • Immobilize the fracture using splints and apply a sling.
  • Do not move the injured part unnecessarily.

FRACTURE HEALING

FACTORS THAT IMPEDE BONE HEALING

  • Excessive motion of fracture fragments
  • Poor approximation of fracture fragments-inaccurate reduction-excessive bone loss during fracture.
  • Compromised blood supply-damage to blood vessel-muscular injury-
  • Excessive edema at fracture
  • Infection at fracture site.
  • Metabolic disorders or diseases (cancer, diabetes, malnutrition)-they retard osteogenesis.
  • Soft tissue injury-disrupts blood supply.
  • Medication use e.g. steroids, anticoagulants.  Steroids can cause osteoporosis and long term use of heparin also causes the same.

COMPLICATION OF FRACTURES

  • General-blood loss, deep vein thrombosis, pulmonary embolism, respiratory distress
  • Early complication- infection, septicemia, plaster sores.
  • Late complication-joint instability, osteoarthritis, mal union, delayed union, non union. 


MANAGEMENT OF SPECIFIC FRACTURES

  1. FRACTURE OF THE SKULL. 

This fracture may be associated with injuries to the spinal cord and to the brain. Fracture may also be associated with condition like concussion.

Concussion is the shaking of the brain leading loss of consciousness. It may also be due to compression and hence also leading to the (compression/pressure) on brain. Patient may bleed from the nose or ears and the casualty may be unconscious.   

SIGNS AND SYMPTOMS 

  • There may be history of an accident
  • Bleeding from the skull.
  • Pupils may be unequal, dilated.
  • Partial unconsciousness 
  • Vomiting may be there
  • Pulse rate is slow.
  • There might be paralysis of the limb.
  • Eye movements may also be disturbed 
  • Speech disorders.

MANAGEMENT

  • A person who has sustained a head injury should be carefully watched and arranged to send to the doctor as soon as possible.
  • Patient should be nursed in a spine position with head turned to one side and shoulders slightly elevated if conscious 
  • If there is bleeding as discharge from ear then the head should be turned to the side of the bleeding ear. But do not plug the ear. 
  • Patient should be kept quite. Nurse him/her in a quite environment. 
  • In case of any wound, dress it
  • If unconscious, change to recovery position check breathing, pulse, level of response and record.

FRACTURE OF THE SPINE

  • The danger of this type of fracture is injury with the spinal cord.
  • You treat shock as you make arrangements to transport the patient.
  • You tie the legs together
  • You put padding between the knees and thighs so that they are not touching directly
  • You need four people to lift this patient
  • You should avoid bending or twisting of the spine.
  • The best position for transporting this person is recumbent position.
  • The patient is transported by stretcher with hard surface.

FRACTURE OF THE RIBS

The broken ribs may be pushed inwards making the fracture to be complicated.

  • The patient will complain of local pain.
  • It is worsened by breathing, severing.
  • The fractured end may manage the underlying part which may lead to blood stained sputum.
  • If the rib has pieced the lungs, the patient may have shallow respiration.
  • Patient may have signs of internal bleeding 
  • Air may escape to the plural cavity or escape to tissues and may lead to lung collapse.

If the air finds its ways to the tissues, we talk of a condition known as Emphysema.

IF THE PATIENT PRESENT WITH THIS;

  • Make the patient sit.
  • Restrict chest movement by applying broad bandages and fix on the opposite side.
  • Support the arm using a sling.
  • If there is an open wound, cover it, immediately to keep out air.
  • You can lay, lean patient on the affected side
  • Support the patient using pillows.
  • Transfer the patient to hospital.

FRACTURE OF THE CLAVICLE

This usually occurs due to indirect pressure like falling on an out stretched arm.

TREATMENT

  • Support the arm of the injured.
  • Put padding in the axilla.
  • Tie the arm to the chest using abroad bandage.
  • Alternatively support with a sling.

FRACTURE OF THE UPPER ARM

  • The humerus may be fractured at a part close to the shoulder.
  • The fracture may be at the shaft or it may be towards the elbow.
  • Sometimes the lower end of the radius may be broken.
  • Sometimes the person sustains the fracture of metacarpal bones. This may be associated with bleeding into the palms of the hand.

MANAGEMENT

  • The limb must be immobilized 
  • If the elbow can comfortably bend without increasing the pain, flex the arm against the chest with the fingers touching the opposite shoulder.
  • Put padding between the limb and chest and fix it with a collar sling.
  • Bind the arm firmly to chest. 
  • If the elbow can’t be bent without causing pain, tie the limb to the trunk. And again fix with broad bandages.    
  • Alternatively, a splint may be used to fix the limb. Transport the patient in any position that he/she is comfortable in. 

FRACTURE OF THE FORE ARM (ULNA, RADIUS)

  • For this, you ask the casualty to sit. Place the arm on the/ across the chest with the thumbs upper most.
  • Use a padded splint which is applied to the front from the elbow up to the fingers.
  • Fix it with bandages.
  • Support the arm with a sling with fingers upper most.
  • Watch the fingers for signs of interference with circulation.

FRACTURE OF THE PELVIS

These usually occur due to indirect force. It may be a car accident, falling from height.

A fracture pelvis may be complicated due to injury of the urinary bladder system.

SIGNS AND SYMPTOMS

History of injury

  • Patient unable to stand
  • Pain may be in hips, back.
  • Pain increase with movement 
  • Difficulty and pain in passing urine.
  • Sometimes the urine is stained.
  • May have desire of passing urine but he finds it difficult. And the patient may present shock signs.

MANAGEMENT

  • Help the patient lie down with the head lower than the rest of the body 
  • Keep the legs straight or the patient can bent the knees slightly and they should be supported in the position.
  • Abroad bandage can be applied around the pelvis
  • But you still put pads between legs and ankles and tie legs safely. 
  • The patient is lifted onto the stretcher with the pelvis supported.

FRACTURE OF THE FEMUR

The femur is the longest bone in the body. And it has every rich blood supply. A fracture of the neck of the femur is common in the elderly but it can affect any part of the femur.

SIGNS AND SYMPTOMS

  • Severe pain 
  • Shortening of the bone
  • And the foot may be turned out upwards.
  • Patient may go into shock because of pain.
  • The broken bone ends may piece blood vessels leading to blood loss.

TREATMENT

  1. Help the casualty to lie down as you support the injured limb.
  2. Treat shock if any.
  3. Immobilize the limb as follows,
  • Tie together the knees, the hips and above and below the site of the fracture.
  • Re-assure the casualty.
  • Arrange for transport to hospital.

If the distance to the hospital is long, do the following.

  • Apply a padded splint from the axilla down to the foot on the outside and put a short splint that starts from the groin (between the legs) up to the foot so that you maintain the injured part. 
  • Tie with a number of bandages.
  • First bandage across the chest.
  • Second bandage a cross the pelvis
  • Third above the fracture
  • Fourth under the fracture
  • Fifth fix the knees.
  • Sixth bandage fixes the ankles.

In some cases there is a splint known as THOMAS SPLINT

Then after, you can transport the patient. 

DISLOCATION

Is a displacement of the bones which form a joint. The most commonly affected joints are the shoulder joints, elbow joints, lower jaw.

SIGNS AND SYMPTOMS

  • Severe pain at the sight of the injury.
  • Movement is restricted at the joint.
  • Deformity of the limb.
  • Swelling may set in especially if there is collection of blood.

TREATMENT

  • Support the limb in the most comfortable position.
  • Relieve pain and refer the patient to hospital.

A SPRAIN

This is an injury to the joint associated with tearing of the ligament. It is sometimes associated with injury to the soft tissues which surround the joints. And this could be a tendon.

SIGNS AND SYMPTOMS

  • Severe pains at first but reduce slowly.
  • Swelling
  • Bruising which is due to collection of blood at the site.
  • Loss of movement.

TREATMENT

  • You can place the limb in a comfortable position. 
  • Apply a firm bandages.
  • Apply cold compress to reduce on swelling.
  • Gently massage the muscle above the sprain.
  • Encourage the patient to try to move the joint 
  • Then advise him to go to hospital to rule other injuries.

STRAIN

This is an injury to a muscle or tendon when it’s forcefully stretched beyond its proper length. It is sometimes associated with tearing of muscle fibers.

SIGNS AND SYMPTOMS

  • The patient will complain of sudden sharp pain at the site of pain.
  • The pain is worsened by movement 
  • Swelling
  • Loss of power.

TREATMENT

  • Place the patient in a comfortable position 
  • Apply bandage or plaster to the affected part.
  • In case of a fracture, you immobilize.

STITCH

It is a painful spasm of diaphragm. It usually occurs during games or running.

Treatment 

  • Rest
  • If not relieved by rest, give sips of hot water and rub the affected area.

BITES AND STINGS

Many insect stings cause irritation, swelling, pain and some are poisonous. Bites from sharp pointed teeth cause deep puncture wounds which can damage tissues and introduce germs. Some of them might crash the tissues. Any bite that breaks the skin needs prompt first aid because it increases the risk of infection.

SNAKE BITES

These can cause punctured wounds. The wound may not be serious but it’s important to determine whether it’s poisonous or not.

SIGNS AND SYMPTOMS

  • The wound may be visible.
  • The patient may show signs of poisoning like bleeding, paralysis of affected limb.
  • Signs of shock may be present.
  • Pulse may be weak and rapid.
  • Visual disturbance.
  • They may have nausea and vomiting
  • Small punctures may appear at the sight which is painful.
  • Swelling.
  • Breathing may become difficult or may completely fail.
  • Patient may start sweating.
  • He/she may become unconscious.

 TREATMENT FOR SNAKE BITES.

  • Tie a piece of cloth or tourniquet.
  • It’s tied above the site to prevent venous blood return
  • It should be tight enough so that blood can’t flow through vein but not too tight to obstruct arterial flow.
  • This tourniquet should be loosen every after 10- 20 minutes
  • Keep the bitten limbs hanging.
  • Re – assure the patient.
  • Keep the patient warm
  • Ensure rest.
  • Examine the wounds for any marks.
  • If there are marks, people think it is not poisonous and if no marks, it is poisonous.
  • Try to get to hospital immediately.
  • And this patient should be given an anti – venom injection.
  • If you are not able to get the patient to hospital immediately, you can do the following:
  • Wash the wound with lukewarm water.
  • You can add potassium permanganate if it is available.
  • Get sterilized knife or a new razor blade, make a cut across the site about 1cm, put a cloth and suck out the poison and spit it out.
  • Apply a clean dressing.
  • Treat shock
  • Refer to the nearest hospital.
  • If breathing fails, start artificial respiration continue monitoring vital signs as you wait for transport.

SCORPION BITE

Scorpion bites or stings or bites from other insects like spiders, mosquitoes etc. can cause serious illness and may be fatal if not treated promptly. A scorpion sting is poisonous so if it bites a person who is weak, it may produce serious results.

SIGNS AND SYMPTOMS

  • Severe pain at the site.
  • Sweating
  • Swelling
  • In case of children, the children may get convulsion.

TREATMENT

  • Reassure the casualty.
  • If the sting is visible, scrap it or brush it a way.
  • Raise the broken part if applicable.
  • Apply a cold compress.
  • Treat for shock.
  • Give a hot drink and keep the patient warm.
  • If the pain and swelling persist and the patient shows signs of shock, advise him to seek medical advice
  • Keep monitoring the vital signs.
  • Check out for allergic reactions like wheezing.

STINGS FOR BEES AND WASPS.

  • These stings occur quite often in rural areas especially if their nests are disturbed.
  • These are very painful but not that dangerous. However, if bitten by many insects (bees).
  • They have a sting which is left at the site and it should be removed.
  • If the person bitten is prone to allergies, then it may cause serious effect or condition because he/she may go into shock.
  • A sting in the mouth or throat is dangerous because the swelling can obstruct the air way.
  • Multiple insect bites cause/ produce serious reaction.

SIGNS AND SYMPTOMS

  • Pain at the site.
  • Swelling
  • Discoloration of the skin.

FIRST AID TREATMENT

  • Remove the sting using your finger, brush, or pair of forceps.
  • Re – assure the casualty.
  • Elevate the affected part if possible.
  • Apply a cold compress and keep it in position for at least 10 minutes.
  • Monitor the vital signs.
  • Treat shock.
  • Watch out for signs of allergic reaction.
  • Advise the patient or casualty to seek medical advice.
  • If the pain persists.

WOUNDS

A wound is a break or tears in the continuity of the skin. 

Wounds can be classified into different types depending on the cause and appearance. And each type has specific risks associated with the surrounding tissue damage.

TYPES OF WOUNDS

  1.  AN INCISED WOUND: Its clean cut wound. It’s usually caused by a sharp object like a razor blade, knife. It has straight edges. And it’s usually accompanied by profuse bleeding because blood vessels are cut across. Surrounding structures like the tendons and nerves may be injured.
  2. LACERATED WOUNDS (TORN WOUND): They are caused by blunt instruments. These wounds do not bleed much but more tissues may be damaged and this type of wound is more prone to infection.
  3. CONTUSED (BRUISED) WOUND: This can be caused by falling down on something that is blunt leaving bruises on the surrounding tissue. The capillaries beneath the skin may rapture and blood may leak into the tissues. And this will result into color change. If the injury is severe, there may be damage to the underlying structure.

This patient may present with the following:

  • Pain and swelling.
  • There are may be discoloration at the site of injury.

The aim of treatment is to reduce blood flow by cooling and gentle compression.

MANAGEMENT

  • Raise and support the injured part in the most comfortable position for the patients.
  • Then apply a cold compress to restrict the bleeding 
  • If you are in doubt about the severity of the injury, refer for medical aid.
  1. PUNCTURED (STAB) WOUNDS: These are caused by sharp pointed instrument e.g. knife, needle, bullet or anything that penetrates into tissues. They tend to cause internal bleed which is dangerous. It can also introduce germs into the bottom of the wound. There is a danger of injury to the internal organs (structure).

The patient may present with following (signs and symptoms)

  • T here might be a wound.
  • There is some bleeding which may not be much.
  • Shock may be there or not.

FIRST AID

  • Handle the injured patient gently as possible.
  • Seat/ lay the patient and raise the injured part.
  • Stop bleeding.
  • Do not disturb any formed clot.
  • If the wound is too big, it requires suturing, just apply a dressing and transfer to hospital.
  • If it’s a limb, immobilize to prevent unnecessary movements.
  • All punctured wounds of the chest and abdomen must be referred to hospital for the doctor to see. 

In case of a small wound 

  • Seat or lay the patient down handle the injured part with water and soap.
  • Clean the injured part with water and soap.
  • Stop bleeding using direct pressure.
  • If it is small wound, apply an antibiotic ointment and cover with a clean dressing.
  1. GUNSHOT WOUNDS: These tend to have a small entry and a big exit. As the missile passes through the body, it may damage internal organs tissues and even some blood vessels. In addition to the external bleeding, there is also internal bleeding the deeper the wound, the more are the chances of becoming infected. Aim of treatment is to stop bleeding and to prevent infection.

           6. PENETRATING CHEST WOUNDS: The rib cage protects not only the lungs, the heart and blood vessels above the diaphragm but it also protects the liver and the spleen below the diaphragm in the upper abdominal cavity. A wound to the front or back of the chest penetrating into the chest allows air to enter the space occupied by the lungs and this will interfere with bleeding and the lungs on the affected side collapses. 

Air in the chest cavity interferes with functions of the sound lung and sometimes the function of the heart is affected. If the wound is not the left lower part of the chest, it may penetrate into the abdominal cavity causing severe hemorrhage.

SIGNS AND SYMPTOMS

  • The casualty may complaint of chest pain.
  • Difficulty in breathing 
  • Breathing is narrow.
  • Cyanosis may be present indicating lack of oxygen.
  • A patient may cough up bright red frothy blood
  • Funny noise may be heard as the patient breathes in.
  • The patient may have signs and symptoms of shock.

AIM OF TREATMENT

To ease breathing by sealing off the wound immediately.

  • Arrange agent transfer to hospital.
  • Place the patient in a half sitting position with the head and shoulder supported.
  • Turn the body to the injured or affected side.
  • Gently cover the wound with a sterile dressing as soon as possible.
  • Form an air tight seal. It can be plastic cover.
  • Support the arm with a sling and make the patient as comfortable as possible.
  • Watch out for signs of internal bleeding.
  • If the casualty becomes unconscious, ensure a clear airway, place in a recovery position with the injured part. Upper most and keep checking breathing.
  • Arrange for urgent remove to hospital.
  1. BED SORE WOUND: Caused by being confined in bed with poor nursing care. It results from bed sore to bed sore wound. When micro organisms invade any of the above wounds, sepsis (pus formation) will occur, and the wound will be dirty and when these micro organisms are destroyed by the use of antiseptics or disinfectants e.g. hibitane, hydrogen peroxide then the wound will be clean.
  2.  ABRASSION: Is caused by tying round a string in a part of the body and it causes a peel of tissues.

Signs and symptoms 

  • Is easily seen
  • Bleeding- external or internal 
  • Pain.
  • Swelling can occur.
  • There can be sweating.
  • Hot and tender.
  • Increased blood supply to the site.

Many wounds do not bleed very much and this slight bleeding may soon stop on its own as clot forms. The process of arresting hemorrhage can be helped by giving the following management.

  1. It is better to wash your hands before dealing with the wound. If the wound is dirty, wash it under running water.
  2. Protect the wound with sterile swab and carefully clean the surrounding area with soap and water.
  3. Gently wipe away from the wound. Do not take off any clot which is forming. You should use each swab once only if the bleeding continues.
  4. Apply direct pressure on the wound using the sterile swab.
  5. Dress small wounds with adhesive dressing while larger ones with addressing pad and bandage.
  6. Raise and support the bleeding part unless you suspect a fracture.
  7. If you do not achieve the objective or you have doubts about the injury seek medical help. 
  1. Eye wounds:  All eye injuries can be serious, even the smallest injury on the eye can affect the cornea. It can also lead to infection with deterioration of the eye sight and even permanent blindness. The cut may be bruised or cut by direct broken fragments, metallic materials, pieces of stone or broken glasses.

Signs and symptoms

  • Patient may complaint of partial or total loss of vision of the affected eye.
  • The eye might appear red; there may be a visible wound.
  •  Blood may be seen or a clear wound on the eye.
  • The shape of eye ball may have become flat.

The aim of treatment is to protect the eye by preventing the movement and seeking medical aid.

Management 

  • Let the casualty lie on the back and keep it as still as possible.
  • Do not attempt to remove any foreign body which is embedded. 
  • Ask the casualty to close the injured eye and cover it with an eye pad or clean dressing then secure the dressing with a bandage or plaster.
  • Advise the casualty not to move the good eye.
  • It may be necessary to cover both eyes and re-assure the patient.
  • Arrange to transfer the casualty to hospital maintaining the treatment position.

10.Wounds which occur in the hand palms: These wounds can occur when a person handles or touches broken pieces of glass, broken objects and cut. Or: If a person falls putting hands on something sharp. These wounds tend to bleed profusely. It can be associated to a fracture. If the wound is deep, some nerves tendons might be affected.

Signs and symptoms

  • Pain at the sight of the wound
  • Bleeding which is sometimes profuse.
  • Loss of sensation, this is because nerves have been injured

Management 

Aim 

  • To control bleeding
  1. Make arrangement to transfer the patient without disturbing any foreign body. 
  2. To control bleeding, you place a sterile dressing over the wound and apply pressure.
  3. Elevate the injured part; put it above the level of the heart.
  4. Encourage the patient to maintain the pressure if the casualty can do it him or himself.
  5. You can also use bandage to support the casualty.
  6. Support the arm with sling as the casualty is being transferred to hospital
  1. ABDOMINAL WOUNDS: These usually occur due to sharp, instruments, gunshots, or anything that penetrates the abdominal wall. A deep wound is serious because it causes internal or external bleeding. But also it might have caused injury to the internal structures. If it has caused internal damage, this may cause severe internal bleeding.

Signs and symptoms 

  • Patient may complaint of general abdominal pain.
  • Bleeding might be there.
  • There might be a wound which may appear small.
  • Sometimes part of the intestine is visible.
  • The casualty may be vomiting.
  • He/she may have signs of shock

AIM:

  1. To protect the wound so that chances of infection are decreased.
  2. Make arrangements to send the casualty to hospital as quickly as possible.

Management 

  • Patient lies at the back with knees upwards. This helps in gaping of the wound.
  • This position helps to decrease strain on the injured part.
  • Knees should be supported in the position.
  • Apply a sterile dressing and secure it with a bandage or plaster.
  • Prevent or treat shock.
  • Do not remove any protruding object in the wound.
  • Do not give anything by mouth.
  • Check the breathing and pulse every 10 minutes.
  • Watch out for any signs of internal bleeding.
  • If the casualty coughs or vomits, support the abdomen gently so that the wound is not strained. It also helps to prevent protrusion of the intestines.
  • If the casualty becomes unconscious, open airway, check breathing and place her in a recovery position while supporting the abdomen. 
  • Quickly transfer the patient to hospital maintaining the treatment position.
  • Do not touch protruding intestines because you may cause infection. You continue supporting the abdomen during coughing and vomiting.

FACTORS AFFECTING WOUND HEALING

  1. Type and severity of the wound: The type and extent of the wound play a significant role in the healing process. Different wounds, such as surgical incisions, lacerations, or burns, may have different healing needs.
  2.  Infections:  Bacterial or fungal infections can significantly affect the healing process and may require medical intervention, such as antibiotics or antifungal medications.
  3.  Blood supply: An adequate blood supply is essential for wound healing. Blood carries oxygen and nutrients to the wound, promoting cell growth and tissue repair. Poor blood circulation, often associated with conditions like diabetes or peripheral artery disease, can delay healing.
  4.  Chronic conditions: Chronic health conditions like diabetes, autoimmune disorders, and cardiovascular disease can affect wound healing. These conditions can impair the body’s ability to deliver necessary nutrients and oxygen to the wound site and weaken the immune response.
  5.  Age: Advanced age can slow down the wound healing process. Older individuals may have reduced collagen production, decreased immune function, and other age-related factors that affect wound healing.
  6.  Nutrition: Adequate nutrition is crucial for proper wound healing. A balanced diet rich in protein, vitamins (mainly vitamin C and A), and minerals (such as zinc) supports the body’s healing processes. Malnutrition or deficiencies in these essential nutrients can impair wound healing.
  7.  Medications: Certain medications, such as corticosteroids or immunosuppressants, can hinder with wound healing. Also, treatments like radiation therapy or chemotherapy may negatively affect the healing process.
  8.  Lifestyle factors: Lifestyle choices, such as smoking or excessive alcohol consumption, can impair wound healing. Smoking, in mainly, reduces blood flow and oxygen delivery to the wound site, hindering the healing process.
  9.  Psychological factors: Psychological stress, anxiety, and depression can influence wound healing. High-stress levels may negatively affect the immune system and slow down the healing process.
  10. Wound care: Proper wound care is crucial for maximum healing. Factors such as keeping the wound clean, moist, and protected can  affect the healing process. Neglecting wound care or using inappropriate wound dressings can affect healing.

Injuries And Trauma Read More »

First Aid Medical emergency

First Aid Medical Emergencies.

First aid is a crucial skill that everyone should possess, as it enables individuals to provide immediate care and assistance to someone who has been injured or is experiencing a medical emergency.

There are various medical emergencies that require prompt first aid intervention. Some of the most common ones include:

 DROWNING

Drowning is defined as the process of experiencing respiratory impairment due to being submerged or immersed in water.

It occurs when the airway is blocked, preventing the person from breathing properly and leading to oxygen deprivation.

Drowning can result into death from hypothermia due to immersion in cold water, sudden cardiac arrest due to spasm of the throat blocking the air way or inhalation of water and consequent air way obstruction.

CAUSES OF DROWNING

  1. Lack of swimming ability: Inability to swim or lack of proper swimming skills increases the risk of drowning, especially in situations where individuals find themselves unexpectedly in water.

  2. Absence of barriers: Insufficient barriers, such as pool fences or lifeguards, can lead to unsupervised access to water bodies, putting individuals, especially children, at higher risk of drowning.

  3. Alcohol consumption: Alcohol impairs judgment, coordination, and reaction time, increasing the likelihood of accidents and drowning incidents in water-related activities.

  4. Seizures or medical conditions: Individuals with conditions like epilepsy or seizure disorders face a higher risk of drowning if an episode occurs while they are near water.

  5. Lack of supervision: Insufficient adult supervision, particularly for children and inexperienced swimmers, can lead to tragic outcomes when accidents happen in or near water.

  6. Fatigue: Especially when a person has been swimming for too long and gets too tired to continue.

Question: What happens during drowning?  The drowning victim struggles of inhale air as much as possible but eventually he goes beneath the water whereby he must exhale air and inhale water.

If this person is not rescued as early as possible, accidental death will result.

SIGNS AND SYMPTOMS

  • Difficulty in breathing
  • Noisy breathing
  • Water comes out from the mouth and the nose.
  • Distended abdomen
  • Cyanosis
  • Confusion
  • Rapid pulse
  • Unconsciousness
  • Fits may occur
  • Breathing may stop.

FIRST AID MANAGEMENT:

Aims of Management

  1. To restore adequate breathing.
  2. To keep the casualty warm.
  3. To arrange for urgent transport to hospital.

(a) REACHING A VICTIM

  • Pull the victim from the water using a rope, a branch of a tree, a stick, a shirt etc.
  • Lie down flat on your stomach and extend your hand or leg to the victim.
  • Throw him an object that will float for example a tire, a log, plastic toes, cautions etc. 
  • Make sure that your own position is safe to rescue to the victim.
  • You can also use a boat and a life jacket if available and swim or tow the casualty to shore or bank.

(b) WHEN THE CASUALTY HAS REACHED THE SHORE

  • Help him lie down a coat, or a rug or any piece of cloth with his head lower than the rest of the body so that the water can drain easily from the mouth and nose. This reduces the risk of inhaling water.
  • Treat the casualty for hypothermia, remove wet clothing and replace with dry ones if possible and cover him with dry blanket or any piece of cloth.
  • If the casualty is fully conscious, give him a warm drink if available.
  • If the casualty is unconscious, open the air way, check the breathing and if not breathing , initiate cardiopulmonary resuscitation. (CPR)
  • Give five (5) initial rescue breaths before you start chest compressions.
  • Call for emergency help even if the casualty appears to have recovered fully because of the risk of secondary drowning.
  • Any water entering lungs causes them to become irritated and the air passages may begin to swell several hours later this condition is known as secondary drowning.
  • Monitor and record vital signs such as level of response, breath and pulse until help arrives.

PREVENTING DROWNING

  1. Learn to swim: Acquiring swimming skills and encouraging others, especially children, to learn how to swim significantly reduces the risk of drowning.

  2. Constant supervision: Ensure active and serious supervision when individuals, especially children, are in or near water. Avoid distractions like phones or other activities that may take away attention.

  3. Use appropriate barriers: Install and maintain proper barriers like pool fences, covers, or gates to restrict access to water bodies and prevent unsupervised entry. Pool nets to cover pools are helpful too when having children around.

  4. Wear life jackets: In situations where swimming ability is limited or uncertain, wearing properly fitted life jackets can be essential  and increase safety.

DIAGRAM OF THE HUMAN SKIN

BURNS AND SCALDS:

BURNS: Are tissue injuries caused by dry heat, extreme cold corrosive substances, friction or radiation. Or: Is the destruction of the body surface by dry heat.

SCALDS: Are tissue injuries caused by wet heat from hot liquids and vapor.

TYPES OF BURNS:

(a) DRY BURNS: Dry burns occur when the skin comes into direct contact with a dry heat source. Examples of dry heat sources include flames, hot objects, or heated surfaces such as stoves, flat iron.

COMMON CAUSES

  • Contact with hot object
  • Friction
  • Flames

(b)  ELECTRICAL BURNS: Electrical burns occur when the body comes into contact with an electrical current. These burns can result from accidents involving faulty electrical appliances, exposed wiring, lightning strikes, or high-voltage power lines.

COMMON CAUSES

  • High voltage current
  • Lightening

(c) CHEMICAL BURNS: Chemical burns occur when the skin or eyes come into contact with corrosive or harmful chemicals. Chemical burns can result from contact with acids, alkalis, solvents, cleaning agents, or industrial chemicals.

COMMON CAUSES

  • Industrial chemicals including inhaled fumes and corrosive gases, domestic chemicals and agents. For example paint, pesticides, bleaching agents or any other strong acid or alkaline chemical.

(d) RADIATION BURNS: These are caused by over exposure to ultraviolet rays from the sun, exposure to radioactive sources such as x – rays.

(e) COLD INJURY: Cold burns, also known as frostbite, occur when the skin and underlying tissues are exposed to extreme cold temperatures. Cold burns can result from direct contact with extremely cold objects, exposure to freezing temperatures, or prolonged exposure to cold, contact with freezing vapor such as oxygen or nitrogen. Frostbite can cause the affected areas to become numb, pale, and firm to the touch. 

 PEOPLE AT RISK OF BURNS 

    1. Children mostly under five years of age.
    2. Elderly.
    3. Those with medical related conditions like seizure due to epilepsy, diabetes, leprosy, and albinism.
    4. Alcoholic or drug abusers.
    5. Factory workers.
    6. Petrol station pump attendants/ workers.

 CAUSES:

The causes of burns and scalds are external and can be grouped as follows.

  • Dry heat can be from flame or any hot object.
  • Moist heat can be from hot water or steam.
  • Corrosive chemicals such as acid and alkaline 
  • Electricity.
  • X –rays or ionizing radiation including radiation dermatitis.
  • Friction.
  • Smoke and inhalation of toxic substances.

SIGNS AND SYMPOMS

  • Reddening of the skin
  • Swelling
  • Blister formation
  • Pain due to exposure to the nerves common in 2nd degree burn
  • Peeling off the skin.
  • The victim is restless.
  • Dehydration
  • Signs may be present
  • For air way burns, there is;
  1. Difficulty in breathing
  2. Hoarseness of the voice.
  3. Shivering due heat loss.

CLASSIFICATION OF BURNS:

Burns are classified according to depth and the extent of damage.

(a)BASED ON DEPTH

  1. Superficial burns.
  2. Partial thickness burns
  3. Full thickness burn.

1. SUPERFICIAL BURNS/ FIRST DEGREE BURNS

This involves only the outer most layer of the skin. It is characterized by pain, redness, swelling, and tenderness but do not result in blistering. It usually heals well if first aid is given promptly.

2. PARTIAL THICKNESS/ SECOND DEGREE BURNS

It involves the epidermis and dermis layers of the skin, the skin may peel off. In this case, medical treatment may be needed. 

3. FULL THICKNESS BURNS/ THIRD DEGREE BURNS.

All the layers of the skin are burnt. There may be some damage to the nerves, the fatty tissues and muscles. Full thickness burns are characterized by loss of pain sensation. This may mislead both the first aider and the casualty about the true severity of the injury. Urgent medical attention is always essential for such burns (pain loss is a sign of nerve damage and not a sign of fairness).

( b)BASED ON DEGREE OF SEVERITY

(i) FIRST DEGREE: Epidermis is only involved reddening of the skin (erythema), no blisters formed.

(ii) SECOND DEGREE: Epidermis and some dermis are destroyed, blister formation, severe pain due to nerve exposure, mild to moderate edema.

(iii) THIRD DEGREE: Epidermis, dermis and hypodermis are involved some muscles get burnt it looks dry, waxy or hard skin and there is no pain.

(iv) FOURTH DEGREE: The whole skin is burnt including muscles, bones, tendons and ligaments.

EXTENT OF BURNS

It is vital to assess the extent of the area affected by the burn. This is because, the greater the surface area affected, the greater the fluid loss and the higher the risk for shock.

The extent of the burnt area is assessed using a simple formula known as WALLACE’S RULE OF NINE TO ADULTS.

The rule of nine divides the body into areas of about 9% as follows

  1. Head and neck – 09%
  2. Frontal trunk – 18%
  3. Back trunk – 18%
  4. Each arm – 9*2= 18%
  5. Lower limbs – 18*2=36%
  6. Perineum – 1%
  •  Total – 100%

RULE OF SEVEN FOR CHILDREN:

  1. Head – 28%
  2. Front trunk – 14%
  3. Back trunk – 14%
  4. Each lower limb – 14*2=28%
  5. Each upper limb – 7*2=14%
  6. Perineum – 2%
  • Total – 100%

This formula divides the body in areas about 7% and is used in estimation of burns in children.

NOTE: If 60% of the skin is burnt or 40% in the very young or very old, kidney failure is likely to occur up to 6 weeks post burning. 30 – 40% burns and above, the patient is considered as having severe burns and should be hospitalized. 

FIRST AID MANAGEMENT

(a) FOR MINOR BURNS

These include superficial burns and those covering a small area.

Aims

  • To reduce pain
  • To prevent complications
  • To reassure the victim
  • To arrange for urgent transport.

MANAGEMENT

  1. Put out the fire by pouring water or rapping the victim in a blanket. Do not allow the person on fire to run about especially into fresh air
  2. Cool the burnt area immediately by immersing it in cold water or putting it under gentle cold water for at least 10 minutes. Do not apply ice onto the skin. 
  3. A clean cold towel can also be applied to help in reducing the pain (cold compress).
  4. If blister form, leave them untempered with i.e. do not break them.
  5. Dry the area with clean piece of cloth and cover with a dry sterile non adhesive dressing to help prevent contamination on and infection.
  6. The first aider should pack the area while drying.
  7. Protect the burn area from pressure and friction.
  8. Reassure the casualty to reduce on the anxiety.
  9. Seek medical help if the burn involves the airways, eyes, hands or genitals.
  10. Seek medical advice if the patient develops signs of infection.
  11. Obtain an up to date information from the patient about tetanus immunization i.e. is this casualty fully immunized against tetanus.

FIRST AID MANAGEMENT FOR SUPERFICIAL BUT EXTENSIVE BURNS:

Burns that are not deep but cover a bigger %age of the body require a prompt medical attention.

  1. Call for help
  2. Put out fire by pouring in water or rapping a blanket.
  3. Remove clothing’s from the burnt area if they come off easily, otherwise do not disrupt the burn if the clothing’s are stuck to the skin.
  4. Reassure the victim to relieve anxiety.
  5. Remove any ring or constricting items since the burnt area may swell any time making it difficult to remove them.
  6. If the burnt area is smaller than the victim’s chest, cool the burn by lowering it with a clean cold wet towel or gently running cold water.
  7. If the burn is larger than the victims chest do not immerse the burn in cold water because there is risk of overcooling the victim instead cover the burn with a dry sterile non adhesive dressing to prevent contamination.
  8. If fingers or toes are burnt, separate them with a dry sterile non adhesive dressing. 
  9. If there is shock, carry out measures to treat it or other ways to prevent it.
  10. Treat shock.
  11. Transfer to hospital as early as possible and keep the head in one position during transit.
  12. Stay with victim until he gets medical help.
  13. Keep dressing clean, dry and change them whenever necessary.
  14. Obtain information about tetanus immunization.

COMPLICATIONS OF BURNS

Immediate

  • Vascular, tendon& nerve injury
  • Foreign body inclusion
  • Skin loss& necrosis
  • Airway obstruction of respiratory distress 

Intermediate

  • Secondary infection
  • Shock due to pain
  • Dehydration
  • Reduced circulatory volume 
  • Electrolyte imbalance

Late 

  • Infections
  • Contractures
  • Renal failure
  • Unstable scars
  • Alopecia
  • Marjolin’s ulcer(squamous cell carcinoma developing from the old scar)

ELETRIC BURNS:

Electric injuries are due to effect of high electric current voltage. The heat generated during the passage of current then through the body causes the deep burns.

In case of direct shock at the source, the victim remains stuck to the source of electricity until current is less. There may be:

  • Physical injury when the victim falls down
  • Respiratory arrest.
  • Cardiac arrest.

Sources of electric current.

 High current from cables from the main sources or low current from appliances.

  • Electrical appliances such as coffee grinders, iron boxes, shaving machines, washing machines, television sets, work shop and shops’ appliances, offices installations, etc.   These are usually connected to a direct power source either of low voltage or high voltage.

Note: Dump clothing’s, foot wear and ground increases electrical conductivity and makes the damage worse.

DANGERS OF ELECTRIC BURNS:

  • Cardiac arrest due to passage of current through the heart
  • Severe burns
  • Shock
  • Unconscious

MANAGEMENT

  1. Switch off the current and remove the plug from the socket to break contact of the casualty with the electric source.
  2. If the patient is lying in water keep out of it yourself as water is an excellent conductor of electricity.
  3. If the patient is in contact with a live wire and the current cannot be switched off, separate the wire from the victim using a long wooden stick and while standing on a non – conductor of electricity such as a wooden board or a pile of news papers. Wear gloves if available.
  4. Give artificial respiration and external cardiac massage if necessary.
  5. Flood the injury with cold water at least 10 minutes or until the pain is relieved. If water is not available, any cold harmless liquid can be used.
  6. Gently remove any jewelry, watches, belts or constricting clothes from the injured area before it begins to swell.
  7. Cover the burnt area using a sterile non – adhesive dressing and bandaging loosely.
  8. Treat shock if present.
  9. Give fluids to drink if conscious.
  10. Reassure the casualty.
  11. Monitor and record vital signs e.g. level of response, breathing and pulse.
  12. Arrange and send the casualty to hospital.

DON’TS

  • Do not touch the casualty if he is in contact with electric current.
  • Do not use any thing that is wet to break the electrical contact with victim.
  • Do not approach high voltage wires until the power is turned off.
  • Do not move a person with electrical injury unless he is immediate danger and is no longer in contact with one.

PREVENTION OF ELECTRICAL INJURIES IN THE HOMES OR AT WORK PLACE

  1. Wiring in the house must be checked by a competent electrician at intervals and rewiring is necessary 
  2. Adequate number of power points is essential instead of having only one plug where many appliances are run risking power over load is very dangerous.
  3. Plugs should also be wired correctly 
  4. Follow manufacturer’s instructions when using electrical appliances.
  5. Switches and electrical appliances must not be touched with wet hands or wall heaters and lights should be having cord pulls.
  6. Electrical appliances should be kept out of bath rooms
  7. Shavers should be used with properly insulated sockets.
  8. Children should not be allowed to have access in areas where these appliances are connected or used and should be taught dangers of electric shock.

CHEMICAL BURNS:

Certain chemicals may irritate, harm or be abserbed through the skin, causing wide spread and sometimes fetal damage. Signs however, develop slowly unlike in burns.

SIGNS AND SYMPTOMS

  • – Evidence of chemical in the vicinity.
  • – Intense, stinging pain.
  • – Later, discoloration, and blistering, peeling and swelling of the affected area.

TREATMENT

Aims

  1. To disperse the harmful chemical.
  2. To arrange transport to hospital.
  3. To make the area safe and inform the relevant authorities.

STEPS

  • First make sure the area is safe by assessing for signs of hazardous substances around you and the casualty.
  • Remove the casualty from the area if necessary.
  • Flood the affected area with water to disperse the chemical and to stop the burning. Do this for as long as 20 minutes.
  • Gently remove any contaminated clothing while flooding the injury.
  • Take or send the casualty to hospital, watch for airway and breathing closely.
  • Ask the casualty if she can identify the chemical, and take care not to contaminate yourself by putting on gloves.
  • Never attempt to neutralize an acid or alkali burns unless you are trained to do so and do not delay starting treatment by searching for an antidote.
  • Note and pass the details about the chemical to the medical personnel.

CHEMICAL BURN TO THE EYE

  • Splashes of chemicals in the eye can cause serious injury if not treated quickly.
  • Chemical can damage the surface of the eye, resulting in scarring and blindness. 
  • When irrigating the eye, be especially careful that the contaminated rinsing water does not splash you or the casualty.
  • Wear gloves if available.

SIGNS AND SYMPTOMS

    1. Intense pain in the eye.
    2. Inability to open the injured eye.
    3. Redness and swelling around the eye
    4. Copious watering of the eye.
    5. Evidence of chemical substances or containers in the immediate area.

TREATMENT

AIMS

  • To disperse the harmful chemical
  • To arrange removal to the hospital.

STEPS OF ACTIONS

  • Do not allow the casualty to touch the injured eye or forcifully remove contact lens.
  • Hold the affected eye under gently running cold water for at least 10 minutes.
  • Make sure that you irrigate both sides of the eye eyelid thoroughly. It is easier to pour water from a glass or eye irrigator or tap.
  • If the eye is shut in a spasm of pain, gently but firmly pull the eye lids open. Be careful that the contaminated water does not splash to uninjured eye.
  • Ask the casualty to hold a sterile eye pad of clean, non – fluffy material over the injured eye and put bandage over the eye pad.
  • Take or send the casualty to the hospital.
  • Identify the chemical if possible and give details.

SHOCK 

Shock is a condition which occurs when the circulatory system fails. And as a result, vital organs like heart, brain are deprived from oxygen. 

OR: Shock is a cute circulatory failure. The severities of shock vary with nature and extend of injury. It is a common cause of death incase of severe injury.  Shock may develop suddenly or gradually. It can be made worse or pain.

Inadequate tissue perfusion can result in:

  • Generalized cellular hypoxia (starvation)
  • Wide spread impairment of cellular metabolism.
  • Tissue damage – organ failure
  • Death

Shock can be of two types i.e.

1. PRIMARY SHOCK: This is shock which occurs immediately after injury. It is due to excessive stimulation of nerve endings at the site of the injury, but recovers quickly if treated promptly.

2. SECONDARY SHOCK: This develops within the next 30 minutes or even an hour. This is usually caused by hemorrhage. Secondary shock is a serious condition and if not treated properly and promptly, it can cause death. Therefore, the first aider should every possible think to prevent shock development or reduce its effects.

TYPES OF SHOCK ACCORDING TO THE CAUSES:

  1. NERVOUS SHOCK (PSYCHOGENIC SHOCK): This type of shock is due to strong emotional upset. This could be caused by fear, pain; it could also be caused by good or bad news. It can also be due to spinal or head injury because this comes from the shock.
  2. HAEMORRHAGIC OR HYPOVOLEMIC SHOCK: This is due to loss of blood or loss of fluids. Bleeding could be external. It could be due to multiple injuries. It can also be due to severe vomiting or diarrhea.
  3.  CARDIOGENIC SHOCK: This is when the cardiac muscles can not pump blood infectively either due to injury or if the person has a heart disease. This means the damaged muscles have no enough pressure to the rest of the body.
  4. BACTERIAL OR SEPTIC SHOCK: This refers to severe infection where there is discharge of poisons or toxin the blood stream. These bacteria or toxin tend to cause dilatation of blood vessels, and when the blood vessels are dilated they tend to withdraw blood.
  5. ANAPHYLATTIC SHOCK: This due to severe allergic reaction of the body to some drugs. They may also react to foreign items. In this case there is dilatation of blood vessels and again blood is withdrawn from some of the organs.
  6. ELECTRIC SHOCK: This is due to high voltage of an electric current. If any part of the body comes in contact with a live wire or an electric cable which has leaking current, then the person will get electric shock.
  7.  NEUROGENIC SHOCK: Chemical injury – association with aspiration of gastrointestinal contents during general anesthesia especially in cesarean section. It is also due to dry induced – associated with spinal anesthesia.

POSSIBLE CAUSES OF SHOCK

  • The most common cause of shock is severe blood loss. (Hemorrhage or bleeding)
  • Other causes include severe burns and scalds.
  • Fractures can also lead to shock possibly because of pain and some fractures are associated to bleeding.
  • Severe pain.
  • Excess fluid losses from the body – diarrhea, vomiting etc.
  • Excessive fear can lead to shock.
  • Some conditions like heart disease if severe.
  • Severe infections.
  • Low blood sugar in the body (Hypoglycemia).
  • Severe allergic reactions. (Anaphylactic shock)
  • Drug over dose.
  • Exposure to heat and cold.

SIGNS AND SYMPTOMS OF SHOCK

  • Giddiness and fainting
  • Patient may have nausea and vomiting. 
  • Pulse is rapid and weak.
  • Blood pressure is low.
  • Patients may be restless.
  • Breathing is shallow and rapid. (gasping)
  • Temperature is sub – normal.
  • The extremities are cold.
  • The patient may become unconsciousness and eventually the heart may stop.
  • Dizziness and weakness.
  • Thirst.

GENERAL TREATMENT FOR SHOCK

It is important to treat primary shock promptly in order to avoid secondary shock.

AIMS OF TREATMENT

  • Is to improve blood supply to the brain, heart, lungs refer the patient as soon as possible.
  1.  Let the patient lie down with the head lower than the rest of the body. This helps to send blood to the vital organs.
  2.  The head should be turned to one side.
  3.  The casualty should be moved as little as possible and should not be handled unnecessarily.
  4.  Keep the casualty warm but not over heated.
  5.  Stop any bleeding if there.
  6.  Immobilize any fracture if present
  7.  Treat any injuries.
  8.  Loosen any tight clothing around the neck, waist.
  9.  Check the breathing, the pulse and level of responsiveness every 10 minutes.
  10.  If breathing becomes difficult or this patient like vomit put him/her in recovery position.
  11.  If the casualty becomes unconscious, ensure an open airway, check breathing.
  12.  Take/ arrange for transfer of casualty to hospital maintaining the treatment position.
  13.  Re-assure the casualty if conscious or the relatives.
  14.  If the patient is not in severe shock and is conscious, give fluids to drink.
  15.  If the cause of the shock is not established, just give sips of clear water.
  16.  If oral fluids are contra – indicated, patient is put on intravenous fluids, I.V fluids should be given with care to avoid over loading the heart. When a patient is on intravenous, watch the pulse rate carefully.
  17.  Relief of pain in case of a fracture, it should temporarily be splinted.
  18.  In case of burns, cover with smooth and clean cloth.
  19.  Give analgesics (pain killer) e.g. morphine. Morphine should not be given if the patient has a respiratory problem, because it depresses the respiratory center which is found in the brain.
  20.  You continuously re-assure the casualty and attendants or relatives.

ASPHYXIA

Asphyxia is a fatal condition which occurs if there insufficient oxygen to the tissues of the body. 

The deficiency may be due to insufficient amounts of oxygen in the breathed in. It may also due to interference or injury to the respiration system.  Without adequate supply of oxygen, the tissues deteriorate very rapidly. So the vital structures will lack enough oxygen leading to loss of conscious or even death.

CAUSES OF ASPHYXIA

Many conditions can lead to asphyxia. And these are conditions which affect the air way and the lungs i.e.

  1. Fluids in the air passages. For example, drowning
  2. Obstruction to the air way. This may be caused by; the tongue falling back in case of an unconscious casualty can also be caused by food, vomit, it could be foreign body.
  3.  Swelling and edema of the tissue with in the throat. This may be due to severe burns of face and neck, it may be due to a sting (wasp or bee), and blood can also cause a blockage, swelling.
  4. Compression of the wind pipe. This may due to strangulation or compression of the chest.
  5. It may be due injury to lungs.
  6. Fits can also disturb the respiratory passage.
  7. Conditions which may affect the brain (respiratory centre) e.g. electrical injury (shock), poisoning, stroke by lightning , paralysis (which may be due to injury of spinal code) 
  8. Inhalation of harmful gases or fumes in the air, passages, e.g. coal gas, motor exhaust fume, smoke sewage gas and ammonia affect the level of oxygen in blood.Note: some gases affect the respiratory centre in addition.
  9. Suffocation is also a possible cause of suffocation is a condition in which air is prevented from reaching the air passage by external prevention.

SIGNS AND SYMPTOMS OF ASPHYXIA

  • The patient feels dizzy and weak.
  • Difficulty in breathing.
  • Later the breathing may become noisy.
  • The pulse is rapid but as the condition worsens, it becomes slow and irregular.
  • The neck veins might swell.
  • Cyanosis (bluish discoloration of the skin, nailed, membrane) may be present (patient may be semi conscious)

Aim

  • To restore adequate breathing and transfer.

MANAGEMENT

  • Immediately remove obstruction or remove the casualty
  • Ensure free passage for air especially for unconscious patients protecting the tongue obstructing the air way
  • If the casualty is conscious re – assure as you wait for transport.
  • If unconscious just keep a clear air way as you keep an eye on breathing.
  • Seek medical advice if you have doubt about the medical condition.
  • If there is frothing at the mouth.
  • If there is cyanosis.
  • If there is confusion.
  • If the level of responsiveness is getting low.
  • And if there is a change in breathing.

MANAGEMENT OF ASPHYXIA DEPENDING ON THE CAUSE

  1. Drowning: while artificial respiration is being performed, instruct by standers to remove wet clothing as far as practicable and wrap the casualty in dry blanket or other dry clothing.
  2. Choking: to dislodge the obstruction, bend the casualty’s head and shoulder forward or in case of a small child, hold him upside down and thump his back hard between the shoulder blades. If this is not successful encourage vomiting by passing two fingers right to the back of the casualty’s throat. 
  3. Swelling of the tissues within the throat: If breathing has not ceased or when it has been restored, or give ice to sock or failing, ice cold water to sip. Butter, olive oil or medicinal paraffin may also be given.
  4. Suffocation by smoke: Protect yourself by tying a towel, hand kerchief or cloth, preferable wet, over your mouth and nose. Keep low and remove the casualty as quickly as possible.
  5. Suffocation by poisonous gas: Before entering any closed space known or suspected to contain poisonous gas of any kind, take a deep breath and hold it. Ensure a free circulation of air by opening or if necessary by breaking doors or windows.
  6. Hanging, strangling and throttling:
  • Hanging: This involves suspension of the body. Grasp the lower limbs and raise the body. Free the neck by loosening or cutting the rope. Do not wait for a police man.
  •  Strangling: This is cutting off the air supply by constricting the neck. Cut and remove the band constricting the throat.
  • Throttling: This is cutting off air supply by squeezing a person’s throat.

SIGNS AND SYMPTOMS 

  • For the case of hanging, the body might be still hanging
  • If the person has not died, the pulse rate is high/ rapid, breathing is rapid, cyanosis, conscious is impaired, congestion of the face.
  • Neck veins are prominent (large or protruding)
  • There might be marks to indicate where the rope passed.
  • Sometimes constriction (squeeze) may still be visible around neck, e.g. a scarf or it may be hidden in the folds of the skin e.g. wire.

AIM OF TREATMENT

  • Restore adequate breathing and arrange moving to hospital.

MANAGEMENT

  • Remove the constriction immediately, supporting the weight of the body if hanging.
  • If there is knot, cut below it (a knot is difficult to cut and it may be useful evidence).
  • If the casualty is unconscious, open the air way and check breathing. Complete ABC of resuscitation if required and place the casualty in the recovery position. 
  • Arrange for shifting to hospital.

Note: seek medical aid even if recovery seems complete.

SUFFOCATION

Suffocation results when air is prevented from reaching the air passages by external obstruction such as a plastic bag, soft pillow or a fall on sand. A baby may be suffocated through lying face down on a pillow or cushion.

GENERAL SIGNS AND SYMPTOMS:

  1. Difficulty in breathing. The rate and depth of breathing increases.
  2. Breathing may become noisy with snoring or gurgling. (low bubbling sound)

AIM

  • Restore supply of air to the casualty and seek medical aid.

MANAGEMENT

  1. Immediately remove any obstruction or move the casualty to fresh air.
  2. If the casualty is conscious and breathing, reassure and observe.
  3. If the casualty is unconscious, open air way and check breathing. Complete the ABC of resuscitation if required and place the casualty in recovery position.
  4. Seek medical aid, if in doubt about the condition, arrange moving to hospital.
  5. Possible frothing at the mouth.
  6. Blueness of face, lips and finger nails (cyanosis)
  7. Confusion
  8. Lowering of level of responsiveness
  9. Possible unconsciousness.
  10. Breathing may stop.

CARDIAC ARREST

 Cardiac arrest is a sudden stoppage of the heart resulting in adequate cerebral circulation, which leads to coma within one minute but recovery would be complete if the oxygen deficiency is relieved within 3 minutes.

If oxygen deficiency exceeds more than 4 – 6 minutes severe and permanent brain damage will occur.

CAUSES OF CARDIAC ARREST

  1. Heart attack and myocardial infarction 
  2. Obstruction in the cardiac (heart) circulation.
  3. Injury to the heart.
  4. Electrolytes imbalances.
  5. Lack of oxygen to the heart.
  6. Severe drug reaction.
  7. Electric shock
  8. Due to anesthetic drugs.
  9. Severe bleeding.

SIGNS AND SYMPTOMS OF CARDIAC ARREST

  1. Absence of pulse in the major arteries like carotid or femoral arteries 
  2. The patient will be unconscious
  3. The skin color will turn into blue (cyanosis) 
  4. Respiration will stop.
  5. Pupils are widely dilated.
  6. If the operation is in progress there will be no bleeding or if there is bleeding it will stop.

FIRST AID MANAGEMENT

AIMS

  1. To save life.
  2. To preserve life.

MANAGEMENT OF CARDIAC ARREST

  • First confirm the diagnosis (unconscious, death like appearance, no pulse and no respiration)
  • Call for help e.g. passersby and an ambulance.
  • Remove tight clothes around the neck, chest, waist, etc which may interfere with circulation.
  • Place the casualty on spine position on a firm ground or a hard board.
  • Do not waste time and start cardiopulmonary resuscitation(CPR)
  • Follow ABC of resuscitation.
  1. A – Form airway clearance, i.e. remove vomits, secretions or any dentures.
  2.  B – For breathing, i.e. assist breathing by artificial means.
  3. C – For circulation i.e. chest circulation by chest compression.
  • Continue chest compressions and mouth to mouth respiration at the rate of 5:1.
  • Hyperextend the neck by tilting. It back ward as far as possible and start artificial respiration (mouth to mouth respiration) with chest compressions.
  • Monitor vital signs such as level of response, pulse, check papillary reaction which indicated successful efforts.
  • Continue basic life support and transport the patient to hospital.

POISOINING

Poison is any substance which when taken into the body in sufficient quantities it can cause injury to health or it can completely destroy life.  It is taken either accidently or intentionally.

HOW POISONS ENTER THE BODY

Poisons enter using different ways;

  1. They can be ingested (swallowed). This is by eating or drinking a poisonous substance. When eaten, they enter the circulatory system through the walls of intestines.
  2. Inhalation: Of fumes/ gases or even smoke from poisonous substance.
  3. Injection. What is intravenously introduced into the body may be poisonous.
  4. By contact. For example if a strong acid or spray comes into contact with the skin.

EFFECTS OF THE POISONS TO OUR BODIES

When poisons reach inside the body, they act in the ways:

  • Once in the blood stream, they can affect the central nervous system whereby they prevent some vital activities like breathing.
  • They may affect action of the heart and even other vital organs.
  • They can also disturb oxygen distribution.
  • When poisons reach the brain, the person may have convulsion or may be delirious.
  • A poison which is swallowed, it affects the food passages directly causing vomiting, pain and sometimes diarrhea.
  • If a person has taken a corrosive poison, it will burn the lips, mouth and the whole of the food passage.
  • Inhaled poisons will cause severe respiratory distress.
  • An over load of poisons will damage the body’s poison filter, i.e. kidney and liver.
  • Poison in the digestive system can cause vomiting, abdominal pain and diarrhea.
  • Poison in the blood may interfere with the red blood cells and if these red blood cells are disturbed, they may not carry adequate oxygen to the tissues.

TYPES OF POISON 

  1. Food poisoning 
  2. Drug poisoning
  3. Alcohol poisoning
  4. Industrial poisoning

AIMS OF FIRST AID:

  • To maintain the airway, breathing and circulation.
  • To identify the type of poison.
  • To obtain medical aid.
  • Aim at removing any contaminated clothing or article.
  • Remove the casualty from danger.

GENERAL TREATMENT FOR POISON 

  • Seek for medical aid as soon as possible because the case may become medical legal
  • Save the container 
  • Do not throw away the vomits in case of vomiting.
  • If the casualty is unconscious put in prone position with the head turned to one side.
  • You can also lay the patient in lateral position if the patient is vomiting.
  • And continue watching the breathing 
  • Start artificial respiration if necessary.
  • If the patient is conscious, you can give salty water or warm water to induce vomiting and also dilute the poison.

FOOD POISONING

Food poisoning, also known as foodborne illness, refers to the illness caused by consuming contaminated food or beverages.

 Contamination can occur due to the presence of harmful microorganisms such as bacteria, viruses, parasites, or toxins produced by certain bacteria or molds. When ingested, these contaminants can cause adverse reactions in the body, resulting in food poisoning.

Common Causes of Food Poisoning

Food poisoning can be caused by various factors, including:

1. Bacterial Contamination Bacterial contamination is a leading cause of food poisoning. Bacteria such as Salmonella, Escherichia coli (E. coli), Campylobacter, and Listeria monocytogenes can contaminate food during production, processing, handling, or storage. Improper cooking, inadequate refrigeration, and poor hygiene practices can contribute to bacterial growth and subsequent foodborne illness.

2. Viral Contamination Viruses such as rotavirus, and hepatitis A can contaminate food and cause food poisoning. Viral contamination often occurs through improper hand hygiene by food handlers or exposure to fecal matter during food preparation.

3. Parasitic Contamination Parasites such as Giardia, Cryptosporidium, and Toxoplasma can contaminate food and water sources. Consuming raw or undercooked contaminated meat, seafood, fruits, or vegetables can lead to parasitic infections and subsequent food poisoning.

4. Toxins and Chemicals Toxins produced by certain bacteria, such as Staphylococcus aureus and Clostridium botulinum, can contaminate food and cause food poisoning. Chemical contaminants, including pesticides, heavy metals, and cleaning agents, can also lead to foodborne illness if present in unsafe levels

MANAGEMENT

It is caused by eating contaminated food (by bacteria).

THE PERSON MAY PRESENT WITH;

  1. Gastrointestinal Symptoms Gastrointestinal symptoms are predominant in food poisoning and may include nausea, vomiting, abdominal pain, diarrhea, and sometimes bloody stools.
  2. Systemic Symptoms In some cases, food poisoning can also cause systemic symptoms such as fever, headache, muscle aches, fatigue, and weakness. (Some times may go into shock)

TREATMENT

  • Give plenty of fluids to prevent dehydration.
  • If the poison was corrosive, do not induce vomiting.
  • Collect and keep any vomitus for examination.
  • For corrosive substances give milk or water to dilute.
  • For example if one has taken an acid, you can give an alkaline like sodium bicarbonate to counteract.
  • And if it was a strong alkaline, you give a weak acid. A weak acid could be lime juice (2 spoons full in a pile of water).
  • You give soothing drinks, while egg, rice water. And still arrange to transfer the casualty.

Prevention of Food Poisoning

Prevention is key in reducing the risk of food poisoning. Effective preventive measures include:

1. Safe Food Handling Practicing proper hand hygiene, using clean utensils and surfaces, and preventing cross-contamination between raw and cooked foods are essential for safe food handling.

2. Proper Cooking and Storage Cooking foods thoroughly and maintaining proper storage temperatures to prevent bacterial growth are vital in reducing the risk of food poisoning.

3. Hygiene Practices Maintaining personal hygiene, such as regular handwashing, especially before food preparation, can help prevent foodborne illness.

4. Avoiding Cross-Contamination Separating raw and cooked foods and using different utensils and cutting boards for each can prevent cross-contamination and reduce the risk of food poisoning.

ALCOHOL POISONING

Alcohol poisoning refers to a severe and potentially fatal condition that occurs when an individual’s blood alcohol concentration rises to toxic levels. 

It happens when a person consumes a large amount of alcohol within a short period. Alcohol is a depressant that affects the central nervous system, and when consumed excessively, it can lead to significant impairment of vital functions.

Signs and Symptoms of Alcohol Poisoning

 Common signs and symptoms include:

1. Mental and Behavioral Symptoms

  • Confusion and disorientation
  • Agitation or aggression
  • Delirium or unconsciousness
  • Slow or irregular breathing
  • Seizures

2. Physical Symptoms

  • Pale or bluish skin
  • Vomiting or retching
  • Hypothermia (low body temperature)
  • Slow heart rate
  • In severe cases, respiratory failure or cardiac arrest

Immediate First Aid for Alcohol Poisoning

When encountering a person with alcohol poisoning, it is essential to take immediate action while waiting for emergency medical assistance. Follow these steps:

  1.  Call for Help / Emergency Assistance Contact emergency services and provide them with accurate information about the person’s condition and the amount of alcohol they have consumed.
  2.  Stay with the Person Do not leave the individual alone, especially if they are unconscious or experiencing severe symptoms. Stay with them to monitor their condition and provide reassurance.
  3.  Monitor and Support Breathing Check the person’s breathing and make sure they are lying on their side in the recovery position to prevent choking on vomit. If breathing becomes irregular or stops, be prepared to perform CPR if you are trained to do so.
  4.  Do Not Leave the Person Alone Continue to monitor the person’s vital signs, mental status, and breathing until medical professionals arrive.

Complications

Alcohol poisoning can have severe consequences and potential long-term effects, including:

  • Brain damage due to lack of oxygen
  • Liver damage or alcoholic hepatitis
  • Damage to the gastrointestinal system
  • Increased risk of accidents or injuries
  • Worsening of existing health conditions

Prevention of Alcohol Poisoning

Preventing alcohol poisoning involves responsible drinking practices and promoting a safe drinking environment,

  1.  Responsible Drinking Drink alcohol in moderation and know your limits. Pace yourself, alternate alcoholic beverages with non-alcoholic ones, and avoid drinking games or excessive peer pressure.
  2.  Know Your Limits Understand your tolerance for alcohol and know when to stop drinking. Avoid trying to keep up with others or exceeding your personal limits.
  3.  Avoid Peer Pressure Resist peer pressure to drink excessively or engage in risky behaviors. Surround yourself with supportive friends who respect your choices.
  4.  Education and Awareness Promote education and awareness about the risks of alcohol poisoning. Encourage open conversations about responsible drinking and the importance of looking out for one another.

DRUG POISONING

Drug poisoning refers to the harmful effects caused by the ingestion, inhalation, or exposure to excessive amounts of medication or drugs.

 It can occur due to accidental overdoses, intentional self-harm attempts, adverse reactions to medications, or interactions between different drugs.

TYPES OF DRUG POISONING

  1.  Accidental Overdose Accidental overdose happens when a person unintentionally takes an excessive amount of a medication or drug, either due to misreading labels, miscalculations, or improper dosing.
  2.  Intentional Overdose Intentional overdose occurs when an individual purposely takes an excessive amount of a medication or drug with the intent to harm oneself or commit suicide.
  3.  Adverse Reactions Adverse drug reactions can lead to drug poisoning. Some individuals may have a hypersensitivity or allergic reaction to certain medications, resulting in severe and potentially life-threatening symptoms.
  4.  Drug Interactions Drug interactions can occur when two or more medications or drugs interact with one another, leading to unexpected side effects or toxicity.

Signs and Symptoms of Drug Poisoning

The signs and symptoms of drug poisoning can vary depending on the type of drug involved and individual factors. Common manifestations include:

1. Central Nervous System Symptoms

  • Confusion or disorientation
  • Agitation or restlessness
  • Drowsiness or coma
  • Seizures or convulsions
  • Hallucinations or delirium

2. Cardiovascular Symptoms

  • Rapid or irregular heartbeat
  • High blood pressure
  • Chest pain or tightness
  • Palpitations or arrhythmias

3. Respiratory Symptoms

  • Shallow or labored breathing
  • Slow or irregular breathing
  • Respiratory distress or failure

TREATMENT.

  • If the casualty is conscious, help him to be in a comfortable position and ask him what he has taken.
  • Monitor and record the vital signs and if necessary transport or refer.

Prevention of Drug Poisoning

  1.  Proper Medication Use Follow prescribed dosages, administration instructions, and recommended durations when taking medications. Avoid self-medicating or altering dosages without medical advice.
  2.  Awareness of Drug Interactions Be aware of potential drug interactions between prescribed medications, over-the-counter drugs, and herbal supplements. 
  3.  Storage and Disposal of Medications Store medications securely and out of reach of children or individuals who may misuse them. Dispose of expired or unused medications properly to prevent accidental ingestion.
  4.  Seeking Professional Help If struggling with substance abuse or mental health issues, seek professional help. Proper treatment and support can reduce the risk of drug poisoning and promote overall well-being.

INDUSTRIAL POISOINING

Industrial poisoning occurs when individuals are exposed to hazardous substances present in industrial environments. 

These substances can enter the body through inhalation, ingestion, or skin contact. Industrial poisons can be in the form of chemicals, heavy metals, or biological agents, and their toxic effects can range from acute to chronic.

Common Types of Industrial Poisons

  1. Chemical Poisons Chemical poisons are substances that have toxic properties and can cause harm to humans upon exposure. Examples include solvents, pesticides, acids, alkalis, and industrial gases, Carbon monoxide (toxic),  irritant gases like ammonia and many others.
  2.  Heavy Metal Poisons Heavy metal poisons, such as lead, mercury, cadmium, and arsenic, are metallic elements that can accumulate in the body over time, leading to chronic poisoning and organ damage.
  3.  Biological Poisons Biological poisons are toxic substances produced by living organisms, such as bacteria, fungi, or plants. They can cause various diseases and health problems when individuals are exposed to them in industrial settings.

Signs and Symptoms of Industrial Poisoning

The signs and symptoms of industrial poisoning can vary depending on the specific toxic substance involved, the duration and intensity of exposure, and individual factors. Some common manifestations include:

1. Acute Symptoms

  • Difficulty breathing or shortness of breath
  • Nausea, vomiting, or abdominal pain
  • Dizziness or lightheadedness
  • Skin rashes or irritation
  • Headaches or migraines

2. Chronic Symptoms

  • Fatigue or weakness
  • Memory loss or cognitive difficulties
  • Chronic respiratory problems
  • Organ dysfunction or failure
  • Development of cancers or other long-term health conditions

GENERAL ROLES FOR TREATMENT OF SWOLLOWED POISONS

  1. Get medical aid as soon as possible.
  2. Keep only container which you think might help to identify the poison.
  3. Check for any signs of burning on the lips. And if the mouth is okay, you can induce vomiting.
  4. If the casualty is conscious, give fluids to dilute the poison.
  5. Where possible give an anti – dot.
  6. Give soothing drinks.
  7. Treat shock if necessary.
  8. Keep the casualty warm.
  9. Loosen any tight, clothing.
  10. If unconscious, put in a semi prone position, watch.
  11. Breathing and give artificial respiration if necessary.

PREVENTION OF POISONING

  1. All medicine bottles and pockets should be labeled containers with unlabeled medicines should not be used.
  2. For toxic medicines, indicated the word poison on the container to enable any person that it’s dangerous.
  3. And put them under lock.
  4. Never take medicine where the label isn’t clear.
  5. Always read the label 3 times.
  6. Label substances used for specific purposes.
  7. And all poisonous substances should be kept out reach of children.
  8. For these cases , as a first aider, always make sure you obey safety regulations so that you don’t become the second victim.
  9. For most of these poisons, you should neutralize so that they are not very harmful.
  10. In some cases, stomach wash out is done.

Question:  What is done for a person who has taken? 

  • Acid 
  •  Alkali
  • Mercury poisoning 
  • Opium
  1. Acid Poisoning:

    • Immediately call emergency services or poison control for assistance.
    • While waiting for help, carefully remove any contaminated clothing and rinse the affected areas with copious amounts of water for at least 20 minutes.
    • Do not induce vomiting unless specifically advised to do so by medical professionals.
    • Keep the person calm and reassured until medical help arrives.
  2. Alkali Poisoning:

    • Contact emergency services or poison control immediately.
    • Rinse the affected areas with large amounts of water for at least 20 minutes to dilute the alkali.
    • If the substance was ingested, give the person small sips of water or milk, unless they are unconscious or experiencing convulsions.
    • Do not induce vomiting.
    • Stay with the person until medical assistance arrives.
  3. Mercury Poisoning:

    • In cases of elemental mercury exposure (liquid mercury), avoid direct contact and prevent further spread by isolating the area.
    • If mercury is present on the skin or clothing, do not touch it with bare hands. Use gloves or a barrier to remove the mercury if possible.
    • Ventilate the area by opening windows and doors to allow the mercury vapor to disperse.
    • Contact emergency services or poison control for guidance on proper disposal and cleanup of the mercury.
    • Seek medical attention to assess the extent of exposure and receive appropriate treatment.
  4. Opium Poisoning:

    • If someone has ingested opium and is unconscious or having difficulty breathing, call emergency services immediately.
    • Do not induce vomiting unless advised to do so by medical professionals.
    • Keep the person lying on their side to prevent choking on vomit.
    • Monitor their breathing and provide first aid, such as CPR, if necessary.
    • Provide all relevant information about the substance and its ingestion to medical professionals.

First Aid Medical Emergencies Read More »

First aid kit

FIRST AID KIT

First aid kit or medical kit is a collection of supplies and equipment used to give immediate medical treatment, primarily to treat injuries and other mild or moderate medical conditions.

It is mandatory to have first aid kit in every work place like school, college, house and vehicles. It should be kept at such a place that is easily accessible. Also everyone should be aware of it. It should be labeled as “First Aid” and should have a red cross on a white background. From time to time, its items should be checked and replaced. All the required items should be available and ready for use at all times.

Components of a First Aid Kit

The minimum contents of the first aid box are as follows.

  • Torch 01
  • Thermometer – 01
  • Tongue Depressor (Disposable ice cream spatula)
  • Writing pad
  • Pen/pencil
  • Bandages of various types
  • Gauze pieces
  • Cotton
  • Eye pads
  • Scissors
  • Plaster
  • Safety pins
  • Tourniquet
  • ORS packets
  • Glucose packets
  • Methylated spirit
  • Tincture of iodine
  • Tincture of benzoin.     

PERSONAL PROTECTION OF A FIRST AIDER DURING FIRST AID.

It is important to protect yourself and the casualty from infection as well as injuries. I.e. transmitting germs or infections to a casualty or contracting infection yourself from casualty. 

This is because blood borne viruses such as hepatitis B, HIV may be transmitted by contact with body fluids and through giving mouth to mouth resuscitation. This increases if an infected person’s blood makes contact with yours through a cut. 

 Always be watchful   for your personal safety, do not put yourself personal safety, do not put yourself at risk by attempting heroic rescues in hazardous circumstances.

WAYS OF MINIMISING THE RISK OF CROSS INFECTION 

  1. Do wash your hands and wear latex free disposable gloves. If gloves are not  available, ask the casualty to dress his or her own wound or enclose your hands in clean plastic bags.
  2. Do cover cuts on your hands with water proof dressing.
  3. Do wear a plastic apron if dealing with large quantities of body fluids and wear plastic glasses to protect your eyes.
  4. Do dispose of all waste safely.
  5. Do not touch any part of the dressing that will come into contact with the wound.
  6. Do not breathe, cough or sneeze over a round while treating the casualty.

OBSERVATION TECHNIQUE USED IN FIRST AID

Every injury and illness manifests itself in distinctive ways that may help your diagnosis. These clues (guide to solution of problem) are divided into two groups: – signs and symptoms. Some will be obvious, but other valuable ones may be overlooked unless you examine the casualty, thoroughly from head to toe.

A conscious casualty should be examined, in the position found,  with any obvious injury comfortably supported, an unconscious casualty’s airway must first be opened and secured.

Use your senses: – sight, touch, hearing and smell. Be quick and alert, but be thorough and do not skimp or make assumptions. Ask the casualty to describe any sensations caused by touch as the examinations proceeds. Though you should handle the casualty gently, your touch must be firm enough to ensure that you will feel any swelling or irregularity or detect a tender spot.

What to observe for.

                           SYMPTOMS

  1. These are sensations that the casualty feels or experiences and may be able to describe. You may be able to describe. You may need to ask questions to establish their presence or absence.
  2. Ask a conscious casualty if there is any pain and exactly where it is felt. Examine that part particularly and then any other sites where pain is felt, severe pain in one place can mask a more serious, but less painful injury at another place. 
  3. Other symptoms that may help you include nausea, giddiness (loss of balance), heat, cold, weakness and impaired sensation.
  4. All symptoms should be assessed and confirmed, whenever appropriate, by an examination for signs of injury or illness.

                                     SIGNS.

  1. These are details discovered by applying your senses: – sight, touch, hearing, and smell, often in the course of examination.
  2. Common signs of injury include: – bleeding, swelling, tenderness or deformity, signs of illness that are very often evident are pale or flushed skin, sweating, a raised body temperature and a rapid pulse.
  3. Many signs are immediately obvious, but others may be discovered only in the course of thorough physical examination.
  4. If the casualty is unconscious, your diagnosis may have to be formed purely on the basis of the circumstances of the incident, information obtained from onlookers and signs discover.

EMERGENCY

An emergency refers to a sudden and potentially life-threatening situation that requires immediate medical attention.

PREPARING FOR EMERGENCY:

If you are prepared for unforeseen emergencies, you can ensure that care begins as soon as possible for yourself, your family and your fellow citizens. 

You can be ready for most emergencies, if you do the following things now:

  1. Keep important information about you and your family in a handy place. Information regarding address, age, medical conditions, allergies, prescription, doctor’s name and phone number.
  2. Keep to emergency:
  3. Learn and stay practiced in first aid skills, such as cardiopulmonary resuscitation (CPR).
  4. Keep the first kit readily available in your home, work place, leisure center, and cars. Any first kit must be kept in a dry place and checked and replenished (refilled) regularly, so that items are always ready for use.

GOALS OF EMERGENCY MEDICAL TREAMENT

When care is being given to a patient in an emergency situation, many crucial decisions must be made. Such decisions require sound judgment based on understanding of the condition that produced the emergency and its effect on the person.

The major goals of emergency medical treatment are:

  1. To preserve life.
  2. To prevent deterioration before more definitive treatment can be given
  3. To restore the patient to useful living. 

When the patient is first received into the emergency department, the goal is to determine the extent of injury (illness) and to establish priorities for the initiation of treatment. These priorities are determined by the comparative threat to the person’s life. Injuries or conditions interfering with vital physiologic function (obstructed airway, massive bleeding) take precedence (priority). Usually, injuries of the face, neck and chest that impair respiration command the highest priorities. Every member of the emergency team must be alert to the total problem of the patient, since the body cannot be isolated into parts. 

PRINCIPLES APPLIED IN EMERGENCY MANAGEMENT

The following principles are applicable to the emergency management of any patient:

  1. Maintain a patient airway and provide adequate ventilation, employing resuscitation measures when necessary. Assess for chest injuries with subsequent airway obstruction.
  2. Control hemorrhage and its consequences.
  3. Evaluate and restore cardiac output.
  4. Prevent and treat shock, maintain or restore effective circulation.
  5. Carry out a rapid initial and ongoing physical examination, the clinical course of the injured or seriously ill patient is not static.
  6. Assess whether or not the patient can follow commands, evaluate the size and reactivity of the pupils and motor responses.
  7. Start electrocardiogram (ECG) monitoring, if appropriate.
  8. Splint suspected fractures of the cervical spine in patients with head injuries.
  9. Protect wounds with sterile dressings.
  10. Check to see if the patient has a medical alert tag or any similar identification designating allergies.
  11. Start a flow sheet of the patient’s vital signs, blood pressure, neurological status, etc. to guide decision making.

                         ASSESSING A CASUALTY.

This involves finding out what is wrong as quick as possible, however your first priority is to make sure that your not endangering yourself by approaching the casualty unless your sure that the incident area is safe. 

AIMS OF ASSESSMENT

  1. To check the situation quickly and calmly while first protecting yourself and the casualty from any danger. 
  2. To find out and treat any life threatening injuries first.
  3. To carry out more detailed findings of each casualty.
  4. To seek for appropriate help, in case of an emergency or if you suspect a serious injury or illness.
  5. To be aware of your own needs.

There are two methods of assessment namely:

  1. Primary survey.
  2. Secondary survey.
  1. 1. Primary survey:

This is an initial, quick and systematic assessment of casualty to establish and treat conditions that are an immediate threat to life. When dealing with each life threatening condition, work in the following order; ABC principle 

  1. Airway: Is the airway open and clear? If not, open and clear it. An obstructed airway will prevent breathing causing hypoxia and ultimately death. Breathing: Note if breathing is slow, fast, absent or gasping. 
  2. Pulse : Note the pulse for its rate, rhythm, volume and tension.
  3. Breathing: Is the casualty breathing normally? Look, listen and feel for breaths. Blueness of tongue, lips, ear lobe and nail – Indicates lack of oxygen.  If not call for emergence help and start chest compressions with rescue breaths (Cardio pulmonary resuscitation).
  4. Circulation: Is the casualty bleeding severely? This must be treated since it can lead to life threatening condition such as shock
  5. Pallor : Note pallor or the degree of whiteness of tongue, conjunctiva and nails. This indicates the severity of bleeding. Therefore, control the bleeding and treat the casualty to minimize the risk of shock.  Bleeding from any part of body and swelling. N.B: If the threatening conditions are successfully managed or there are none, you carry on assessment and perform a secondary survey.
  1. 2. Secondary survey: This is a detailed examination of the a casualty to look for other injuries or conditions after a primary survey has been done it involves;


  • Head to toe 


(i) Head: 

– Observe skin color, wound, confusion and facial symmetry.

Check pupils

– Assess level of consciousness

– Palpate for depression of the skull.

– Check ears and nose for fluids or blood.

– Check the mouth for bleeding, dentures and any foreign body.

(ii) The neck: Observe and palpate for areas of tenderness and deformity.

(iii) Chest: 

  • Palpate clavicles and shoulders. 
  • Observe for wounds and whether the chest expands normally upon respiration.
  • Press gently on sternum and ribs to check integrity.

(iv) Arms:

  • Palpate entire length for pain, wounds, deformity and sensation.
  • Ask about pain, tingling, numbness and movement. 

(v)  Abdomen:

  • Observe for distension or wounds.
  • Pal pet for rigidity or tenderness.

(vi) Pelvis:

– Palpate the iliac crest and the pubis for pain.

– Observe for incontinence of the bladder and the bowel.

(vii) Spine: Palpate for tenderness, wounds and deformity.

(viii) Legs: Palpate entire length for pain; deformity and sensation.

(b) HISTORY TAKING

– Ask what happened

– Ask about medical history to find out if there is ongoing and previous condition 

– Ask about medication the casualty is taking currently

– Find out if the person has any allergy.

– Check when the person last had something to eat or drink 

NOTE: Use ‘’AMPLE’’ as a reminder when assessing a casualty to ensure that you have covered all aspects of examination.

A – Allergy

M – Medication

P – Previous medical history

L – Last meal

E – Event history (what happened).

(c) SYMPTOMS: These are sensations that the casualty feels and describes to you. For example if the casualty complain of pain.
(d) SIGN: These are features that can detect by observing and feeling the casualty such as swelling, bleeding, discoloration, deformity and smells. Use all your senses to look, listen, feel and smell.

POINTS TO CONSIDER WHEN DEALING WITH CASUALTY

  1. Make eye contact but look away now and then so as not to stare.
  2. Use a calm, confident voice that is loud enough to be heard but do not shout.
  3. Do not speak to quickly.
  4. Keep instructions simple by using short sentences and simple wards.
  5. Use affirming nods and ‘mmms’ to show that you are listening when the casualty is speaking.
  6. Check that the casualty understands what you mean.
  7. Do not interrupt the casualty but always acknowledge what you are told. For example summarizing what the casualty has told you to show that you understand.
  8. Be aware of risks.
  9. Build and maintain the casualty trust.
  10. Call appropriate help. 

POSITIONING OF A CASUALTY:

A casualty is nursed in different positions in different situations. The commonly used positions are;

  1. Recovery position
  2. Prone position
  3. Fowler’s position/ sit up position
  4. Dorsal recumbent position.
  5. Positioning in shock.

RECOVERY POSITION:

This is used in unconscious patients/ casualties if breathing and has heart beat should be nursed in recovery position.

ADVANTAGES:

  • It maintains open air way.
  • The tongue cannot fall to the back of the throat.
  • Head and neck will remain in the extended position so that the air passage is widened and that any vomiting or other fluid in the casualty’s mouth will drain freely.

recovery position

The recovery position is as follows:

  • Place the body in the prone position.
  • Turn the head down to the one side. No pillows should be used under the head.
  • Pull up the leg and the arm on the side to which the head is facing.
  • Pull up the chin.
  • Stretch other arm out as shown.
  • His clothes should be loosened at the neck and waist and any artificial tooth should be removed.

NOTE:  Recovery position cannot be used in:

  • When there are fractures to the upper or lower body.
  • When the casualty is lying in a confined space or if it is not possible to bend the limbs.
  1. PRONE POSITION

A patient is placed on his abdominal with head turned to one side. A pillow is placed under the head and hand’s kept on sides. This position is used for patients with burns of the back.

prone position

  1. FOWLER’S POSITION/ SIT UP POSITION

When a patient is having difficulty in breathing, this position is used. The patient is kept in a sitting position with the help of 3 or 4 pillows.

FOWLER’S POSITION

              4.  DORSAL RECUMBENT POSITION

The patient is kept on his back. A pillow is placed under the head. It is used for examination of the patient. This position without pillow is used in case of fracture of the spine and also to give CPR (cardio pulmonary resuscitation)

DORSAL RECUMBENT POSITION

          5. POSITIONING IN SHOCK.

Lay the casualty on the back turn head to one side. Raise the legs with two pillows to improve blood supply to the heart. If the victim has fracture on the lower limbs, it should not be elevated unless they are well splinted.

POSITIONING IN SHOCK.

RESUSCITATION (BASIC LIFE SUPPORT)

Basic life support is an emergency life saving procedure that consists of recognizing and correcting failure of the respiratory and the cardio vascular system.

Basic life support comprises of ABC steps which concern the Airway, Breathing, and Circulation respectively. 

For any one’s life to continue, the body needs adequate supply of oxygen to enter the lungs and transferred to all cells of the body through the blood stream. The most critical organ that should not fall short of Oxygen is the brain since it’s the master controller of all body functions.

Brain damage is possible if the brain is deprived of Oxygen for 4-6 minutes.

NOTE: Once you have started basic life support, do not interrupt it for more than 5 seconds for any reason accept it’s necessary to move the patient. Even in that interruption should not exceeds 7 seconds each.

THE RESUSCITATION SEQUENCE
  1. 1. CHECKING RESPONSE:
  • On discovering a collapse casualty, you should first establish whether he/she is conscious by asking simple questions like, what has happened or command the patient to do something e.g. ‘’open your eye’’.
  • Speak loudly and clearly close to the casualty’s ears. If the casualty does not respond, try to shake his shoulders gently as you speak to him/her (fully unconscious casualty will make no response at all).
  • The casualty may respond to pain, so you can gently pitch his/her skin.
  • A casualty who is partially conscious makes unnecessary movements on pitching.

NOTE: Quick assessment can be done using the ‘’AVPU’’ code.

A – Alert

V – Response to voice

P – Response to pain

U – Unresponsive.

CHECK POINTS

  1. Eyes
  2. Speech
  3. Movement

HOW TO OPEN THE AIRWAY

  1. Place the person in are recumbent position (face up) on a hard surface.
  2. Place one hand on his fore head and gently tilt his head back.  As you do this, the mouth will fall open slightly. 
  3. Place the finger tips of your hand on the point of the casualty’s chin and lift the chin up.
  4. Check the casualty’s breathing.

              HOW TO CHECK FOR BREATHING:

Keeping the air way open look, listen and feel for normal breath.

  1. Look for chest movements.
  2. Listen for sounds of breathing.
  3. Feel for breaths on your own cheek and see movement.
  4. Along her chest and abdomen.

Do this for not more than 10 seconds before deciding whether the casualty is breathing normally.

  NOTE: If there is any doubt, act as if breathing is not normal.

IF THE CASUALTY IS BREATHING

  1. Check the casualty for any life threatening injuries e.g. severe bleeding and manage it as necessary
  2. Place the casualty in a recovery position.
  3. Call for emergency help e.g. call for the nearest ambulance services.
  4. Monitor and record vital signs for example, level of response, breathing as you wait for help to arrive. 

IF THE CASUALTY IS NOT BREATHING

  1. Shout or ask for help (dial for an ambulance).
  2. Begin cardio- pulmonary resuscitation with chest compressions.

HOW TO GIVE CARDIO PULMONARY RESUSCITATION

  1. Kneel the casualty’s level with his chest.
  2. Place the heel of one hand on the center of the casualty’s chest.
  3. Place the heel of your other hand on top of the first hand and interlock your fingers making sure the fingers are kept off the ribs
  • Leaning over the casualty with your arms straight, press down vertically on the breast bone. (Sternum) and depress the chest 5 – 6cm (2 – 2 1/2inch).
  • Allow the chest to come back up fully before giving the next compression.
  1. Compress the chest 30 times at a rate of 100 – 120 compressions per minute. The time taken for compression and release should be about the same.
  2. Move the casualty’s head and make sure that the airway is still opened.
  • Put one hand on his fore head and two fingers of the other hand under tip of his chain.
  • Move the hand that was on the fore head down to pitch the soft part of the nose with the finger and the thumb.
  • Allow the casualty’s mouth to fall open.
  1. Take a breath and place your lips around the casualty’s mouth making sure that you have made a good seal. Blow into the casualty’s mouth until the chest rises. A complete rescue breath should take one second. Adjust the head position if the chest doesn’t rise.
  2. Maintaining the head tilt and chin lift, take your mouth off the casualty’s mouth and look to see the chest fall.  If the chest rises visibly as 61,000 and falls fully when you lift your mouth a way, you have given a rescue breath. Give a second rescue breath.

8. Continue the cycle of 30 chest compressions followed by two rescue breaths. This is done until emergency help arrives or another first aider takes over or until the casualty shows signs of regaining consciousness, such as coughing, opening eyes, speaking or moving purposely e.tc. It can also be until you are too exhausted to continue.

HOW TO GIVE CARDIO PULMONARY RESUSCITATION

First Aid Kit Read More »

First aid

First Aid

First aid: refers to initial or immediate assistance given to someone who has sustained an injury or got a sudden illness before the arrival of an ambulance, a doctor or any other qualified person.

Or: Is immediate care given to the injured or suddenly ill person. First aid does not take place in presence of proper medical treatment.

It consists only of giving temporary assistance until competent medical care, if needed, is obtained, or until the chance of recovery without medical care is ensured. Most injuries and illnesses require only first aid care. 

First aid includes assessing the victim for life-threatening conditions, performing appropriate intervention to sustain life and mental conditions until he/she can enter the emergency or casualty unit in the hospital.

F-Fast arrival

I-Intelligent

R-Recording and reporting

S-Safety precautions

T-Timely action

A-Alertness

I-Initiation and implementation

D-Decision making


  • First aider: Is a person who is capable of providing first aid to a casualty.
  • A casualty: This is any person who has sustained an injury or a sudden illness.
  • By- standers or on- lookers: These are people around the accident or the emergency scene.

AIMS OF FIRST AID

  • Save life 
  • Promote life
  • Prevent worsening of the casualty’s condition
  • Relive pain and anxiety
  • Make the casualty as comfortable as possible
  • Ensure that proper and immediate medical care is available.
  • Transport the casualty to the nearest hospital at the earliest.

SCOPE OF FIRST AID

    • Diagnosis: Determine the nature of the case requiring attention so far, as is necessary for intelligent and efficient treatment or diagnosis. I.e. Diagnosis: – Taking proper history, checking signs (bleeding pile) and symptoms (pain).
  • Treatment: To decide the character and extent of the treatment to be given and to apply the treatment, which is most suited to the circumstances until medical aid is available. I.e. Treatment: Remove the cause. Make the casualty comfortable and continue assistance till doctors arrives.

Apply treatment which is most suited to the circumstances until medical aid is available.

  • Disposal: Arrange for disposal of the casualty by shifting him either to his home or other suitable shelter or to hospital. I.e. Disposal: To nearest shelter, by the quickest means and to send a word to relatives.

PRIORITIES OF TREATMENT IN CASE OF AN ACCIDENT

The first aider should;

  • Observe carefully
  • Think carefully
  • Act quickly

OTHER FIRST AID PRIORITIES:

  • Assess the situation quickly and calmly. 
  • Protect yourself and the casualty from danger. Never put yourself at risk.
  • Prevent cross infection between yourself and casualty as possible.
  •  Comfort and reassure casualties at all times.
  • Assess the casualty by identifying the injuries or nature of illness affecting him or her.
  • Give early treatment and treat the casualties with the most serious or life threatening conditions first. 
  • Arrange for appropriate help. I.e. call for emergence help if you suspect a serious injury or illness or arrange for transportation of the casualty hospital or his home.

QUALITIES OF A GOOD FIRST AIDER

  • Observant: First aider should use all his senses and closely observe the cause of accident and its effect on the casualty.
  • Tactful: First aider should be tactful in dealing with casualty, crowd, doctor and relatives. He should be sensitive to the needs of the casualty and take prompt action. 
  • Selfcontrol: On seeing the accident, the first aider should have self-control and not get panic or excited.
  • Resourceful: First aider should be resourceful and make use of anything available at site of rescue to save life.
  • Knowledgeable: One should have good knowledge of accidents, emergencies, rescue measure, disease conditions, disasters, etc.
  • Skillful: One should have skill in taking vital signs, control of bleeding, cardio pulmonary resuscitation, bandaging, caring for sick, etc.
  • Empathy: A good first aider must have empathy and be understanding. (This is known as a good Samaritan principle).
  • He/she must be able to act quickly.
  • He must have common sense.
  • Discriminating: First aider may decide which of the several injuries should be given attention.
  • Explicit: Giving clear instructions to the patient and advice to the assistants.
  • A good first aider must be updated with knowledge and skills.
  • He/she must have the ability to make decisions quickly.

OBJECTIVES OF FIRST AID

The objectives of first aid are:

  • To preserve life.
  • To prevent further injury and deterioration of the condition.
  • To prevent complications related to injury or illness conditions.
  • To make the victim as comfortable as possible to conserve the strength.
  • To put the injured person under professional medical care at the earliest.

BASIC OBJECTIVES OF PSYCHOLOGICAL FIRST AID

  • To establish a human connection in anon intrusive compassionate manner.
  • To enhance immediate and ongoing safety, and provide physical and emotional comfort. Calm and orient emotionally overwhelmed or distraught survivors.
  • To help survivors to articulate immediate needs and concerns, and gather additional information as appropriate. 
  • To offer practical assistance and information to help survivors address their immediate needs and concerns.
  • To connect survivors as soon as possible to social support networks, including family, neighbors and community helping resources.
  • To support adaptive coping, acknowledge coping efforts and strengths, and empower survivors, encourage adults, children and families to take an active role in their recovery. 
  • To provide information that may help survivors to cope effectively with the psychological impact of disasters. 
  • Facilitate continuity in disaster response efforts by clarifying how long the psychological first aid provider will be available and (when appropriate) linking the survivor to another member of a disaster response team or to indigenous recovery systems, mental health services, public sector services and organizations. 

GOLDEN RULES OF FIRST AID

  • Do first things quickly and without fuss or panic.
  • Give artificial respiration, if breathing has stopped every second.
  • Stop any bleeding. 
  • Guard against or treat for shock by moving the casualty as little as possible and handling him gently.  
  • Do not attempt too much do the minimum that is essential to save life and prevent the condition from worsening. 
  • Reassure the casualty and those around and so help to lessen anxiety. 
  • Do not allow people to crowd round as fresh air is essential. 
  • Do not remove clothes unnecessarily. 
  • Arrange for the removal of the casualty to the care of a doctor or hospital as soon as possible.

PRINCIPLES OF FIRST AID (ACTION AT AN EMERGENCY)

  1. Remove the casualty to a place of safety
  2. Loosen clothing around the neck and waist, to help breathing
  3. Reassure the patient
  4. Look for the following:
  • Is there any failure of breathing? If yes, start artificial respiration.
  • Is there any failure of circulation? If yes, start external cardiac massage.
  • Is there severe bleeding? If yes, stop bleeding by pressing firm on pressure areas with a clean pad for few minutes.
  • Are there any signs and symptoms of shock? If yes, treat shock
  • 5. Relieve pain
  • 6. Avoid handling the casualty unnecessarily. 
  • 7. Arrange for safe removal of the casualty to the hospital. 

GENERAL RULES OF FIRST AID

  • Reach accident spot quickly. This will help to save life of the casualty.
  • Shout for help. Organize labour or onlookers or bystanders to help in any possible way. Make sure there are enough people to help you.  
  • Be calm, methodical and quick. By doing so, you can minimize the pain and the effect of the injuries, which may save life. Handling casualty clumsily will make the final recovery difficult.
  • Remove the casualty from danger or danger from casualty.
  • Look for the following:
  • Is there failure of breathing?
  • Is there severe bleeding?
  • Is the shock high or severe? Is there any signs/ symptoms of shock?
  • Attend to these and then treat easily observable injuries.
  • Start artificial respiration, if the casualty is not breathing, it must begin at once, as every second gained is helpful.
  • Stop bleeding by pressing on the pressure point, press firmly on the bleeding area for at least a few minutes (minimum 3 minutes) by watch – take help if available.
  • Treat shock
  • Avoid handling casualty unnecessarily.

Note: Never give anything by mouth to the patient who is unconscious.

  • Use the first aid articles if available (All trains, railway stations, Lorries and buses keep first aid box). Make use of material so obtained. In case, first aid box is not available, improvise and make use of available resources.
  • Assess the situation sensibly in regard to medical aid treatment which may be needed.
  • Make a written note on the general condition and your findings about the casualty.
  • Inspect the area: Take the casualty away from live wire, fallen walls, beams, fire, broken gas chamber, moving machinery, etc. to safer place.
  • Clear the crowd with polite words. Do not allow people to crowd around the casualty as the casualty needs fresh air. If a doctor is present, he will guide you. Any other first aider should be asked to help, otherwise take the assistance of by standers by giving them correct instructions.
  • Note the weather: If it is not raining, too hot or cold, treat in open, otherwise move the casualty into an airy room. If no suitable house or shelter is available nearby, it’s best to protect the casualty with an umbrella or a sheet of cloth or even a newspaper.
  • Reassure the casualty by soft words and encourage talking. This will help the casualty to take things lightly and lie quietly. This will help in recovery.
  • Arrange for dispatch of the casualty to the care of a doctor or to a nearby hospital. At the same time inform relatives as to where the casualty is being taken to. 
  • Do not attempt too much. You are only a first aider, give minimum assistance so that condition does not become worse and life can be saved.

DO’S AND DON’T’S 

  • Do not forget that you are not a doctor hence, do not attempt to overdo things.
  • Do not handle the victim unnecessarily as that condition may worsen.
  • Do not expose the casualty unnecessarily
  • Do not open any wounds / dressing, if bandaged previously by anybody.
  • Do not move any fracture case without putting proper splints.
  • Do not tie tourniquet at bleeding site and forget about it.
  • Attend to casualty as per priority.
  • Attend to children and women first.
  • Ensure self – safety and security before jumping into heroic attempts to save casualty
  • Follow precautions in handling communicable / infectious cases.
  • Never declare any casualty dead, it is that doctor’s job.

THE MANAGEMENT OF THE CASE

The first aider must always:

  • Respond quickly to calls for assistance, the saving of a life may depend on promptness of action.
  • Adopt a calm and methodical approach to the casualty, quick and confident examination and treatment will relieve pain and distress, lessen the effect of injury and may save life. Time spent on long and elaborate examination of a casualty may be time lost in his ultimate recovery.
  • Treat obvious injuries and conditions endangering life such as failure of breathing, severe shock, before making a complete diagnosis.
  • Take first aid material. If this is immediately available. If standard equipment is not available the first aider must depend on material to hand which will have to be provided as required.
  • Study the surroundings carefully. These may influence the action to be taken and therefore require careful consideration for example:
  • Danger: From falling building, moving machinery, electric current, fire, poisonous gases and similar hazards.
  • Weather: If the accident occurs out of doors, the casualty may be treated in the open if the weather is fine, if the weather is bad, he must be removed to shelter as soon as is reasonably possible.
  • Shelter: Note houses and buildings near at hand, whether occupied or unoccupied and whether likely to be particularly useful, such as a chemist’s shop, otherwise, temporary shelter may be provided by means of umbrellas, rugs and the like.
  • Assistance: Crowds must be tactfully controlled. If a doctor is present, work under his direction. If not, ask if anyone with knowledge of first aid is present. If neither is available make use of bystanders to the best advantage.
  • Reassure the casualty by speaking encouragingly to him. Warm him to be still and tell him that he is in trained hands.  

STEP BY STEP ACTION TO BE TAKEN BY THE FIRST AIDER

  1. Examination and Diagnosis: This is taking account of the casualty‘s history and that of incident, symptoms, signs and level of responsiveness.
  2. History: This is the full story of how the incident occurred or the illness began, and should be taken directly from the casualty and a responsible bystander wherever possible.
  3. Never hurry the casualty and remember to pass on all information you have obtained when skilled help arrives.
  4. Symptoms: These are sensations that the casualty feels and describes to you the most useful of these is pain. If the casualty is unconscious or unreliable because dazed (confused) or in shock, their diagnosis cannot be based on symptoms but has to be based on information obtained from bystanders and signs.
  5. Sign:  These are details ascertained by you using your senses – sight, touch, hearing and smell. These may be signs of injury such as: bleeding, swelling, deformity, or signs of illness such as raised temperature and rapid or regular pulse.

  • Cardiopulmonary resuscitation (every second).
  • Control bleeding.
  • Treat shock and special care of unconscious cases. 
  • Fracture immobilization 
  • Burn cover, with clean washed or dressing and treat shock.
  • Eye, nose and ear injuries.
  • Multiple superficial injuries.
  • Transportation

RESPONSIBILITIES OF A FIRST AIDER IN THE MANAGEMENT OF CASUALTIES:

  • Gain access to the patient in easiest and safest way.
  • Observe the accidents scene and assess the situation.
  • If necessary, direct others to direct traffic keep bystanders at a safe distance and make essential telephone calls. Turn off all engines that may be still running.
  • To find out whether is unconscious, conscious alive dead. 
  • Identify the disease or condition from which the casualty is suffering.
  • Give immediate, appropriate and treatment considering priority of the first aid measures. Such as first priority will be of restoration of breathing and circulation, while second will be stopping the bleeding.
  • Should bear in mind that a casualty may have more than one injury and that some casualties will require more urgent attention than others. 
  • Arranging without delay for shifting of the casualty to a doctor, hospital or home according to the condition in such a manner that injury is not complicated or the victim is not subjected to unnecessary discomfort.
  • Keeping the record of the patient and of the patient and of incidence, addresses and witness.
  • Once a first aider has voluntarily started care, he should not leave the scene, or stop the care until a qualified and responsible person relieves him.
  • To report your observations to those taking over care of the casualty and to give further assistance if required.
  •  To prevent cross infection between yourself and casualty as much as possible.

LIMITATIONS OF THE FIRST AIDER

  1. The first aider should be observant with the rules or objectives of first aid and act quickly and vigilantly.
  2. He should inspire confidence in the patient and others closely related to the patient.
  3. To save lives, there are three conditions that call for first aid: – stoppage of breathing, severe bleeding and shock.
  4. If breathing movements are not proper, the lips, tongue and finger nails become blue, in such a situation, artificial respiration should be started immediately.
  5. If there is heavy bleeding: It may be from wounds through one or more large vessels. In this condition, pressure should be applied directly over the wound. For this, a clean handkerchief or a pad may be kept on the wound and pressed firmly with one or both hands, then apply affirm bandage.
  6. The important factor to be attended immediately is shock. Shock accompanies severe injury or emotional disturbance. Cold and clammy skin, beads of perspiration on the fore head and palms. Pale face, nausea and vomiting are the common symptoms of shock.

SKILLS REQUIRED FOR THE FIRST AIDER:

  • Control the scene of accident.
  • Gain access to the patient.
  • Evaluate the scene in terms of safety and possible cause of accident.
  • Gather information from patient and bystanders.
  • Determine vital signs (pulse, breathing, skin, temperature)
  • Determine diagnostic signs and relate those to possible injuries or sudden illnesses that require emergency care.
  • Perform the necessary ABC’S of emergency care:
  1. Open air way.
  2. Breathing (breathlessness- provide artificial ventilation).
  3. Circulation (pulseless- provide one and two rescuer cardiopulmonary resuscitation).
  4. Bleeding control (haemorrhage controlled by direct pressure and elevation, pressure points and tourniquets).
  • Diagnosis and care for shock.
  • Diagnosis and care for open and closed fractures, sprains (tearing of ligaments), strains (muscle injured by overstretching) and dislocations, including cold treatment and basic splinting techniques.
  • Diagnosis and care for soft tissue and internal injuries including basic dressing and bandaging techniques.
  • Detect and care for poisoning including alcohol and drug abuse.
  • Diagnosis and care for heart attack, stroke, diabetes, coma, insulin shock, and epileptic or other seizures. 
  • Diagnosis and care for facial injuries, head injuries, neck and spinal injuries and chest injuries including fracture ribs and penetrating chest wounds
  • Diagnosis and care for burns and smoke inhalation.
  • Diagnosis and care for exposure to heat and cold, which includes heat exhaustion, heat cramps, heat stroke, hypothermia and frostbite.
  • Assist in child birth and care of the new born.
  • Psychological and proper emergency care to victims of crisis and disasters.
  • Perform proper transformation techniques.  

First Aid Read More »

Get Pen and a Paper and write,

No copy and Paste Allowed!