
Wound Care, Bandaging, and Orthopaedic Splinting
Part A: Theory — Wound Dressing
Definition
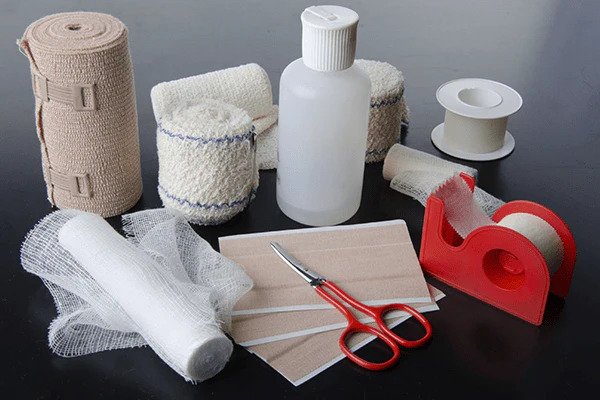
- A dressing is a sterile pad or compress applied directly to a wound to promote healing, protect it, and/or absorb exudate (fluids).
- Wound dressing is the systematic, aseptic procedure of cleaning a wound and applying a sterile covering using sterile technique and sterile equipment.
Purposes / Indications of Wound Dressing
Why do we dress wounds? As a nurse, you must know these indications for your exams:
- To protect the wound from further injury or external bacterial infection.
- To absorb exudates such as pus, blood, or serum.
- To immobilise and support the injured part.
- To apply pressure on the wound to control bleeding or to approximate (bring together) the wound edges.
- To provide psychological and physical comfort for the patient (hiding a severe wound reduces anxiety).
- To keep the wound moist for optimal healing and to allow regular inspection/monitoring of the wound bed.
Types of Wounds that Need Dressing
- Surgical wounds: Sutured incisions from the operating theatre. These are usually clean wounds.
- Traumatic wounds: Abrasions, lacerations, and deep punctures from accidents.
- Infected wounds: Wounds actively discharging pus or foul fluids ("dirty wounds").
- Burn wounds: Requiring highly specialized, sterile, non-adherent care.
- Chronic wounds: Pressure sores (bedsores), diabetic foot ulcers, and venous leg ulcers.

Types of Dressings Used
| Type of Dressing | Description & Use |
|---|---|
| Dry sterile dressings (Gauze) | Basic sterile gauze used for covering clean, dry, sutured wounds. |
| Non-adherent dressings | Dressings treated with petroleum jelly (e.g., Paraffin gauze / Jelonet). They do not stick to the raw wound surface, making removal painless. Used for burns, grazes, and skin grafts. |
| Wet-to-dry dressings | Saline-moistened gauze is packed into a dirty wound. As it dries, it sticks to dead tissue. When pulled out, it mechanically debrides (removes) the dead tissue. Used for dirty/sloughy wounds. |
| Occlusive / semi-permeable films | Clear, waterproof films that keep the wound moist while allowing gas exchange. Protects IV sites and minor burns. |
| Hydrocolloid / Alginate / Foam | Advanced modern dressings that absorb extremely heavy exudate and promote rapid granulation tissue growth. |
Principles of Aseptic Technique (Why we use it)
Aseptic technique is the foundation of wound care. The core principles are to:
- Prevent cross-infection (spreading germs from one patient to another) and wound infection/sepsis.
- Protect both the patient and the nurse by following standard precautions (treating all blood/body fluids as potentially infectious, e.g., HIV, Hepatitis B).
- Ensure that ONLY sterile articles touch the wound.
- Maintain a strict clean-to-dirty workflow, and perform rigorous hand hygiene before and after.
Wound Assessment Before Dressing
Before you clean a wound, you must observe and document its status:
- Site, size, depth, and shape of the wound.
- Type and amount of exudate (serous/clear, purulent/pus, or blood-stained) and check for any foul odour.
- The state of the wound edges (are they approximated/closed or gaping open?) and the presence of any stitches, clips, or surgical drains.
- Signs of Infection: Redness, heat, swelling, severe pain, pus, fever, or red streaks tracking up the limb.
- The condition of the surrounding skin and the patient's general vital signs.
⚠️ Dangers of Poor Dressing Technique
If a nurse is sloppy with asepsis, it leads to severe wound infection/sepsis, delayed healing, wound dehiscence (a surgical wound bursting open), excessive bleeding, or damage to fragile new healing tissue from rough handling. Always respect the sterile field!
Procedure: 7.3 Dressing of Wounds
🏥 OSCE EXAM PROCEDURE: 7.3 DRESSING OF WOUNDS
Objectives to Master:
- 1. Mention the indications for wound dressing.
- 2. Mention the general rules of wound dressing.
- 3. Identify requirements for wound dressing.
- 4. Prepare requirements for wound dressing.
- 5. Perform wound dressing correctly.
General Rules for Wound Dressing (Crucial for Exams)
| No. | Rules | Rationale |
|---|---|---|
| 1. | All bed making, mopping of the floor and dusting must be finished at least one hour before the dressing round is started. | To prevent spread of infections (dust settling). |
| 2. | Before the dressing round, wash the trolley with soap and water and dry it. | To maintain a clean working surface. |
| 3. | Before each dressing, wipe the trolley shelves with disinfectant using a mop. | To ensure asepsis before setup. |
| 4. | Sterile articles are placed on the top shelf, un-sterile articles on the bottom shelf. | To prevent contamination of sterile fields. |
| 5. | Clean wounds are always dressed first. | To prevent tracking bacteria from dirty wounds to clean ones. |
| 6. | Limit movements in the ward and windows near to the patient being dressed must be closed. | To prevent cross infection via airborne dust. |
| 7. | Do not carry out dressing when having a focal wound or droplet infection (e.g., a cold). | To protect the patient's wound from your own flora. |
| 8. | If possible 2 nurses should be available to carry out dressing. | To prevent contamination and save time. |
| 9. | Apply universal infection prevention and control before and after each procedure. | To prevent spread of infections. |
| 10. | Nails must be short, watch and rings should be removed. | Rings and nails harbour bacteria. |
| 11. | Masks are worn if required and once in position they must not be handled. • When removing the mask, handle only the tapes and dispose of immediately. • Never put a used mask in the uniform pocket. | To prevent spread of infections. |
| 12. | Lotions: The dressing assistant should pour only enough lotion for one dressing. Unused lotion must be disposed of when cleaning the trolley. | To avoid wastage and cross infection. |
| 13. | The trolley is reset for each dressing. | To guarantee a fresh sterile field. |
| 14. | All used equipment must be decontaminated, washed with soap water, brushed, dried and sterilised. | To be ready for next dressing. |
| 15. | The trolley is cleaned with disinfectant. | To leave the unit sanitary. |
Requirements (Setting the Trolley)
Memorize this layout for your practical exams:
| Top Shelf (Sterile) | Bottom Shelf (Unsterile) | Bed Side |
|---|---|---|
Sterile dressing pack containing:
|
|
|
🚨 EXAM TRAP: Extra Requirements for a DIRTY Wound
If the examiner says the wound is dirty or infected, you MUST add these to your trolley:
- 1. Probe
- 2. Hydrogen peroxide (to lift debris)
- 3. Pedal bin
- 4. Sinus forceps
- 5. Pus swab (for collecting a sample)
- 6. Laboratory form
- 7. Hypotonic saline
Procedure for Wound Dressing
| Step | Action | Rationale |
|---|---|---|
| 1. | Refer to general rules. | To maintain sterility. |
| 2. | Dressing assistant positions the patient. | To prepare the site. |
| 3. | Place mackintosh and towel under the part to be dressed. | This provides comfort and prevents soiling the bed linen. |
| 4. | Dressing assistant puts on clean gloves, removes the bandage, loosens the strapping. | For easy removal of old dressing. |
| 5. | Dressing assistant removes gloves, washes hands, opens the dressing pack and adds any additional sterile equipment using Cheatle forceps. | To arrange the materials as needed for easy use and maintain sterility. |
| 6. | Add sterile cleaning solution required. | To prevent spread of infections. |
| 7. | Dressing assistant puts on clean gloves, removes the dressing and discards it in the receiver. | To prevent spread of infections. |
| 8. | Dressing nurse washes hands thoroughly with soap and water and dries with sterile towel. | Reduce the spread of infections. |
| 9. | Put on sterile gloves. | To maintain surgical asepsis. |
| 10. | Drape the wound with dressing towel. | In order to provide a sterile environment. |
| 11. | Using forceps, swab the wound in the following way discarding each swab after use: • First the centre of the wound. • Then each side of the wound, working from the middle outwards. | Minimise spread of infection. |
| 12. | For a dirty wound perform the necessary toilet e.g. as prescribed. This may involve the removal of stitches or clips, probing the wound or packing the wound. | Promote healing. |
| 13. | Apply dressing to cover the wound. Put additional dressing if oozing or discharge is anticipated. | To protect the wound and prevent soiling of the linen. |
| 14. | Place used instruments in a receiver. | To avoid cross infections. |
| 15. | Remove gloves, apply strapping or and bandage on the wound as required. | To maintain hygiene and sterility. |
| 16. | Wash your hands, clear away and leave patient comfortable. | Standard care completion. |
| 17. | Document the procedure and report accordingly. | For continuity of care and follow up. |

📝 EXAM TECHNIQUE: How to Clean a Wound
Always clean in ONE direction only, from the cleanest part to the dirtiest part.
- 1st swab: Centre of the wound, working outward.
- 2nd swab: One side of the wound, middle outwards.
- 3rd swab: The other side of the wound, middle outwards.
Rule: Each swab is discarded after a single stroke. Never return a used swab to the wound; this carries germs back in (cross-infection).
Points to Remember
- Use spirit or alcohol for easy removal of any marks from previous strapping.
- If strapping is adherent to the skin, soften it with antiseptic lotion.
- For a dirty wound, hydrogen peroxide or any prescribed medicine is used.
- Avoid excessive surgical toilet that interferes with fragile wound healing or causes bleeding.
Procedure: 7.4 Removal of Sutures or Clips
🏥 OSCE EXAM PROCEDURE: 7.4 REMOVAL OF SUTURES/CLIPS
Objectives:
1. Identify the requirements for removal of sutures/clips.
2. Remove sutures/clips correctly.
Requirements: See trolley setup for standard wound dressing.
| Step | Action | Rationale |
|---|---|---|
| 1. | Refer to general rules. Review patient's chart. | To confirm patient and procedure. |
| 2. | Follow procedure for surgical wound dressing. | Promote infection prevention and control. |
| STITCH REMOVAL | ||
| 1. | Hold the stitch using a pair of non-toothed dissecting forceps and cut beneath it on the opposite side; and remove the stitch slowly. | To prevent pulling the dirty exposed part of the stitch through the clean wound tract. |
| 2. | Use antiseptic lotion for dirty wounds after the removal of stitches. If the skin is clean and dry do not clean and dress. | Standard aseptic practice. |
| CLIP REMOVAL | ||
| 4. | Insert the clip remover under the clip; press it for the clip to come out. | Clip remover helps to remove the clip safely. |
| 5. | When the wound has healed with no discharge then a dressing is not necessary. | For quick healing (exposure to air). |
| 6. | Count the stitches or clips. | To make sure all have been removed and none are left inside. |
| 7. | Document the procedure. | Follow up. |
Points to Remember
- Stitches or clips are normally removed between the 5th and 10th day post-operatively.
- Sometimes the stitches or clips are removed alternatively (every other stitch) to prevent the wound from gaping open prematurely.
- On some occasions absorbable sutures may be used in which case they are not removed.
Supplementary Theory — Sutures (For Depth/Exams)
A suture is a stitch used to approximate (bring together) wound edges. You must know the materials:
- Non-absorbable: Silk, nylon, polypropylene, stainless steel clips. These must be physically removed later.
- Absorbable: Catgut, vicryl, dexon. These dissolve naturally inside the body and are not removed.
- Wound healing:
- Healing by First Intention: Clean, sutured edges that heal quickly with minimal scarring.
- Healing by Second Intention: A dirty or gaping wound left open to heal by granulation tissue forming from the base upwards. Leaves a larger scar.
Part B: Theory — Bandaging
Definition
- A bandage is a strip of material used to bind, support, cover or immobilise a part of the body.
- Bandaging is the technique of applying bandages firmly, evenly and safely to hold dressings, support injuries or apply pressure.
Purposes / Indications of Bandaging
- To keep a dressing securely in position on a wound.
- To apply pressure and control bleeding (e.g., a pressure bandage).
- To support and immobilise an injured part (sprains, strains, fractures).
- To prevent or reduce swelling (compression + elevation).
- To secure rigid splints in place.
- To correct or prevent deformity; and to provide warmth.
- To assist in venous blood return and reduce oedema in the limbs.
Types of Bandages & Materials
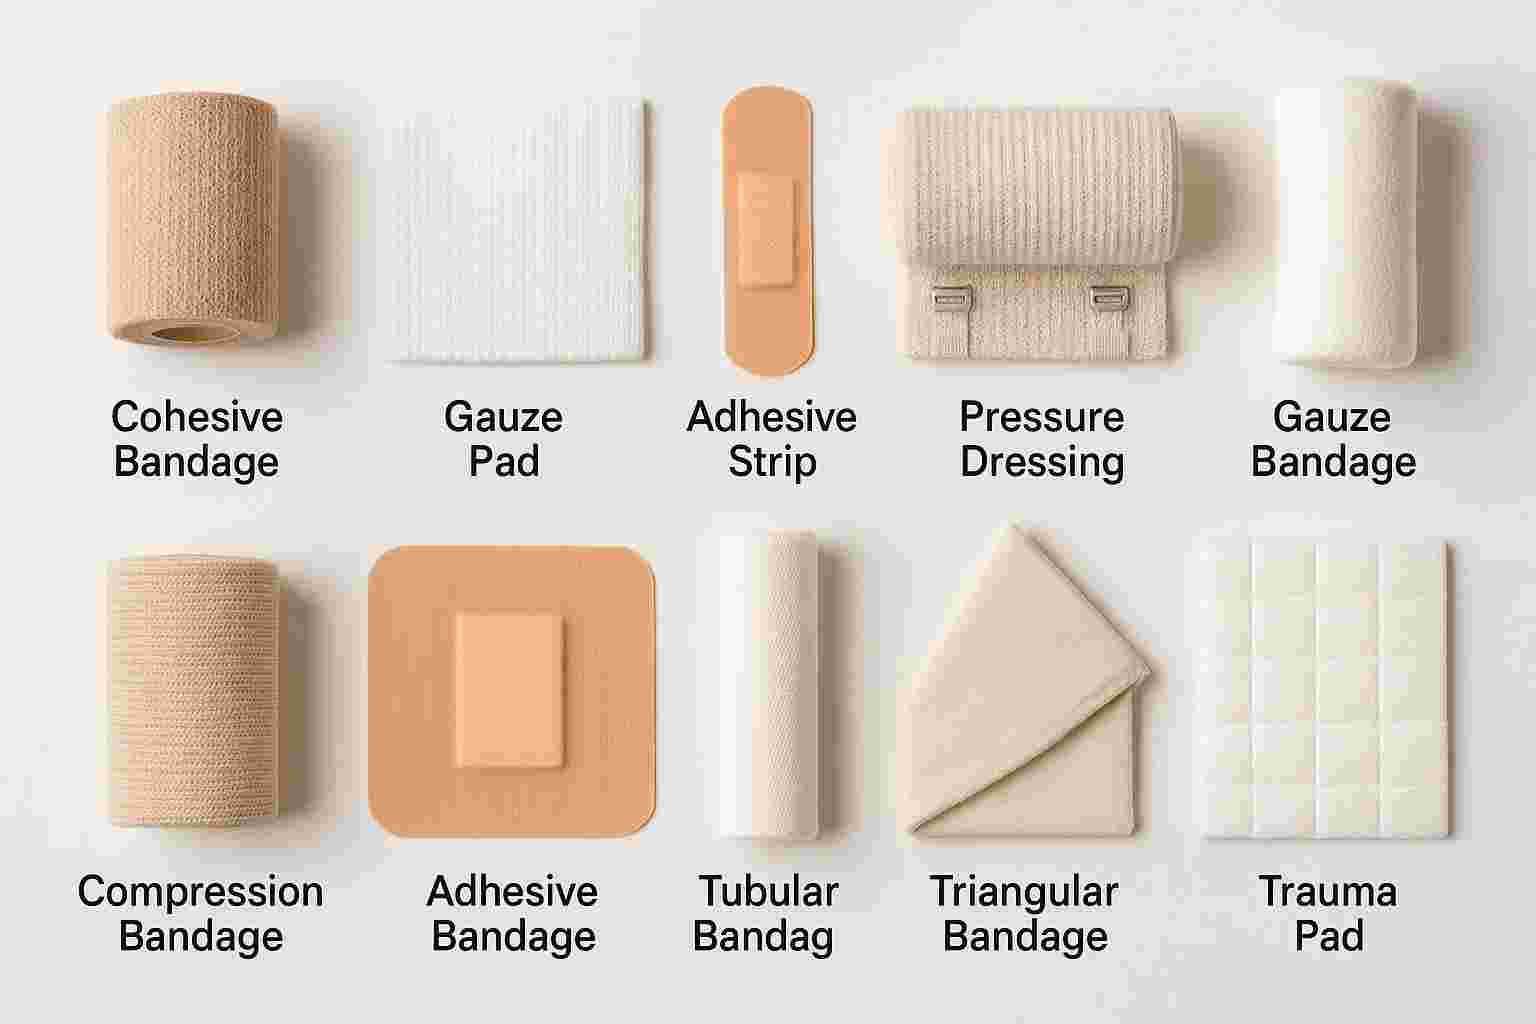
- Roller bandages: Long strips rolled on themselves. Made of Cotton, Crepe (elastic), Domette, or Flannel.
- Triangular bandages: Extremely versatile! Used for arm slings and large dressings. Made by cutting a square of cloth diagonally.
- Tubular bandages: E.g., stockinet, tube gauze, or elastic tubing used for fingers and limbs.
- Adhesive strapping (plaster): For fixation of dressings.
- Plaster of Paris (POP) bandage: Infused with plaster; used for rigid splints/casts.
Basic Bandaging Turns/Patterns
| Turn/Pattern | Description & Use |
|---|---|
| Fixing (anchor) turn | 2 overlapping circular turns to firmly anchor the bandage before real bandaging starts. |
| Circular turns | Each turn goes directly over the previous one. Used at the start/end of bandaging, or on equal-width parts like fingers. |
| Spiral turns | Each turn overlaps the previous by ½ to ⅔ of the width, ascending the limb evenly. |
| Spiral-reverse turns | Used for limbs that change width (like the forearm or calf). You must fold/reverse the bandage at each turn to make it lie flat. |
| Figure-of-eight turns | Used specifically for joints (ankle, wrist, knee, elbow). |
| Spica (basket-weave) turns | Crossing turns over a fixed joint/area (shoulder, hip, thumb). Divergent spica is used for joints with fixed dressings (knee/elbow/heel). |
| Recurrent turns | Folding the bandage forwards and backwards over a stump/end (finger tip, amputation stump, or the head). |
Dangers of Wrong Bandaging
- Too tight: Obstructs blood circulation, causing severe swelling, excruciating pain, numbness, cold/blue limb, and eventual tissue death (gangrene).
- Too loose: Slips off and completely fails to support the injury or apply pressure to bleeding.
- Too much tension on skin: Causes severe blisters and pressure sores.
- ALWAYS CHECK CSM: After applying any bandage, check the Circulation, Sensation, and Movement of the part beyond the bandage. Recheck after 15–30 minutes!
Procedure: 17.10 Bandaging
🏥 OSCE EXAM PROCEDURE: 17.10 BANDAGING
Objectives:
1. Mention the general principles of bandaging.
2. Outline indications for bandaging.
3. Identify requirements for bandaging.
4. Prepare materials for bandaging.
5. Perform bandaging of the various body parts.
General Rules of Bandaging
| No. | Rule | Rationale |
|---|---|---|
| 1. | Use a tightly rolled bandage of suitable width and material. | To promote neatness and efficiency. |
| 2. | Face the patient when bandaging limbs. | To observe the patient's facial expression (for pain). |
| 3. | Hold the head (roll) of the bandage uppermost. | To apply even pressure and tension. |
| 4. | Bandage the limb well aligned in an anatomical position. | To prevent deformity and discomfort. |
| 5. | Hold the bandage in the right hand when bandaging a left limb and vice versa. | To promote correct bandaging technique. |
| 6. | Bandage the limb from inside outwards and from below upwards, keeping the bandage even throughout. | To support venous return to the heart. |
| 7. | Ensure that the bandage is neither too tight nor too loose. | To prevent interference with circulation, and avoid slippage. |
| 8. | Finish off the bandage with a straight turn, fold in the end and secure avoiding joints and the site of injury. | To prevent localized pressure, irritation and discomfort. |
| 9. | Fasten with safety pins or with the provided fastener. | To prevent loosening of the bandage. |
| 10. | Apply tape in psychiatric, mentally handicapped or paediatric patients instead of pins or other sharp appliances. | To prevent injury (swallowing pins or self-harm). |
Materials Used to Make Various Bandages
| Material | Description/Use |
|---|---|
| Cotton | Heavy weaves are used for slings. Thin porous ones form open weave bandages which are cheap, light and disposable. Firmer ones can be washed repeatedly. |
| Domette | This woven material with a slightly fluffed surface makes a firm supporting bandage, which has some resilience but provides firm support. |
| Flannel | Strips are used for dressing splints like the Thomas splint. |
| Crepe | These bandages are elastic. The degree to which they are stretched when applied determines the amount of pressure they exert. Widely used for sprains. |
| Plaster | Plaster muslin is the basis for making plaster of Paris (POP) bandages. |
| Stockinet | Used beneath plaster casts to protect the skin. |
| Proprietary tubular | Such as tube gauze or Helodast, for seamless coverage. |
Bandaging Patterns — OSCE Procedures

A. Figure of Eight (For Joints)
| Step | Action | Rationale |
|---|---|---|
| 1. | Observe general rules of all nursing procedures. | To maintain standards. |
| 2. | Put patient to comfortable position exposing the affected part. | To promote comfort, circulation and prevent deformity. |
| 3. | Hold bandage with the drum facing upwards. | Allows application of even tension and pressure. |
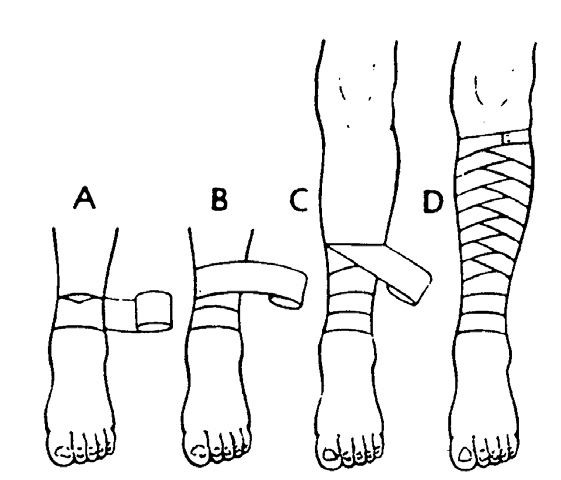
| 4. | Wrap bandage around the limb twice below the joint. | To stabilize the bandage and provide firmness. |
| 5. | Use alternating ascending and descending turns to form a figure of eight; overlap each turn of the bandage by one half to two-thirds the width of the strip. | To promote firmness and neatness. |
| 6. | Wrap bandage around the limb twice, above the joint to anchor it and secure with a clip or safety pin. | Standard finishing protocol. |
| 7. | Elevate the bandaged extremity for 15 to 30 minutes after application. | To promote venous return and reduce oedema. |
| 8. | Assess the skin for colour, integrity, pain and temperature. | To detect complications (like blocked circulation) early. |
| 9. | Leave patient comfortable and clean away. | Maintain standards. |
B. Spiral Bandaging (e.g. Bandaging the Ear)
- Make a fixing turn around the head.
- Bring the bandage under the ear and straight over the head and down the back, leaving the other ear un-bandaged.
- Repeat these turns three or four times until the affected ear is gradually covered.
- Finish with a fixing turn and secure the bandage at the centre of the forehead using a safety pin, clip, or tape.

C. Divergent Spica (For fixed joints like Knee, Heel, Elbow)
- Make two turns directly over the centre of the joint. (To stabilize the joint).
- Now make alternate turns above and below these initial turns, forming a basket-weave pattern at each side of the joint.
D. Triangular Bandaging / Arm Sling
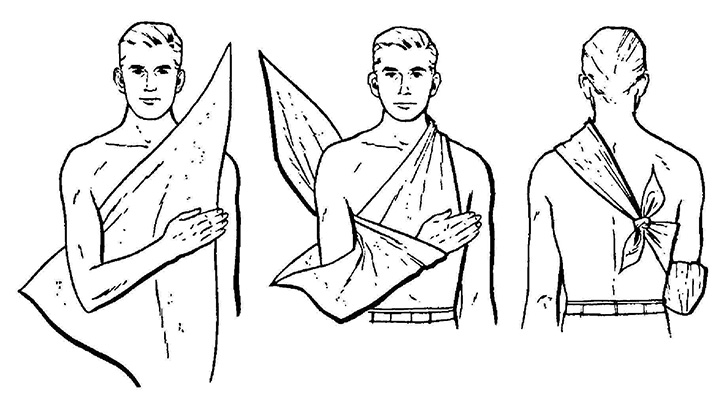
- Place the injured arm across the patient's chest so that the fingers are almost touching the opposite shoulder. (To mobilise and relieve pain).
- Place one corner of the bandage over the uninjured shoulder, with the right-angled corner just above the level of the elbow on the injured side.
- Tuck the other upper half of the base of the bandage well beneath the forearm and elbow.
- Carry the corner ends across the back and tie the ends with a reef knot, which lies in the hollow above the clavicle on the UNINJURED side. (Never tie on the neck bone).
- The right angle is folded and pinned to enclose the elbow securely. (To prevent skin irritation).
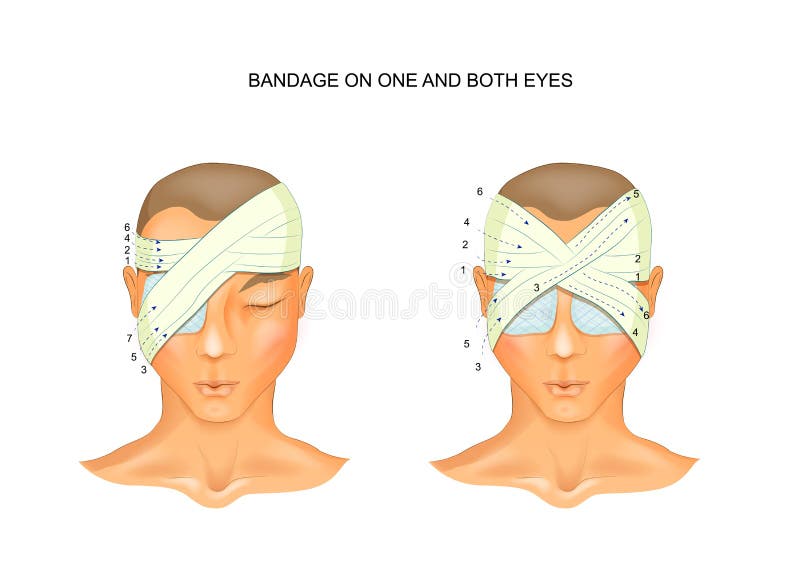
Bandaging the Eye
- Facing the patient, hold the eye pad in position until the bandage covers it. (To secure the dressing).
- Begin from the affected side to the normal side, across the forehead and round the head in a fixing turn. Then from the back of the head, the bandage comes under the ear, across the cheek covering the nasal side of the pad, and straight over the head and down the back.
- The next turn comes under the ear, overlaps the eye turn, crosses the fixing turn at the same point, then covers the other side of the pad and comes round to the front.
- Fix a pin in the centre of the forehead.

Capeline Bandage (For the Head - using a double-headed roller)
- Position patient in a sitting up position and stand behind the patient.
- Place the centre of the outer surface of the bandage in the centre of the head.
- Bring the head of the bandage round over the temples and above the ears to the nape of the neck where the ends are crossed. (Ensure that the ear is not covered).
- Bring the upper bandage around the head and the other end over the centre of the top of the scalp and down to the root of the nose.
- Bring the bandage which circles the head over the forehead, covering the bandage which crosses the scalp. The bandage is then brought to the nape of the neck.
- Ensure that each turn covers 2/3 of the previous turn. (Adheres snugly to the body part).
- Cross it again at the back and fix it using the encircling bandage, and turn back over the scalp to the opposite side at the central line, covering the other margin.
- Repeat the backward and forward turns to alternate sides of the centre until the whole scalp is covered.
- Take two circular turns around the head, secure bandage with a safety pin.

Recurrent Bandaging (For stumps/fingertips)
- Overlap each layer of bandage by half to two-thirds the width; wrap firmly but not tightly. Ask the patient if she feels any numbness, loose skin, tightening, aching, or pain.
- Stand facing the patient and take a fixing turn. (To observe facial expression).
- Carry the bandage forward across the front of the limb at 45° to the bandage behind at the same level, and backwards over the front to cross the first turn at a right angle.
- Repeat these turns until the limb (or stump) has been sufficiently covered.
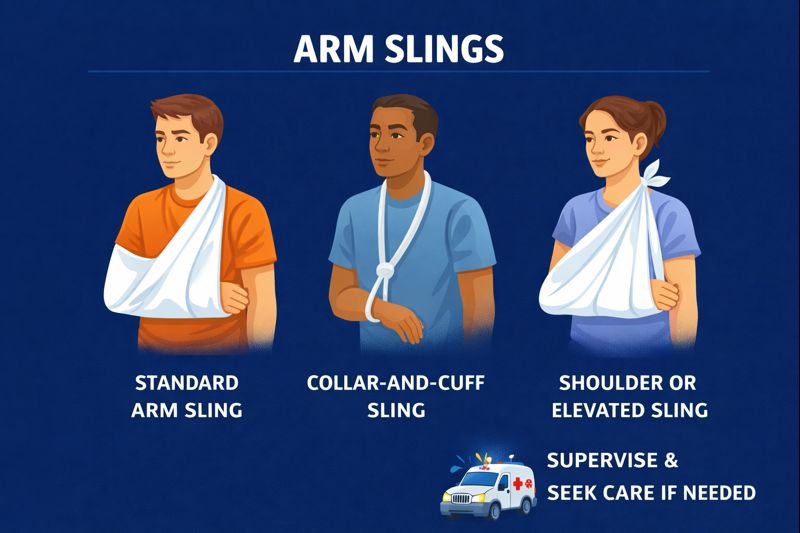
B3. Theory — Types of Slings
Know these for exams:
- Triangular arm sling: Supports the whole forearm and wrist (used for forearm fractures).
- High arm (elevation) sling: The arm is elevated high against the chest. Used to drastically reduce swelling of the hand/wrist, and to control severe bleeding.
- Collar-and-cuff sling: Supports only the weight of the arm from the collar. Used for upper arm (humerus), shoulder, or clavicle injuries, because it allows the arm to hang naturally to assist in bone alignment.
Part C: Theory — Splinting
Definition
- A splint is a rigid or flexible device used to immobilise, support and protect an injured part of the body (such as a fracture, dislocation, or severe sprain) or to maintain a body part in correct alignment during healing.
- Splinting is the act of applying a splint.
Purposes / Indications of Splinting
- To strictly immobilise fractures/dislocations and prevent broken bone edges from causing further deadly injury to nerves and blood vessels.
- To drastically relieve pain and reduce severe muscle spasm.
- To prevent or correct deformity, maintaining proper alignment during healing.
- To support injured soft tissues (severe sprains and strains).
- To secure and protect dressings and IV lines inserted on limbs.
- To allow safe, pain-free transport of the injured casualty to the hospital.

Types of Splints
- Rigid splints: Made of wood, metal, plastic, or hard cardboard. They must be long enough to immobilise the joint above and below the fracture.
- Soft splints: A pillow splint around an ankle, a blanket roll, or a simple arm sling for minor injuries.
- Traction splints: (e.g., the Thomas splint). Used specifically for femur (thigh) fractures. It applies continuous mechanical traction to align the massive bone and stop internal bleeding.
- Plaster of Paris (POP) casts/slabs: Used in hospitals for definitive, long-term immobilisation.
- Air (pneumatic) splints: Inflatable plastic splints commonly used in modern ambulance/field rescue.
General Rules of Splinting (Summary)
If you fail to follow these, you can cause permanent paralysis or amputation:
- Assess the casualty first (DRABC) and definitively control severe bleeding before applying a splint.
- Splint the limb in the exact position found. NEVER attempt to straighten or realign a severe fracture or dislocation in the field.
- Immobilise the joint above and the joint below the fracture site.
- Pad the rigid splint extremely well. Secure it with bandages above and below the fracture site — never tie a knot directly over the break.
- Expose the fingers/toes and check CSM (Circulation, Sensation, Movement) before AND after splinting. Recheck every 15 minutes.
- The splint must be snug, but never tight enough to cut off blood flow.
- Elevate the limb after splinting, treat the patient for shock, and arrange urgent referral.
⚠️ DEADLY COMPLICATION: Compartment Syndrome
This occurs when severe swelling happens inside a rigid compartment (like a tight POP cast or tightly bandaged limb), cutting off blood supply. Muscle and nerves die within hours, leading to amputation.
Check the 6 Ps:
- 1. Pain (severe, out of proportion, worse on stretching)
- 2. Pallor (pale, white skin)
- 3. Paresthesia (numbness/tingling/pins and needles)
- 4. Paralysis (unable to move the fingers/toes)
- 5. Pulselessness (no pulse beyond the cast)
- 6. Poikilothermia (the limb feels ice cold)
Action: This is a massive EMERGENCY. The cast/bandage must be split or removed immediately!
Nursing Care of a Patient in a Splint/Cast (POP Care)
- While the plaster dries (first 24–48 h): Handle the wet cast with the palms of your hands only (fingertips will cause dents that press on the patient's skin and cause sores). Support it on soft pillows. Keep it uncovered and exposed to air to dry. Use a bed cradle to keep heavy bedclothes off a leg plaster.
- After drying: Keep the plaster strictly clean and dry (cover it with plastic when washing the patient, but do not leave it enclosed long-term or the skin will macerate). Keep the edges of the cast smooth and padded.
- Neurovascular observations (CSM): Constantly check the colour, warmth, pulses, sensation, and movement of the exposed fingers/toes. Compare them with the uninjured normal limb. Report coldness, blueness, massive swelling, numbness, or severe pain immediately!
- Elevate: Raise the limb on pillows for the first 24–48 hours to drastically reduce swelling.
- Exercises: Encourage the patient to actively move their fingers/toes and the joints that are NOT inside the cast. This prevents joint stiffness and deadly Deep Vein Thrombosis (DVT).
- Skin integrity: Never insert objects (like rulers or pens) inside a cast to scratch an itch. It breaks the skin and causes hidden, rotting infections.
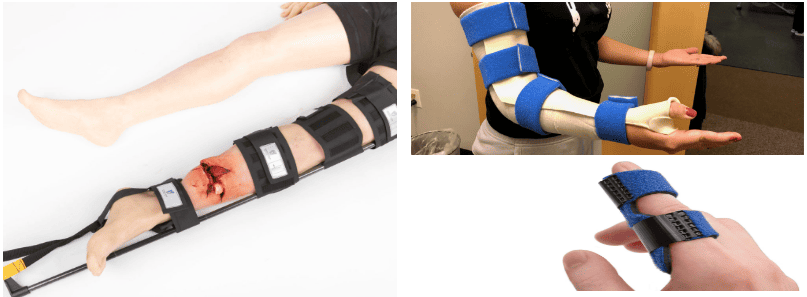
Procedure: 7.11 Orthopaedic Splints
🏥 OSCE EXAM PROCEDURE: 7.11 ORTHOPAEDIC SPLINTS
Objectives:
1. Identify the requirements used for applying orthopaedic splints.
2. Apply an orthopaedic splint.
Requirements for Application of Plaster of Paris (POP) — Trolley
| Top Shelf | Bottom Shelf | At the Side |
|---|---|---|
|
|
|
To Dry a Plaster
- Plaster sets in a few minutes but takes several hours to dry thoroughly.
- To assist splinting in the correct position, allow nothing hard to press against a wet plaster (e.g., the bed frame or a cradle). Keep the rest of the patient warm to prevent chilling.
- Leave the plaster completely exposed to the circulating air, supported on soft pillows if necessary.
- For a leg in plaster, a bed cradle should be used to keep the heavy bed clothes off the wet cast.
Points to Remember When Applying Plaster to an Arm
- The patient should receive a thorough bath before the plaster is applied; nails should also be cut short to prevent scratching inside the cast.
- The nails must be completely clean and absolutely no plaster left on them (plaster on nails makes it impossible to check capillary refill/circulation).
- The fingers and toes should be warm and free to move.
- Report immediately if the fingers become cold or blue in colour!
- The patient should be able to move their fingers and toes freely, and sensation should be tested regularly to ascertain that the circulation is perfectly satisfactory.
the notes are well organized and summarized, I love reading them