
Normal Third Stage of Labour
The Third Stage of Labour is a very critical phase that begins immediately after the baby is born. It involves three main steps: the separation of the placenta from the uterine wall, its descent down the birth canal, and its final expulsion along with the membranes.
A major goal of the midwife during this stage is to ensure the complete removal of the placenta and to prevent heavy bleeding (postpartum hemorrhage).
Physiology of the Third Stage of Labour
Understanding how the body naturally separates and pushes out the placenta helps the midwife manage this stage safely. The process involves four main actions:
1. Contraction and Retraction
Placental separation is started by the continuous contraction (tightening) and retraction (shortening and thickening) of the uterine muscles.
- These contractions make the wall of the uterus much thicker.
- As the wall thickens, the inside space (capacity) of the upper part of the uterus becomes very small.
- This causes the area where the placenta is attached to shrink. Because the placenta itself cannot shrink, it begins to tear away from the wall, usually starting from the center.
- As the blood vessels (sinuses) tear, a pool of blood called a retroplacental clot forms behind the placenta. This clot pushes and helps to separate the placenta even more.
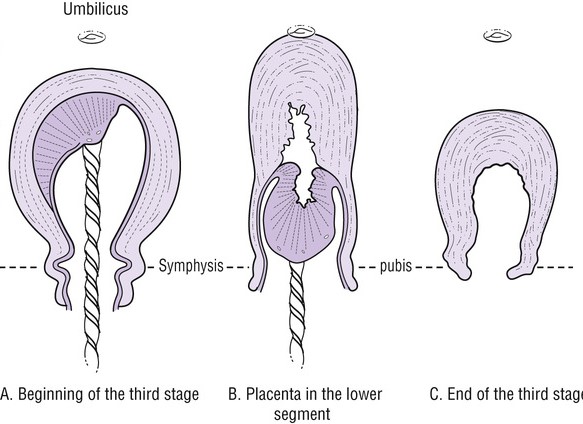
2. Descent of the Placenta
Once separated, the placenta must move down. The force of gravity and the weight of the blood clot act like a heavy piston. This heavy weight pushes the loose placenta down from the upper part of the uterus into the lower part of the uterus.
3. Separation of Membranes
The membranes (the bag that held the baby and fluid) are peeled off the wall of the uterus (the decidua) by the heavy weight of the falling placenta. However, these membranes might stay stuck around the cervix until the whole placenta is pushed completely out of the vagina.
4. Haemostasis (Preventing Hemorrhage)
When the placenta separates, it leaves behind open, bleeding blood vessels. The body must quickly control this blood flow to prevent serious bleeding. The body achieves haemostasis (stopping the bleeding) through four vital steps:
- Living Ligatures: The unique crossed (oblique) muscle fibers of the uterus contract and thicken. They act like strong clamps or tight ropes (ligatures) that tightly squeeze and close the torn blood vessels.
- Vigorous Uterine Action: After the placenta separates, the empty uterus contracts very strongly. The walls press tightly against each other, putting direct pressure on the bleeding site.
- Clot Formation: A strong protein net called a fibrin mesh quickly covers the bleeding site. The body uses about 5% to 10% of its circulating fibrinogen to form solid blood clots to stop the bleeding completely.
- Oxytocin from Breastfeeding: If the mother starts breastfeeding immediately, her brain releases the natural hormone oxytocin. This hormone makes the uterus contract even harder, which greatly helps to stop the bleeding.
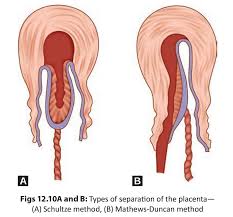
Methods of Placental Separation
The placenta can separate from the uterine wall and come out in two different ways. These are known as the Schultze method and the Mathew Duncan method.
1. Schultze Method
This is the most common and preferred way for the placenta to separate.
- The separation starts deeply in the center of the placenta.
- A large pool of blood (retroplacental clot) forms behind it. This clot pushes the middle part down and helps to strip the edges of the placenta off the wall smoothly.
- The weight of the placenta easily peels the membranes off the wall, creating a neat bag that holds the blood clot inside.
- As the placenta comes out, the shiny, smooth fetal surface comes out first.
- Advantage: This method is very quick and clean. Because the blood is trapped inside the membrane bag, there is less visible blood loss, and both the placenta and membranes come out completely without tearing.
2. Mathew Duncan Method
This method is less common and a bit messier.
- The separation starts from the sides (edges) of the placenta, not the center.
- Because there is no central blood clot to trap the blood, the blood escapes continuously from the sides during the whole process.
- The placenta slides down sideways, and the rough, fleshy maternal surface comes out first.
- Disadvantage: This method takes a longer time. It is associated with ragged, torn, and incomplete membranes, and it causes a higher amount of visible blood loss.
🧠 Easy Memory Aid for Placental Delivery Methods
Shiny Schultze: The smooth, shiny fetal side comes out first. (Clean and common).
Dirty Duncan: The rough, dark red maternal side comes out first. (Messy and bleeds more).
Signs of Placenta Separation
Before a midwife can safely deliver the placenta, she must observe for clear signs that it has fully detached from the wall. These signs include:
- The uterus becomes hard, round, and mobile: It feels like a firm ball in the abdomen.
- The fundus rises: The top of the uterus (fundus) moves up to the level of the umbilicus (belly button) or slightly above it.
- Lengthening of the cord: The umbilical cord hanging outside the vagina appears to suddenly grow longer as the placenta drops down.
- A gush of blood: A sudden, small flow of dark blood escapes from the vagina as the placenta detaches.
- Placenta felt on VE: The placenta can be physically felt if a vaginal examination is done.
- Placenta visible at the vulva: The placenta can be seen resting at the vaginal opening.
- Cord does not recede: If the midwife presses firmly just above the pubic bone (suprapubic pressure), the umbilical cord will not pull back inside the vagina. This means it is completely free.
Mechanism of Placental Separation
The natural process of the placenta falling away relies heavily on uterine contractions and a process called involution (the shrinking of the uterus).
- Immediately after the baby is born, the uterus does not stop working. It continues to contract strongly about every 3 to 4 minutes.
- These contractions, combined with the rapid shrinking (involution) of the uterus, force the site where the placenta is attached to shrink drastically.
- Usually, within 10 to 15 minutes after the baby is delivered, the majority of the placenta successfully detaches from the wall.
- When it detaches, the open blood vessels bleed, causing the classic "gush of blood" that signals the midwife.
- As the placenta is delivered, the uterus continues to clamp down hard, closing the small bleeding arteries (spiral arterioles) and ensuring the mother does not bleed to death.
⚠️ Attention: Normal Blood Loss
It is important for every midwife to note that the average normal blood loss from a healthy vaginal delivery is approximately 250ml to 300ml. Any bleeding significantly above this amount (500ml or more) is considered a dangerous Postpartum Hemorrhage (PPH).
Management of the Third Stage of Labour
There are two main methods a midwife can use to deliver the placenta safely. These are Active Management and Passive Management.
1. Active Management (Controlled Cord Traction)
This is the most recommended method because it is faster and significantly reduces the risk of heavy bleeding. It involves the midwife taking an active role using drugs and controlled pulling. The steps are:
- Palpate the abdomen: Immediately after the baby is born, feel the mother's stomach to make sure there is no second baby (undiagnosed twin) still inside.
- Administer Oxytocin: Give the mother an injection of Oxytocin 10 IU intramuscularly (IM). This forces the uterus to contract quickly and strongly.
- Prepare the cord: Move the clamp on the umbilical cord closer to the mother's vulva so you can get a strong, comfortable grip.
- Apply counter-traction: Wait for the first strong contraction. Place your left hand flat over the mother's lower abdomen (just above the pubic bone). Push firmly upwards towards the mother's head to support the uterus and prevent it from turning inside out (inversion).
- Apply traction: With your right hand holding the cord clamp, pull the cord steadily downwards and outwards. When the placenta appears at the vulva, pull gently upwards to catch it in your cupped hands.
- Deliver the membranes: Carefully roll or twist the placenta as it comes out. This twists the fragile membranes into a strong rope, preventing them from tearing and leaving pieces inside. Deliver them using a gentle upward and downward motion.
- Record the time: Note exactly what time the placenta and membranes were completely delivered.
- Massage the uterus: Rub the fundus (top of the uterus) until it feels hard like a stone. This promotes continuous contractions to stop bleeding.
- Examine the placenta: Quickly spread the placenta out in a receiver to check that all parts (lobes and membranes) are complete.
- Check for tears: Clean the mother's vulva with warm water or antiseptic. Examine the vagina and cervix carefully for any tears, lacerations, or bleeding episiotomies, and repair them immediately.
- Make the mother comfortable: Provide a clean sanitary pad, cover her with a warm blanket, and ensure she is resting well.
2. Passive Management (Maternal Efforts)
This method allows the body to work entirely on its own without pulling the cord. It is only used if the placenta has already separated naturally. The steps are:
- Wait for the signs: Carefully observe the mother for the clear signs of placental separation (gush of blood, lengthening of cord, hard round uterus).
- Encourage pushing: Once you are sure the placenta has separated, ask the mother to bear down and push exactly when she feels a contraction.
- Provide resistance: Place your flat hand over her abdomen to give her something firm to push against.
- Receive the placenta: Catch the placenta gently in both hands as it is pushed out to ensure it comes out complete.
- Administer Oxytocin: Even after natural delivery, give Oxytocin 10 IU intramuscularly to keep the uterus contracted and prevent late bleeding.
⚠️ Attention: Prevent Hypothermia
The mother has just gone through hours of strenuous physical exercise during the first and second stages of labour. This causes extreme heat loss. It is strictly essential to keep the mother warm with dry sheets and blankets during and immediately after the third stage to prevent shivering and cold shock.
AM SO HAPPY THIS WAS HELPFUL THANKS ONCE AGAIN